How to Protect Nails From Nail Polish Damage
Quick Answer
To protect nails from nail polish damage, start with clean, dry nails, apply a thin base coat, use light layers of polish, and remove color gently instead of peeling it. Moisturize your nails and cuticles after removal, wear gloves for wet chores, and avoid aggressive buffing. If your nails are already sore or peeling, simplify your manicure routine until the affected areas grow out.
Time needed: 15–25 minutes for basic prep and care
Difficulty: Beginner
Items needed: 5–7 simple nail-care items
Result lasts: With consistent habits
You don’t have to give up glossy reds, sheer pinks, or your favorite Pinterest nail designs to care for your natural nails. Most manicure-related trouble comes from how polish is prepared, maintained, and removed—not simply from wearing regular lacquer.
That matters when your tips are peeling or your nails feel dry after another color change. The eight habits below help you keep the fun part of doing your nails while reducing avoidable wear.


Can Nail Polish Actually Damage Your Natural Nails?
Ordinary polish doesn’t automatically ruin a healthy nail. Your visible nail plate is made of hardened keratin; it doesn’t need to breathe through the surface. Problems often arise from repeated mechanical trauma, irritating products, prolonged solvent contact, and moisture loss around the nails.
For example, pulling off stubborn gel can remove superficial nail layers. Repeatedly buffing a ridge smooth can thin the nail plate. Dark pigments may also leave cosmetic stains, especially when you skip a base coat. Those are different issues, so their solutions shouldn’t be identical.
If you’re deciding whether to wear color at all, our guide to whether nails are healthier without polish explains when going bare can actually be useful.
Warning
Stop using a product if you develop burning, itching, blisters, swelling, or a rash. These can indicate irritation or an allergy, particularly with some gel systems. Don’t cover painful, lifting, infected-looking, or unexpectedly dark nails with another manicure; get medical advice instead.
What Do You Need for a Nail-Safe Polish Routine?
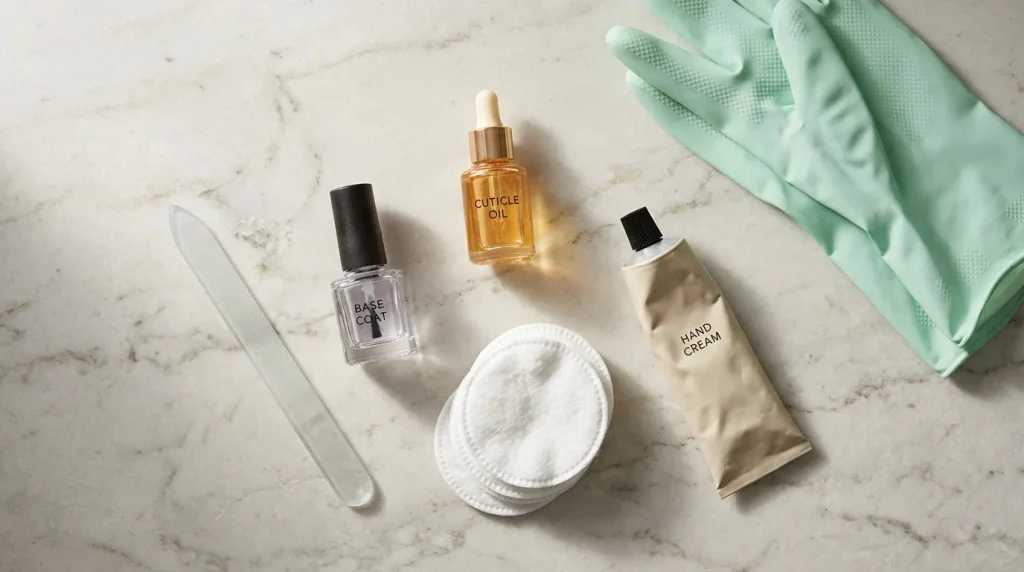
Keep your manicure kit small and practical. Having the right basics helps you avoid reaching for harsh scraping tools when something goes wrong.
- A gentle nail file, preferably glass or a fine-grit file, to smooth snags.
- A regular base coat designed for your polish system.
- Your chosen lacquer and a compatible top coat.
- Cotton pads or lint-free wipes and appropriate nail polish remover.
- Hand cream or cuticle oil to use after your manicure and removal.
- Household gloves for dishwashing and cleaning.
If you need to replace a basic, browse regular nail polish base coats or glass nail files. Choose a product that suits your current nail condition rather than buying every treatment labeled strengthening.
How Do You Protect Nails From Nail Polish Damage? 8 Simple Steps
1. Check Your Bare Nails First
Before repainting, look for splitting tips, rough patches, lifting, or irritated skin. If the surface is simply dry, a gentle manicure may be fine. If it is sore, noticeably thinned, or separating, avoid adding another coating until you understand the problem.
Common mistake: Hiding a new change with opaque polish makes it harder to monitor whether it is improving.
2. Clean and Gently Shape Your Nails
Wash your hands, dry them thoroughly, and smooth only the rough edges. You don’t need to sand down your entire nail surface for ordinary lacquer. Keep nails at a manageable length if the tips keep catching on clothing.
Common mistake: Buffing every visible ridge removes nail material without fixing the cause of the ridge.
3. Apply a Thin Base Coat
Swipe a thin, even layer over each dry nail and let it set according to the label. A base coat creates a more even surface for color and can reduce direct pigment contact, which is especially helpful with dark red, blue, and black polish.
Common mistake: Assuming base coat prevents all damage. It doesn’t protect against picking, over-filing, or harsh removal.
4. Paint With Thin, Controlled Layers
Apply one thin color coat, allow it to dry as directed, then add another if you need opacity. Avoid flooding the skin or cuticle area. Use a small cleanup brush rather than picking dried polish off the surrounding skin.
Common mistake: One thick coat takes longer to dry and can smudge or peel more easily, tempting you to start over.
5. Seal With a Compatible Top Coat
Finish with a light coat of top coat, including the free edge if your nail length allows it. A top coat can help protect the color from everyday scuffs and extend wear, reducing how often you feel the need to strip and repaint.
Common mistake: Treating top coat as a shield against impacts. Nails can still crack when used as tools.
6. Protect Your Manicure During Chores
Wear suitable gloves for dishwashing, cleaning, and other prolonged wet tasks. Repeated water exposure can make nails swell and shrink, contributing to splitting and peeling in susceptible nails. Dry your hands thoroughly afterward.
Common mistake: Leaving damp gloves on for too long can irritate the surrounding skin.
7. Remove Nail Polish Without Scraping
Use an appropriate remover and a cotton pad to dissolve ordinary lacquer. Press the damp pad against the nail briefly before wiping instead of scrubbing repeatedly. For gel and other long-wear systems, follow the manufacturer’s removal instructions or seek professional removal.
Common mistake: Peeling or prying stubborn polish can lift layers of the natural nail plate.
8. Moisturize After Every Removal
After removing polish, wash your hands and apply a fragrance-free hand cream or a little cuticle oil. Massage it into the nail folds and surrounding skin. Repeat after handwashing whenever your skin feels dry.
Common mistake: Expecting moisturizer to repair missing nail layers immediately. It helps with dryness, while damaged nail sections need time to grow out.
What Should You Do—and Avoid—Between Manicures?
Do
- Use a thin base coat under highly pigmented shades.
- Apply hand cream after washing and cuticle oil when needed.
- Wear gloves during wet chores.
- Inspect bare nails between color changes.
- Keep weak nail tips short and smooth.
Don’t
- Peel off gel, dip, or stubborn lacquer.
- Buff the entire nail at every manicure.
- Cut deep into healthy cuticle tissue.
- Use your nails to scrape or pry.
- Cover painful or unexplained nail changes.
For a simple routine you can keep using even when you aren’t wearing color, explore our daily nail-care routine. Consistency matters more than having a crowded shelf of treatments.
How Can You Help Nails Already Damaged by Polish or Removal?
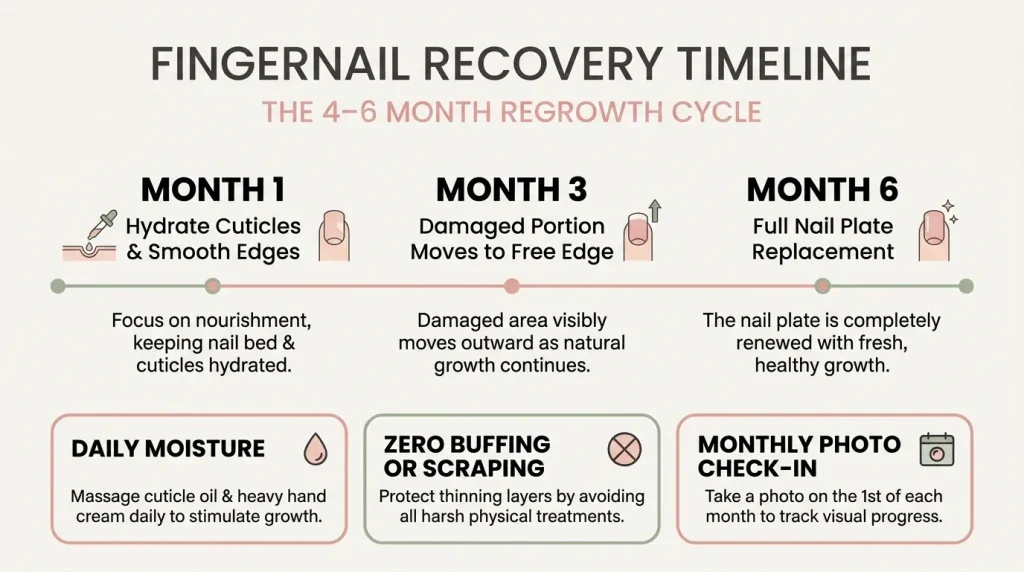
If your nails are peeling, dry, or thin after manicures, the aim is to prevent further damage while healthier nail grows from the base. Existing nail plate doesn’t repair itself the way living skin does, so a temporary product can’t permanently rebuild a layer you’ve removed.
Start by trimming snagging edges, filing gently, and moisturizing after handwashing. Avoid additional buffing, picking, and repeated gel removal. You may prefer to leave nails bare temporarily so you can monitor their surface. A gentle regular manicure is sometimes possible, but don’t cover discomfort or suspicious changes.
Fingernails typically take several months—often around four to six—to replace most of the visible nail plate. A little improvement in the condition of the surrounding skin may happen sooner, but the already-damaged section needs time to grow forward. Review this guide to caring for a mildly damaged nail at home if you’re dealing with peeling or rough tips.
Pro Tip
Take a clear photo of your bare nails in the same light once a month. It’s easier to notice whether a rough patch is moving toward the tip as the nail grows, instead of judging changes from memory.
What If Your Nails Still Peel, Stain, or Feel Weak?
Your Nails Have Yellow or Orange Staining
Remove the polish, check whether the color looks superficial, and avoid sanding the nail to force it away. Next time, use a base coat with dark shades. If discoloration is new, persistent, or accompanied by thickening or pain, have it examined.
Your Nail Tips Split After Removal
Shorten the nails, smooth sharp edges, and moisturize regularly. Next time, avoid picking or scraping the coating. If a split extends into attached, painful tissue, don’t try to glue it yourself.
Your Cuticles Feel Tight After Remover
Wash your hands and apply a fragrance-free hand cream or a small amount of cuticle oil. Next time, limit contact with surrounding skin and avoid unnecessary repeated removal.
Your Nails Look Rough After Gel
Stop buffing the roughness away, keep the nails protected, and let new growth replace the affected area. Next time, insist on gentle removal with minimal natural-nail filing.
Which Nail-Care Products Are Actually Worth Buying?
A few useful products can support better habits, but none can reverse lost nail layers overnight. Start with a base coat you like using, a reliable file, and a moisturizer that you’ll reach for consistently.
Recommended Product Type
Jojoba-Based Cuticle Oil Pen
A portable pen makes it easier to moisturize dry nails and surrounding skin after handwashing or polish removal.
As an Amazon Associate, we earn from qualifying purchases.
If long dishwashing sessions leave your hands dry, reusable dishwashing gloves may be more useful than another bottle of nail hardener. Choose gloves that fit comfortably and keep their interiors dry.
Frequently Asked Questions About Nail Polish Damage
Q: Do nails need a break from nail polish to breathe?
A: No. The visible nail plate doesn’t breathe through the air. A polish break can still help if it prevents repeated filing or removal and lets you observe damaged nails.
Q: Is acetone-free nail polish remover always better?
A: Not always. Some non-acetone removers require more rubbing, while acetone can dissolve stubborn coatings quickly but dry the skin. Match the remover to the formula and moisturize afterward.
Q: Can base coat stop nails from turning yellow?
A: A base coat can reduce staining from highly pigmented lacquer, although it can’t guarantee zero discoloration. Persistent unexplained yellowing should not automatically be blamed on polish.
Q: Is gel polish more damaging than regular polish?
A: Gel often requires a more involved removal process. Picking, scraping, or excessive filing can damage the nail plate. Proper application, curing, and removal make a major difference.
Q: How long will damaged nails take to recover?
A: Mild dryness around nails may improve quickly with care, but a thinned or peeling nail plate must grow out. Complete fingernail replacement often takes roughly four to six months.
One last practical detail: if you visit a salon, speak up when filing feels painful or a technician starts prying off attached product. Ask how the coating will be removed before the service begins. A manicure should never require you to tolerate burning, bleeding, or significant discomfort for the sake of a smooth finish.
Keep the Color, Change the Habits
You can enjoy beautiful manicures without treating your natural nails roughly. The most effective protection is simple: minimize filing, use a base coat, remove polish gently, and moisturize consistently. Save this guide to your Pinterest nail-care board before your next manicure so these small habits become second nature.

Hi, I’m Jessica, the creator behind Unique Lash & Nails Katy.
I created this website for anyone who loves beautiful nails as much as I do. Here, I share trendy nail designs, seasonal manicure ideas, easy nail care tips, honest product recommendations, and step-by-step guides to help you create salon-worthy nails at home. Whether you’re looking for everyday inspiration or your next favorite nail trend, I hope you’ll find something you love.