Care for Split or Cracked Nails After Gel or Acrylic Removal
Quick Answer
To care for split or cracked nails after gel or acrylic removal, keep your nails short, gently smooth rough tips, and apply cuticle oil and moisturizer regularly. Protect your hands with gloves and pause gel or acrylic manicures while damaged areas grow out. Never glue a deep, painful crack or pull away attached nail layers. See a healthcare professional if you notice bleeding, swelling, infection, or nail lifting.
You finally removed your gel or acrylic manicure, but now your natural nails look thin, flaky, or cracked. Even simple tasks like washing your hair or putting on jeans can make a split nail catch and hurt.
The good news? You can often manage minor nail damage with gentle care. While existing cracks cannot magically heal together, you can protect fragile nails and support healthier new growth.
Here’s how to tell what kind of damage you’re dealing with, what to do immediately, and how to build a realistic nail recovery routine.


Why Do Nails Split or Crack After Gel or Acrylic Removal?

Your natural nails contain layers of hardened keratin. Those layers provide strength while allowing some flexibility. When nail enhancements are applied or removed aggressively, the nail plate can become thinner and more vulnerable to damage.
Understanding the cause helps you avoid repeating the same problem during your next manicure.
1. Aggressive Filing Removes Nail Layers
Acrylic application often involves roughening the natural nail surface to improve adhesion. If too much material is filed away, your nail plate becomes thinner.
Repeated filing during maintenance appointments or removal can make this worse. A thinner nail may bend more easily, split under pressure, or develop peeling edges.
That’s why you should avoid additional buffing when your nails already feel weak.
2. Peeling Off Gel Polish Damages the Surface
When you peel attached gel polish away, it can pull superficial nail layers with it. The surface underneath may look white, flaky, uneven, or unusually flexible.
Even if the polish appears loose, pulling it off isn’t a safe shortcut. Proper removal involves following the product’s instructions or visiting a qualified nail technician.
3. Acetone Can Increase Dryness
Acetone helps dissolve certain soak-off nail products, but it can also remove oils from your nail surface and surrounding skin.
Dry nails may become more brittle, especially when combined with previous mechanical damage. This is why moisturizing after removal matters.
However, acetone isn’t automatically harmful when used correctly. Rough scraping and excessive filing can be more damaging than a carefully performed removal.
4. Everyday Activities Stress Weak Nails
After enhancement removal, nails that previously felt strong because of their coating may now bend under ordinary pressure.
Typing with long nails, opening containers, washing dishes, or repeatedly soaking your hands can turn small cracks into larger splits.
If your nails keep breaking, explore these common reasons nails become weak before purchasing another treatment.
How Can You Tell If Your Nails Are Damaged?
Not every rough nail needs medical attention. Some problems are cosmetic, while others involve the nail bed or surrounding skin.
Common signs of mild damage include:
- Peeling layers near the nail tips.
- Small cracks limited to the free edge.
- Thin nails that bend more easily than usual.
- Rough, chalky-looking nail surfaces.
- Dry cuticles and surrounding skin.
- Nails that snag on clothing or hair.
- Minor surface flaking after gel removal.
These changes often improve in appearance as damaged portions grow outward and you prevent additional breakage.
Warning: Know When to Get Help
Seek medical evaluation for a crack extending into attached nail tissue, significant pain, bleeding, swelling, warmth, pus, spreading redness, unexplained dark discoloration, or a nail separating from its bed. Do not cover these problems with acrylic, gel, adhesive, or nail wraps.
How to Care for Split or Cracked Nails After Gel or Acrylic Removal: 8 Steps
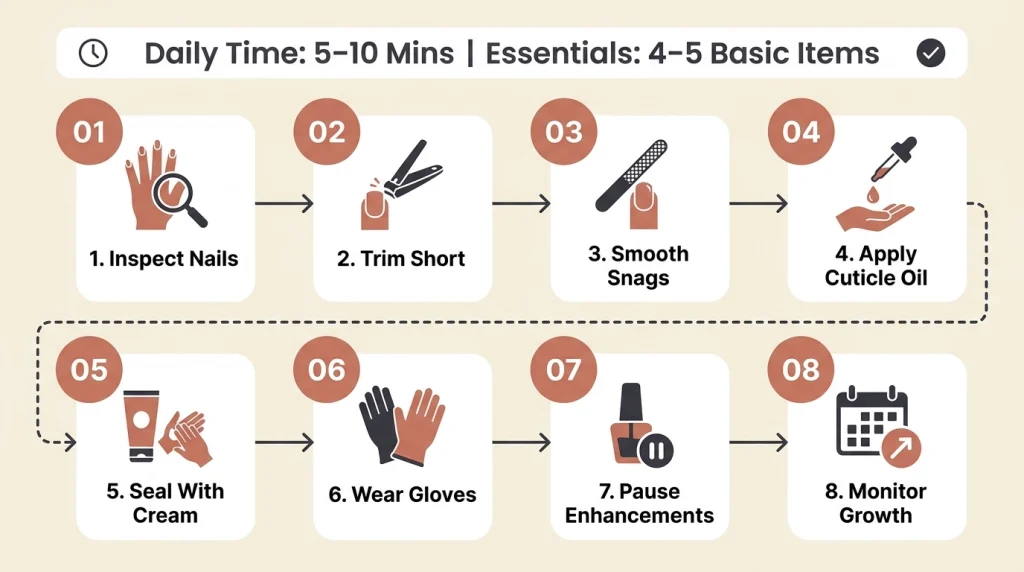
For minor, painless nail damage, the best approach is to minimize stress while keeping the nail surface and surrounding skin comfortable.
You don’t need an expensive recovery kit. A few basic tools and consistent habits can make nail care easier.
Daily Time
5–10 minutes
Difficulty
Beginner
Essentials
4–5 basic items
Recovery
Until damage grows out
What You’ll Need
- Clean nail clippers.
- A fine-grit nail file.
- Cuticle oil or a simple moisturizing oil.
- Fragrance-free hand cream or petroleum jelly.
- Protective household gloves.
Step 1: Inspect Your Nails Before Treating Them
Look at each nail under good lighting. Identify whether the damage involves only the free edge or extends into the attached nail.
If the split causes pain, bleeding, or separation from the nail bed, stop home cosmetic treatment and seek professional medical advice.
Common mistake: Assuming every crack can be safely covered with nail glue. Deep splits need a different approach from small cosmetic edge defects.
Step 2: Trim Your Nails to a Comfortable Length
Use clean clippers to shorten nails that are long enough to catch or bend during everyday activities. Keep a little free edge if trimming closer would hurt.
Shorter nails experience less leverage when you type, wash your hair, or handle clothing.
Common mistake: Cutting through an attached crack or trimming into tender skin to remove all visible damage.
Step 3: Smooth Snags With a Fine Nail File
Use a fine file with light, controlled strokes to smooth rough tips. Focus on the free edge rather than the entire nail surface.
Stop when the snag is gone. Your goal isn’t to make the nail perfectly glossy.
Common mistake: Buffing the top of an already thin nail to remove ridges or white patches. This removes more nail material.
Step 4: Apply Cuticle Oil Regularly
Place a small amount of cuticle oil on each nail and gently massage it into the surface and surrounding skin.
Repeat when your nails feel dry, particularly after handwashing. Oil helps condition the nail surface, although it cannot permanently reconnect split keratin layers.
Common mistake: Expecting oil to repair a deep structural crack overnight.
Step 5: Seal in Moisture With Hand Cream
Apply a fragrance-free cream containing moisturizing ingredients such as glycerin. Massage it over your fingertips, nail folds, and cuticles.
At bedtime, a thin layer of petroleum jelly can help reduce moisture loss from dry skin around the nails.
Common mistake: Moisturizing only the palms while ignoring the fingertips and nail folds.
Step 6: Protect Your Nails During Household Chores
Wear protective gloves when washing dishes or using cleaning products. Repeated wetting and drying can make fragile nails more prone to peeling.
Dry your hands thoroughly after washing and apply moisturizer afterward.
Common mistake: Leaving damp gloves on for long periods. Moisture trapped against the skin may cause irritation.
Step 7: Pause Gel and Acrylic Enhancements
Take a break from products that require additional filing, adhesives, or aggressive removal. The American Academy of Dermatology recommends a polish break of one to two weeks or longer after gel manicures when needed.
Severely thinned nails may need a much longer period without enhancements while affected portions grow forward.
Common mistake: Immediately applying another acrylic set because the damaged nail looks unattractive.
Step 8: Monitor Healthy New Nail Growth
Check your nails weekly for new splitting, lifting, discoloration, or discomfort. The damaged portion will gradually move toward the tip as the nail grows.
Continue gentle care instead of repeatedly applying treatments that promise instant rebuilding.
Common mistake: Trying to accelerate recovery through frequent buffing, hardeners, or aggressive salon treatments.
For additional guidance on preventing damage during recovery, read our safe damaged-nail care guide.
Should You Use Nail Glue on a Split Nail?
Nail glue may seem like the quickest solution when a split catches on everything. However, applying adhesive to a painful or deep crack can irritate damaged tissue, conceal a developing problem, or make later assessment more difficult.
If a minor split is limited to the free edge, shortening and smoothing the nail is generally a simpler first step.
Don’t apply glue to exposed nail beds, bleeding areas, open skin, infected-looking nails, or cracks extending into attached tissue.
If you’re unsure whether a nail can safely be repaired cosmetically, ask a qualified nail professional or healthcare professional before applying adhesive.
How Long Do Split or Cracked Nails Take to Recover?
The recovery timeline depends on the depth of the damage, your nail growth rate, and whether new trauma continues.
Many healthy fingernails grow approximately 3 millimeters per month, although individual growth rates vary. Replacing an entire fingernail commonly takes around four to six months.
During the First Week
You can focus on eliminating snags, reducing dryness, and preventing further cracking. Moisturizers may improve comfort and flexibility, but they don’t reverse missing nail layers.
After Two to Four Weeks
You may notice a small area of newer nail near the cuticle. If the original problem was temporary manicure-related damage, the newer growth may look smoother.
Continue protecting the older damaged portion because it remains vulnerable until it reaches the free edge.
After Several Months
More of the damaged nail plate will have grown forward. Full replacement may take several months, depending on the affected nail and how close the damage was to the base.
If your nails continue cracking despite careful protection, or changes appear in new growth, consider a dermatology evaluation.
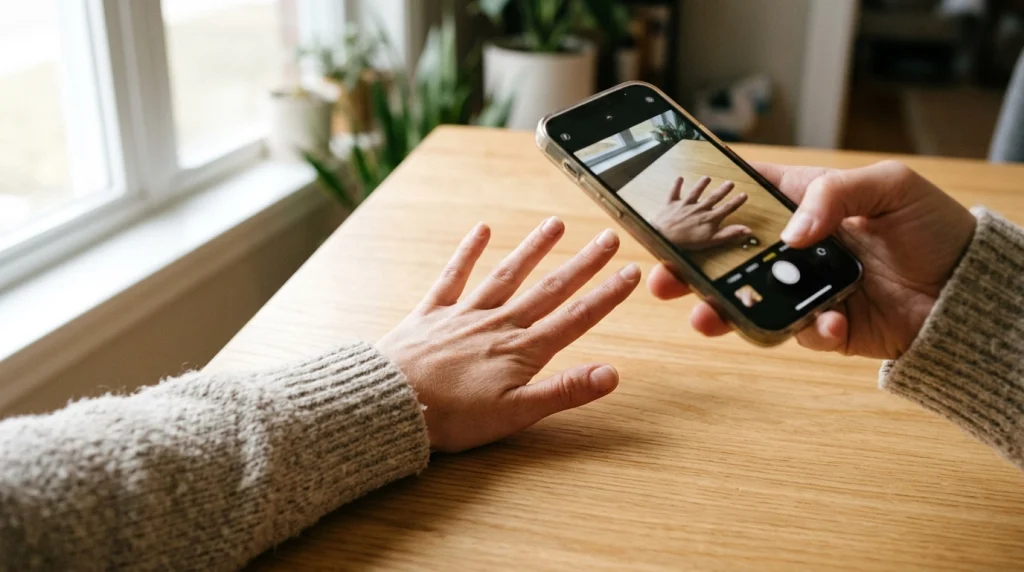
Pro Tip
Photograph one affected nail every two weeks under similar lighting. This can help you notice gradual growth and changes without constantly examining or picking at the damaged surface.
What Should You Do and Avoid During Nail Recovery?
Do
- Keep nails comfortably short.
- Moisturize after handwashing.
- Use a gentle file for snags.
- Wear gloves when cleaning.
- Allow damaged areas to grow out.
- Get unusual symptoms checked.
Don’t
- Peel off remaining gel or acrylic.
- Buff thin nail surfaces.
- Cut or aggressively push cuticles.
- Use nails to pry objects open.
- Cover painful cracks with glue.
- Expect instant nail repair.
Many of these habits also help when your nails break for other reasons. Explore our daily nail protection tips for a longer-term routine.
Which Products Actually Help Fragile Nails?
You don’t need a cabinet full of nail treatments. Products that reduce dryness and minimize everyday trauma are usually more useful than aggressive hardeners or heavy coatings.
Affiliate disclosure: As an Amazon Associate, we earn from qualifying purchases. Product links below lead to Amazon search results rather than a specific listing.
Recommended Product
Jojoba-Based Cuticle Oil
Useful for conditioning dry nails and surrounding skin after manicure removal. Choose a simple formula that doesn’t irritate your skin.
Recommended Product
Fine-Grit Natural Nail File
A gentle nail file helps remove small snags without the excessive abrasion of a coarse buffing block.
Recommended Product
Fragrance-Free Hand Moisturizer
A moisturizer containing glycerin or petrolatum helps reduce dryness around nails and makes regular aftercare easier.
What If Your Nails Keep Splitting Despite Proper Care?
If you have followed a gentle routine but your nails continue breaking, look at where and how the damage appears.
Problem: The nail keeps peeling at the tip.
What to do: Keep the tip short, gently remove snags, and moisturize regularly. Avoid surface buffing and repeated polish removal until the damaged portion grows out.
Problem: Your nails feel extremely thin.
What to do: Stop additional filing and enhancement services. Use gentle protection while new nail grows. See a dermatologist if thinning is severe, painful, or persistent.
Problem: A crack keeps catching on clothing.
What to do: If the split is confined to the painless free edge, shorten and smooth it carefully. Don’t cut into attached tissue or pull loose sections away.
Problem: New nails are also becoming brittle.
What to do: Review exposure to water, detergents, and manicure products. Persistent brittleness can sometimes involve skin conditions, nutritional deficiencies, or other medical causes that deserve professional assessment.
For a broader look at strengthening habits, read how to strengthen nails with everyday care.
How Can You Prevent Cracked Nails During Future Manicures?
Once your nails feel healthier, you may want to return to gel polish or acrylic extensions. The goal isn’t necessarily to avoid every manicure forever, but to reduce unnecessary trauma.
- Choose a qualified technician: Ask about safe product removal, tool hygiene, and how they minimize filing on natural nails.
- Never peel enhancements: Arrange proper removal when gel or acrylic begins lifting.
- Limit aggressive buffing: Your nail plate shouldn’t be repeatedly thinned for a smoother appearance.
- Protect your cuticles: Avoid cutting or forcefully pushing back the skin that helps protect the nail area.
- Consider occasional manicures: Give your nails time without enhancements if they repeatedly become fragile.
- Watch for allergies: Itching, swelling, burning, or rashes after nail products may indicate irritation or an allergic reaction.
If your nails are already damaged, a fresh set of extensions can hide changes rather than solve them. Wait until the nail condition is appropriate for another service.
Frequently Asked Questions
Q: Can split nails heal completely after acrylic removal?
A: Existing split nail layers cannot naturally fuse back together. The damaged area gradually grows toward the tip as new nail forms at the base. Protecting the nail helps prevent additional breakage.
Q: Is cuticle oil enough to repair cracked nails?
A: Cuticle oil helps condition dry nail surfaces and surrounding skin, but it cannot rebuild missing keratin layers or repair deep cracks. Combine moisture with shorter nails and protection from further trauma.
Q: Should I apply nail hardener after gel removal?
A: Not necessarily. Some hardeners make nails rigid and may contribute to breaking when nails are already brittle. Gentle moisturizing and avoiding additional filing are safer starting points for many people.
Q: How long should I wait before getting acrylic nails again?
A: There is no universal waiting period. If your nails are painful, severely thinned, peeling, or cracked, avoid further enhancements until the affected areas have recovered sufficiently. This may require several months of growth.
Q: When should I see a dermatologist for damaged nails?
A: Seek evaluation for persistent splitting, significant nail lifting, worsening pain, swelling, pus, unusual discoloration, or changes affecting new nail growth. These problems may need treatment beyond cosmetic nail care.
Final Thoughts: Give Your Nails Protection, Not More Pressure
Caring for split or cracked nails after gel or acrylic removal comes down to three things: reduce damage, moisturize consistently, and allow healthy new nails to grow.
Keep your nails short, skip harsh treatments, and pay attention to any painful or unusual changes. Small daily habits can help protect fragile nails while recovery takes place.
Save this nail recovery guide to your Pinterest nail-care board so you can revisit these steps whenever your nails need a gentler routine.

Hi, I’m Jessica, the creator behind Unique Lash & Nails Katy.
I created this website for anyone who loves beautiful nails as much as I do. Here, I share trendy nail designs, seasonal manicure ideas, easy nail care tips, honest product recommendations, and step-by-step guides to help you create salon-worthy nails at home. Whether you’re looking for everyday inspiration or your next favorite nail trend, I hope you’ll find something you love.