19 Zombie Halloween Nails for a Creepy-Cute October
Zombie Halloween nails are made for anyone who wants their October manicure a little weird, creepy, and impossible to ignore. Think exposed brains, toxic green slime, stitched monster faces, bloody details, and eerie eyeballs.
The 19 designs below range from playful cartoon zombies to full-on gore, so you can go as cute or creepy as you like. If softer spooky art is more your style, you can also browse these ghost Halloween nails for more October inspiration.
✦ Our Top Picks at a Glance
Best Overall — Pink Brain & Stitched Zombie Coffin Nails
Best for Beginners — Black & Lime Slime Zombie Nails
Most Trendy — Lavender Brain & Stitched Zombie Stilettos
Best for Special Occasions — Gore Eyeball Zombie Stiletto Nails
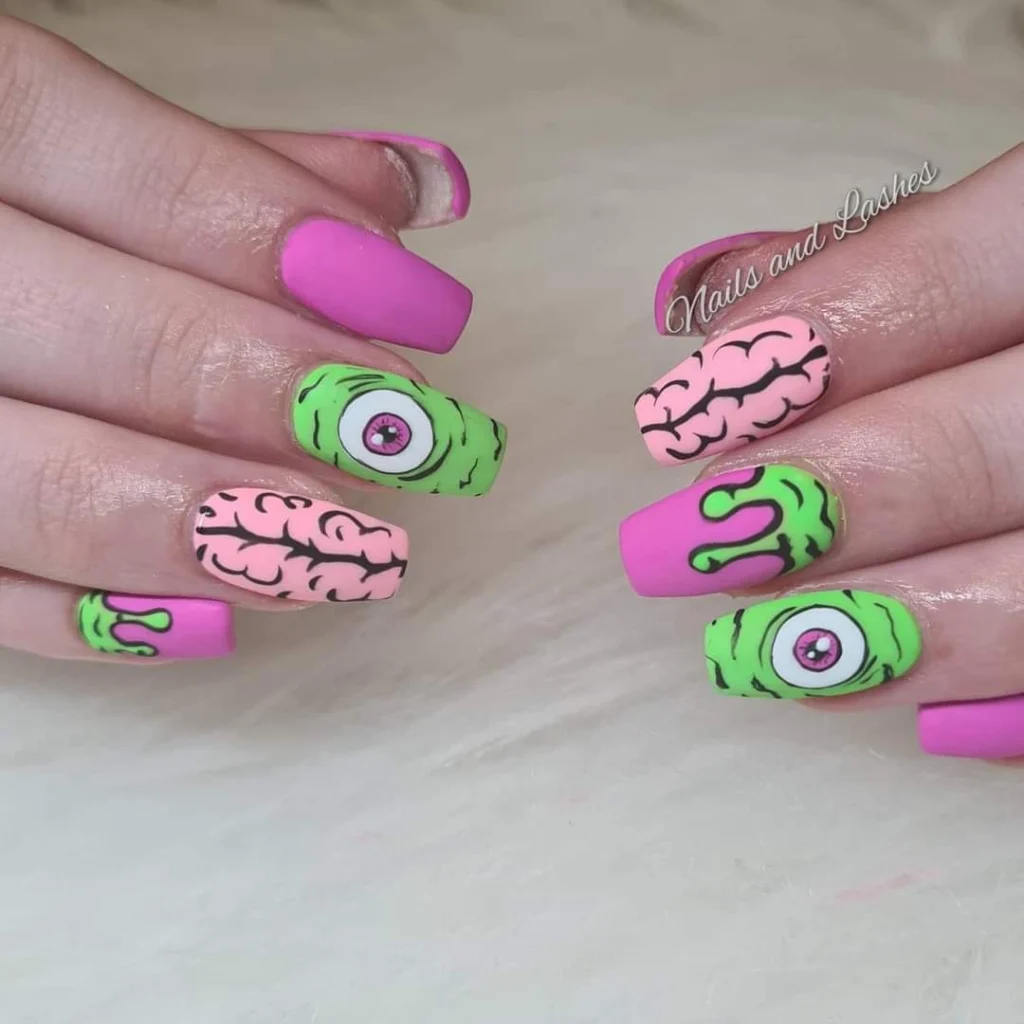


#1. Neon Pink Brain & Eyeball Zombie Nails
Hot pink and toxic green make this zombie manicure feel playful before you even notice the creepy details. Exposed brains, giant eyeballs, dripping slime, and black outlines give the long square nails a comic-book horror finish.
Best For — bold neon Halloween party looks
Pro Tip — Outline the brain folds with a thin nail art liner brush after the pink base cures so every squiggle stays crisp.
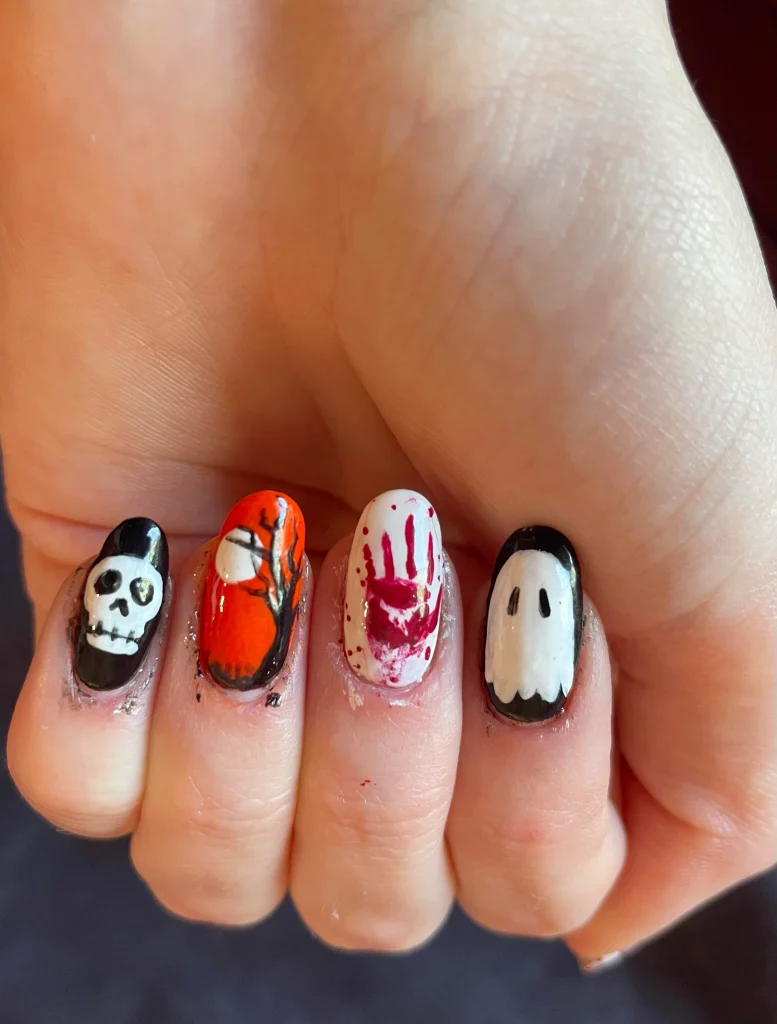
#2. Bloody Handprint & Ghost Zombie Nails
This short horror set mixes a skull, fiery orange detail, smeared red handprint, and white ghost against deep black and white bases. The intentionally rough brushwork makes the manicure look distressed and unsettling instead of overly polished.
Best For — short nails with horror artwork
Pro Tip — Dab the red polish unevenly with a tiny sponge before painting the handprint so the blood effect looks layered rather than flat.
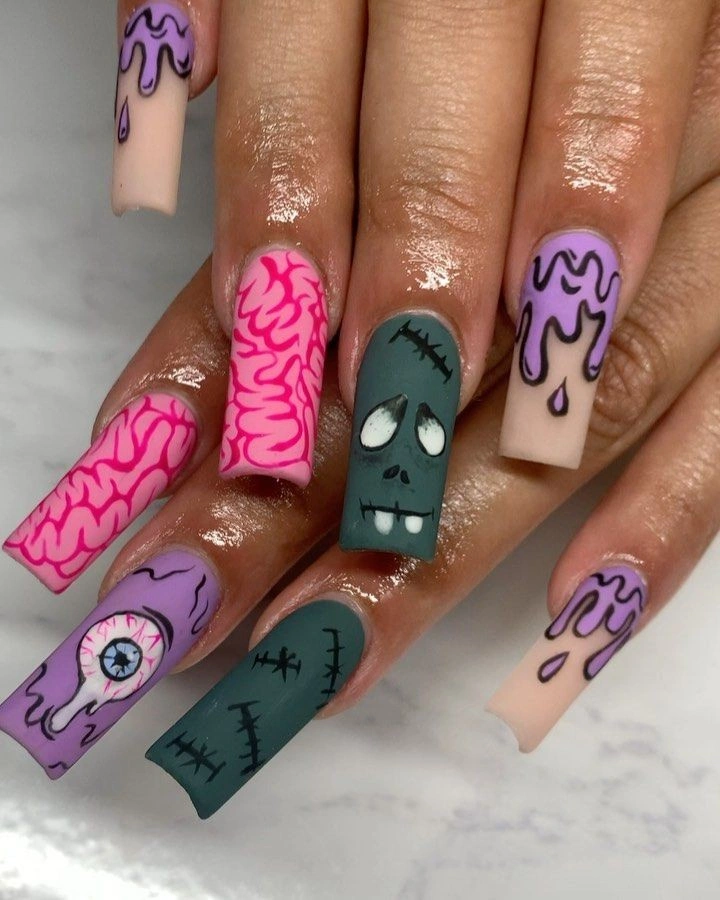
#3. Pink Brain & Stitched Zombie Coffin Nails
Matte gray-green zombie faces sit beside vivid pink brain patterns and dripping lavender accents on this long coffin set. The mix of stitches, blank monster eyes, brains, and melting polish makes every nail feel like a different piece of the same creepy character.
If you love the stitched monster details, these Frankenstein Halloween nails offer even more green-and-black inspiration.
Best For — dramatic coffin nail art lovers
Pro Tip — Apply a matte gel top coat over the finished design to give the zombie skin that soft, eerie texture.
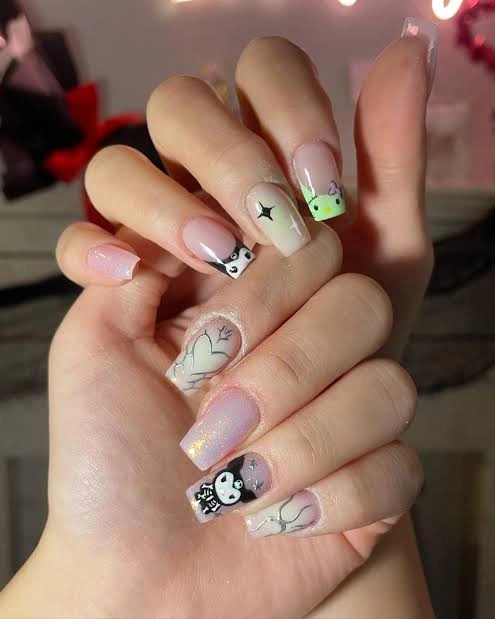
#4. Pastel Kawaii Monster Zombie Nails
This softer take on spooky nails uses translucent pink, pearly lavender, tiny cartoon faces, and pale green details. The delicate artwork keeps the manicure cute and wearable while still fitting right into a playful Halloween theme.
Best For — cute spooky aesthetic fans
Pro Tip — Keep the base sheer and neutral so tiny character details remain readable instead of competing with a strong background color.
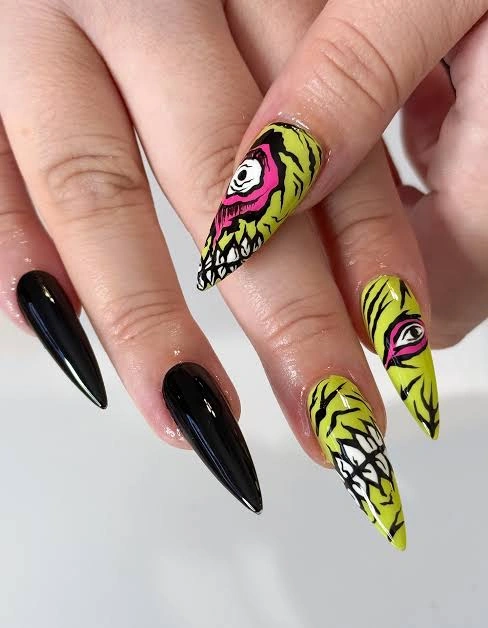
#5. Neon Toxic Monster Stiletto Nails
Glossy black stilettos get an aggressive makeover with acid-yellow monster faces, distorted eyes, sharp teeth, and heavy graphic outlines. The pointed shape makes the toothy artwork feel even more dangerous.
Best For — edgy costumes and night parties
Pro Tip — Paint the neon shapes first, then add the black linework last so the teeth and eyes stay sharp against the bright background.
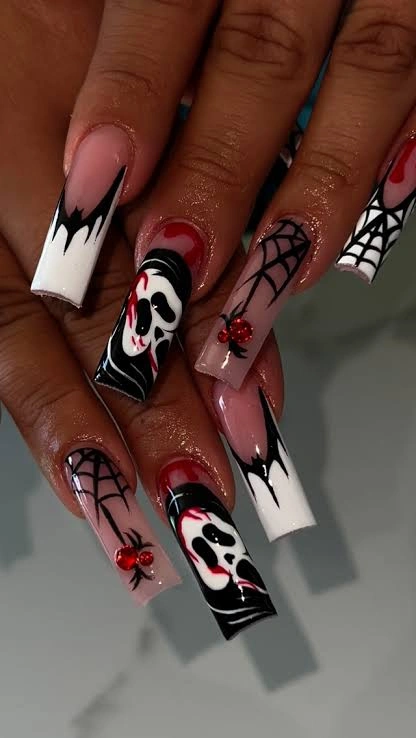
#6. Scream Mask & Spiderweb Gore Nails
Long coffin nails combine ghostly mask faces, dripping crimson polish, black spiderwebs, and tiny red spiders over nude, black, and white backgrounds. It’s a full horror-movie manicure with enough negative space to keep every detail visible.
For more bone-and-skull artwork, save a few ideas from these skeleton Halloween nails too.
Best For — classic horror movie nail fans
Pro Tip — Use Halloween nail art decals for the mask or spiderweb accents if detailed freehand painting feels intimidating.
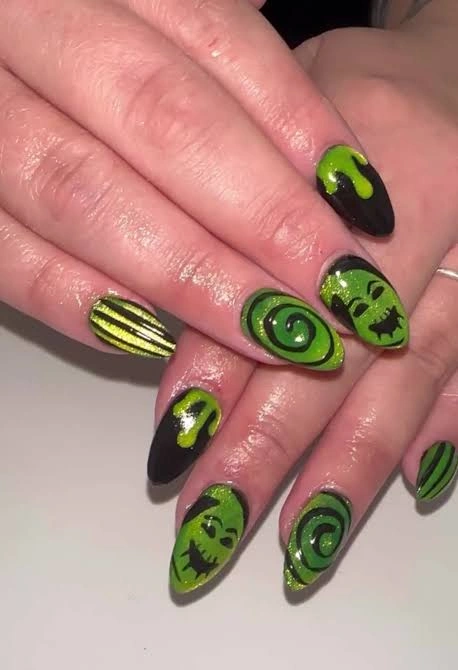
#7. Green Slime Spiral Zombie Nails
Black almond nails come alive with sparkling green slime, hypnotic spirals, stitched mouths, and cartoon monster eyes. The limited black-and-green palette ties the mismatched artwork together without making the set feel busy.
Best For — easy coordinated monster manicures
Pro Tip — Draw the spiral from the center outward in one continuous motion to avoid wobbly joins in the green line.
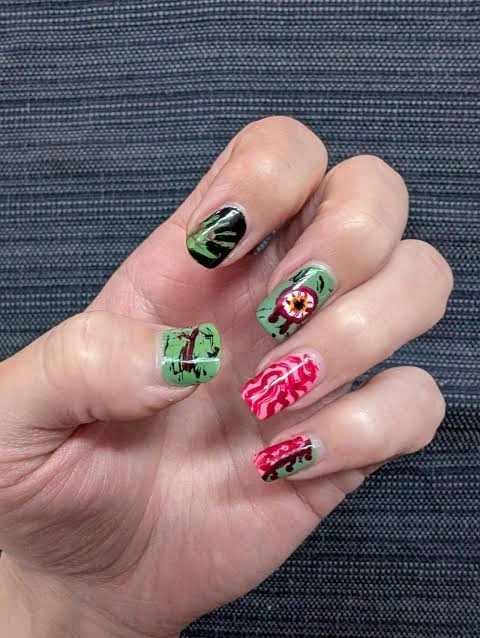
#8. Short Frankenstein Brain Zombie Nails
Short square nails prove you don’t need extra length for detailed zombie art. Mint-green monster skin, exposed pink brain texture, stitches, a staring eyeball, and black tips create a miniature horror scene across five nails.
Best For — practical short Halloween manicures
Pro Tip — Choose only two or three details per nail on short lengths so the artwork doesn’t become visually crowded.
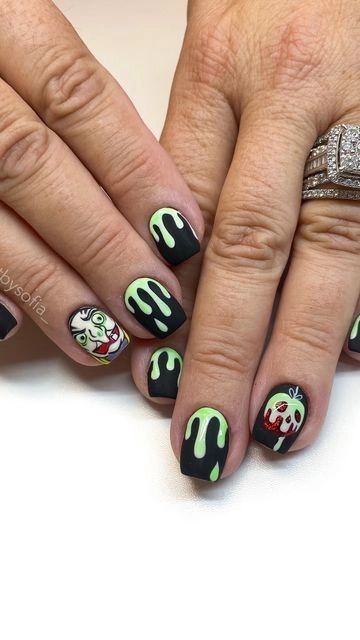
#9. Black & Lime Slime Zombie Nails
Matte black short nails become instantly spooky with simple lime-green drips and two expressive zombie faces. Because most nails use only one easy slime motif, this look feels much more beginner-friendly than the highly detailed sets.
Best For — beginners recreating zombie nail art
Pro Tip — Make each slime drip with a dotting tool, then pull a thin trail upward with a detail brush before curing.
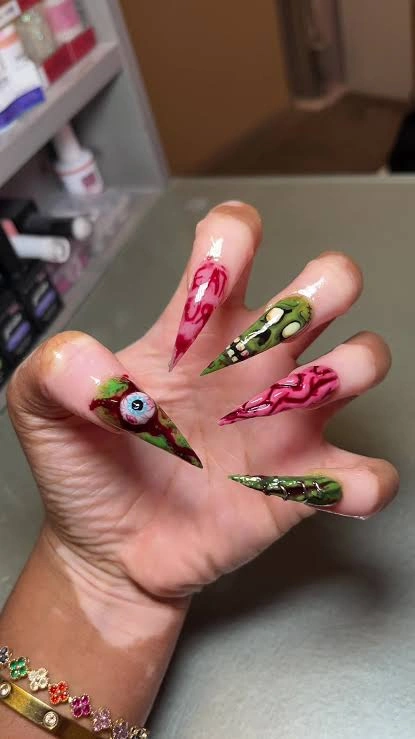
#10. Gore Eyeball Zombie Stiletto Nails
These razor-sharp stilettos go straight into zombie-movie territory with bulging eyeballs, veiny pink flesh, murky greens, and metallic-looking organic details. The exaggerated length gives every creepy texture room to become the center of attention.
Best For — Halloween events and costume photos
Pro Tip — Build raised veins and wounds with a small amount of clear builder gel, curing each section before adding the next layer.
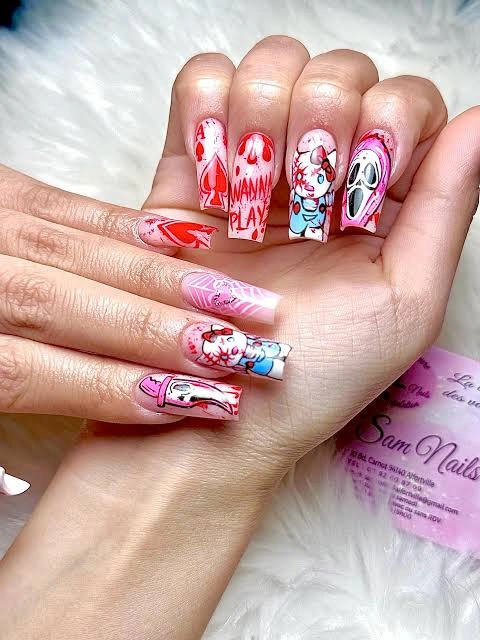
#11. Pink Horror Character Zombie Nails
Pink, white, and red turn classic scary imagery into something unexpectedly cute on this long square manicure. Bloody faces, cartoon horror accents, web-like lines, and a screaming mask create a maximalist set that still feels coordinated through color.
Best For — pink Halloween and horror lovers
Pro Tip — Repeat one accent color on every nail, even in tiny amounts, to make a mismatched character set look intentional.
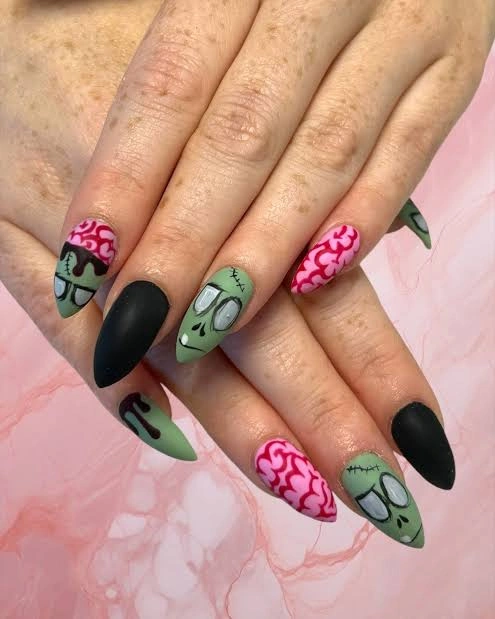
#12. Matte Pink Brain & Green Zombie Nails
Muted green monster faces and bubblegum-pink brains stand out beautifully beside solid matte black almond nails. The alternating artwork gives you plenty of zombie personality without requiring complicated details on every finger.
Best For — balanced spooky statement manicures
Pro Tip — Paint the solid black nails first and use them as visual breaks between the brighter brain and zombie accents.
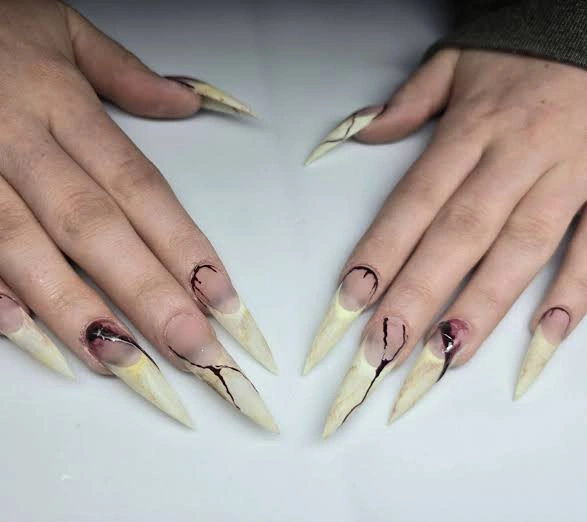
#13. Rotten Bone Zombie Claw Stilettos
Extra-long ivory stilettos look almost like decaying claws thanks to smoky brown shading, dark cracks, and bruised-looking details around the nail beds. It’s a subtler zombie concept, but the sharp silhouette makes it genuinely eerie.
Best For — realistic undead costume styling
Pro Tip — Sponge translucent brown and gray near the cuticle rather than brushing solid color to create a bruised, aged effect.
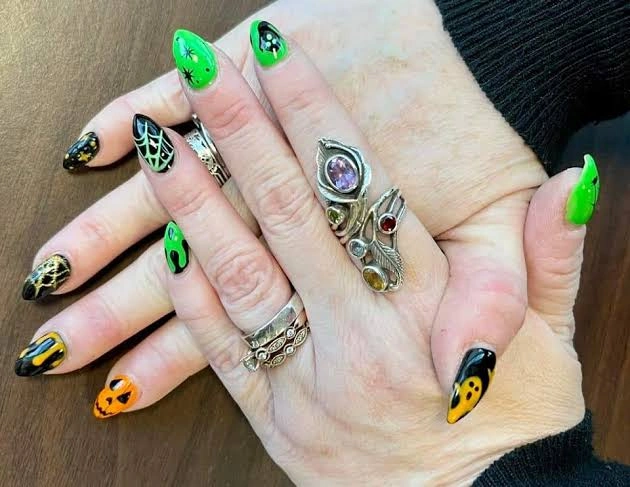
#14. Neon Monster Mash Zombie Nails
Bright green, orange, yellow, and black give this mixed manicure a retro monster-party mood. Webs, striped accents, glowing-looking faces, and graphic symbols make the set feel energetic instead of gruesome.
Best For — colorful Halloween outfits and parties
Pro Tip — Put a white base underneath neon gel colors so green, orange, and yellow stay bright after curing.
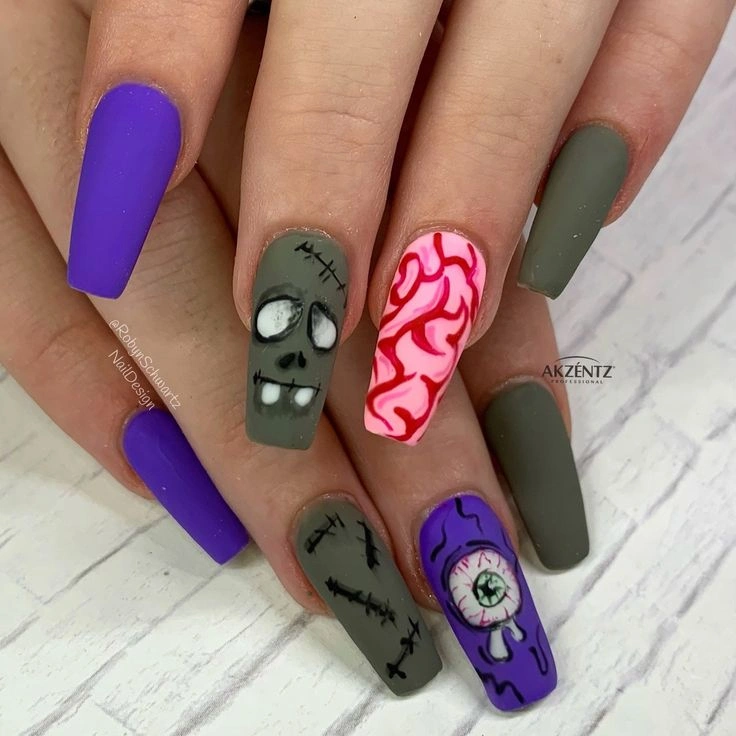
#15. Purple Brain & Eyeball Zombie Coffin Nails
Dusty green zombie faces meet a bright pink brain and a dripping purple eyeball on this matte coffin manicure. Solid purple and gray-green nails calm down the detailed accent art, creating a set that looks bold without feeling overcrowded.
Best For — matte coffin nail enthusiasts
Pro Tip — Paint your eyeball white first and fully cure it before adding the iris, veins, and black outline in separate layers.
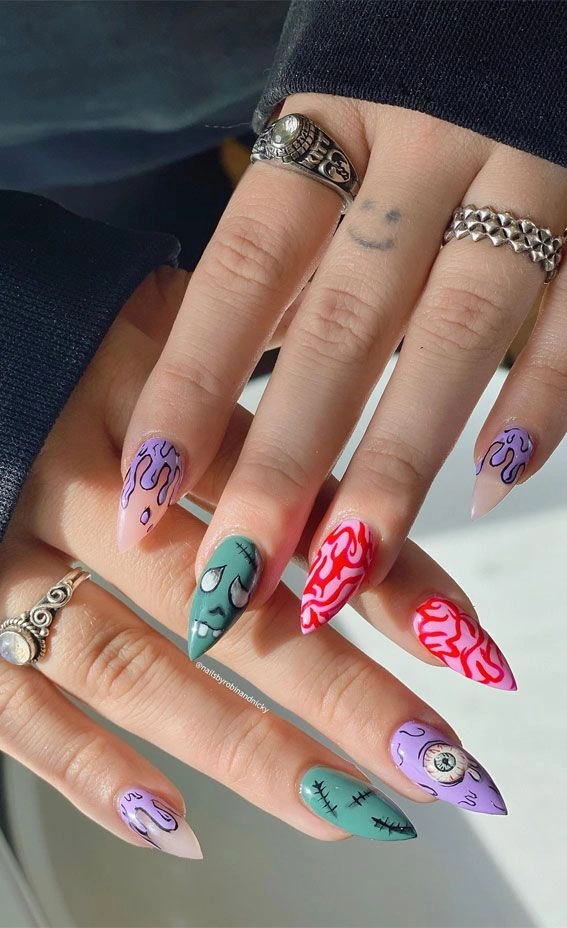
#16. Lavender Brain & Stitched Zombie Stilettos
Long pointed nails mix lavender drips, bright pink brain patterns, smoky green stitches, monster faces, and a creepy eyeball accent. The pastel color story gives classic zombie artwork a trendy, almost candy-colored update.
Best For — trendy pastel spooky nail looks
Pro Tip — Keep the purple, pink, and green tones slightly muted so black outlines stay strong and readable across the full set.
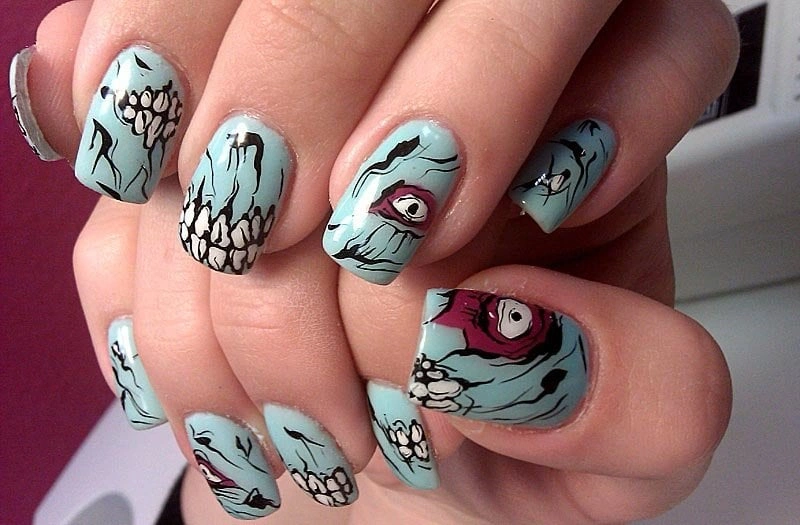
#17. Blue Decay Zombie Face Nails
Pale blue-gray polish becomes seriously creepy with exposed teeth, staring eyes, torn-looking skin, and deep red shadowing. The short rounded-square shape makes this detailed zombie artwork surprisingly wearable despite the gruesome faces.
Best For — detailed art on shorter nails
Pro Tip — Use a fine detail brush set for individual teeth rather than trying to paint the mouth as one white block.
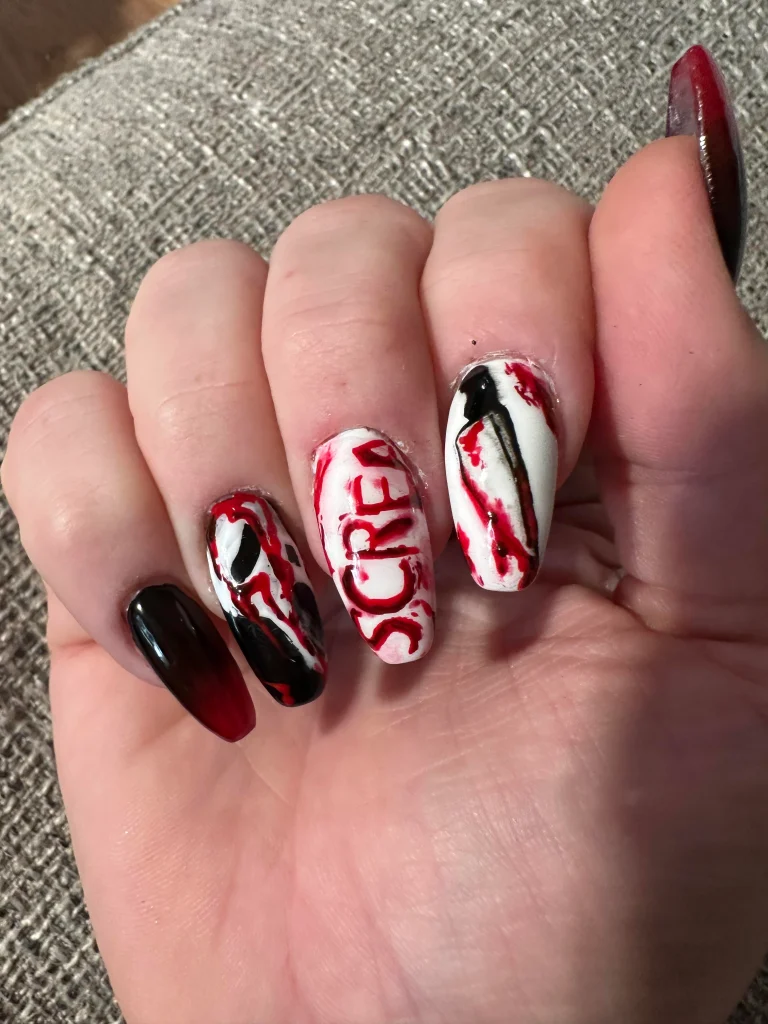
#18. Bloody Scream Knife Zombie Nails
White nails splattered with dark red polish make the black mask and knife-inspired artwork look even more disturbing. The hand-painted lettering adds a chaotic homemade-horror feel that suits the rough blood effects perfectly.
Best For — bloody slasher-inspired Halloween costumes
Pro Tip — Thin a tiny amount of red gel before dragging it irregularly across the white base for more natural-looking streaks.
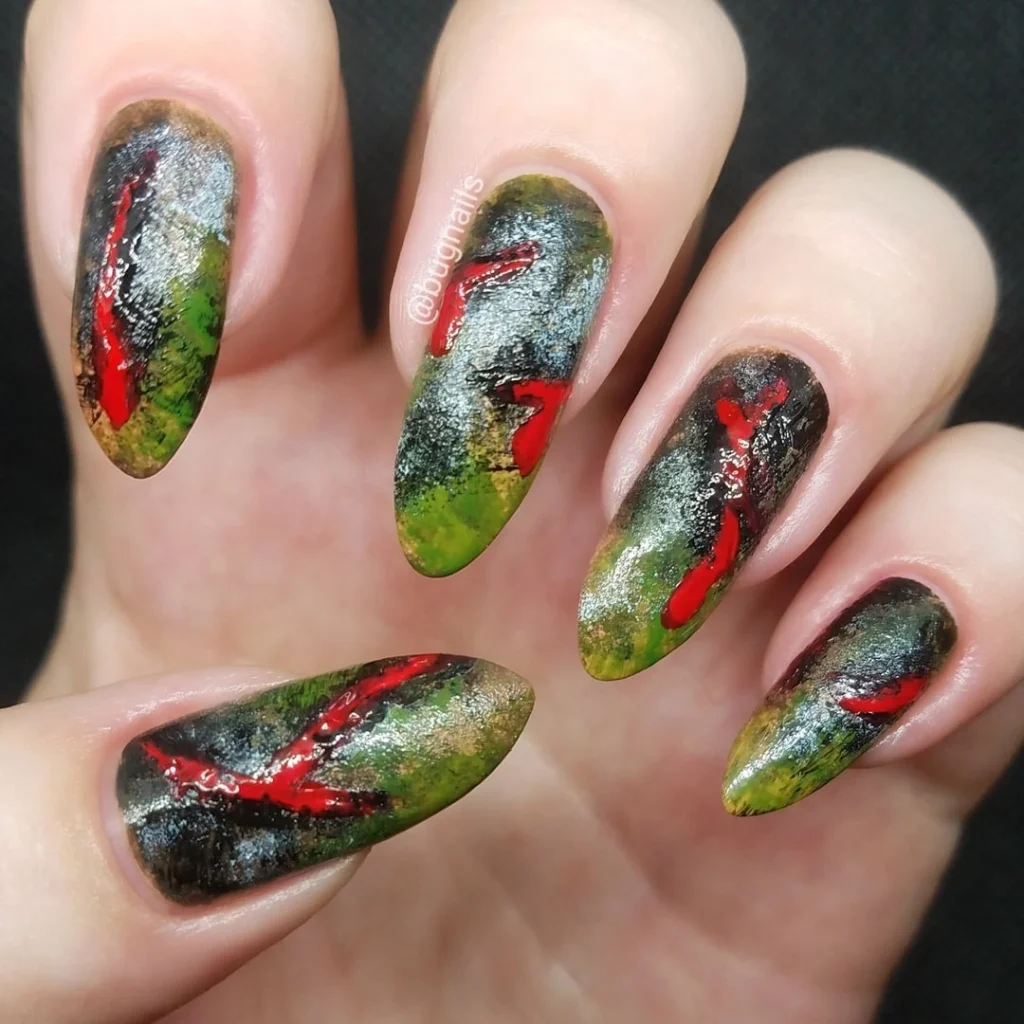
#19. Grunge Wound Zombie Almond Nails
Murky green, black, bronze, and silver create a decayed grunge base for glossy red wound-like streaks. Instead of cartoon faces, this almond manicure focuses on texture and color, making it look like weathered zombie skin.
Best For — realistic grunge zombie costumes
Pro Tip — Layer green, brown, and metallic polish with a small sponge, letting each shade remain partly visible instead of blending everything smooth.
How to Choose the Right Nail Design
The best zombie manicure is the one that fits your nail length, outfit, and comfort level with detailed art. Use these four factors to narrow down your favorite.
- Nail shape — Stiletto and coffin nails give brains, eyeballs, stitches, and monster faces more space. Short square or almond nails work better when you want one or two simple zombie accents.
- Skin tone — Neon green, pink, and purple create strong contrast on many skin tones, while dusty olive, gray, burgundy, and black produce a moodier effect. Hold your polish colors beside your hand before committing to the full set.
- Occasion — Gore, long claws, and raised eyeballs are perfect for parties or costumes, while slime tips and simple stitched faces are easier for everyday October wear.
- Skill level — Beginners should start with drips, stitches, or one accent face. For more manageable inspiration, browse these simple Halloween nails before attempting detailed character art.
What You’ll Need
You don’t need an enormous nail kit to recreate the zombie effect. A few precise tools and strong Halloween colors will cover most of the techniques used above.
Useful for brain folds, stitches, webs, teeth, and outlines.
Makes round eyes, slime drops, blood drops, and pupils easier.
Look for black, white, red, green, pink, and purple shades.
Gives zombie skin, brains, and stitched designs a velvety finish.
A quick option for skulls, eyes, webs, and horror details.
Adds raised wounds, veins, slime, or dimensional eyeball effects.
Pro Tips for a Long-Lasting Manicure
Prep Before You Paint
Gently push back the cuticles, remove surface shine, and clear away dust before applying your base coat. Detailed zombie art won’t matter if the polish starts lifting around the edges.
Work in Thin Layers
Brains, stitches, blood, and slime can quickly become bulky when every color is painted too thickly. Thin layers also make it easier to correct a small line without rebuilding the whole design.
Cure Detailed Art in Stages
Finish one group of details and cure it before painting over or beside them. This is especially helpful for eyeballs, tiny teeth, brains, and black outlines that can smear easily.
Seal the Free Edge
Run your top coat lightly across the nail tip before the final cure. This helps protect long coffin and stiletto designs where chipping often starts first.
Frequently Asked Questions
Q: What colors work best for zombie Halloween nails?
A: Green, gray, black, red, pink, and purple are the easiest colors to build a recognizable zombie palette. Add white for eyeballs and teeth, then use red sparingly when you want blood or wound details.
Q: Can beginners recreate zombie Halloween nails at home?
A: Yes. Start with green slime, black stitches, or one simple zombie face instead of recreating a detailed ten-nail set, then add decals when you want extra artwork without freehand painting.
Q: Do zombie Halloween nails work on short nails?
A: Absolutely. Short nails look especially good with slime drips, stitches, tiny brains, simple eyeballs, or one monster accent nail because those motifs don’t require much painting space.
Q: How can I make zombie nail art look more realistic?
A: Use several muted colors instead of one flat green. Sponging brown, gray, olive, black, and a little red around wounds or edges creates the uneven, decayed texture that makes zombie nail art more convincing.
Recommended Product
Halloween Nail Art Detail Brush and Dotting Tool Set
★★★★☆ Highly rated on Amazon
Fine brushes and dotting tools are useful for the tiny brains, eyes, stitches, teeth, blood drops, and slime details used throughout these zombie nail designs.
As an Amazon Associate, we earn from qualifying purchases.
Final Thoughts
Zombie Halloween nails can go in almost any direction, from cute pink brains and green slime to realistic wounds, creepy eyeballs, and dramatic horror artwork. Pick the level of spooky that feels right for you, then adjust the colors and nail shape to make the design your own.
If you want even more playful October inspiration after these undead looks, check out these funny Halloween nails.
Which of these nail looks are you trying first? Save this post to Pinterest so you can come back to it whenever you need fresh nail inspo!

Hi, I’m Jessica, the creator behind Unique Lash & Nails Katy.
I created this website for anyone who loves beautiful nails as much as I do. Here, I share trendy nail designs, seasonal manicure ideas, easy nail care tips, honest product recommendations, and step-by-step guides to help you create salon-worthy nails at home. Whether you’re looking for everyday inspiration or your next favorite nail trend, I hope you’ll find something you love.