How to Protect Nails During Gel Manicures
Quick Answer
To protect nails during gel manicures, avoid aggressive filing, keep your cuticles intact, use SPF 30+ sunscreen or UV-protective gloves, and make sure every gel layer cures correctly. Moisturize your nails daily, never peel off lifting gel, and remove the coating with the appropriate method. These habits help reduce thinning, peeling, irritation, and breakage.
Time needed
5–10 minutes of extra preparation
Difficulty
Beginner
Items needed
5–6 protective essentials
Typical gel wear
About 2–3 weeks
Gel manicures give you glossy color, beautiful nail art, and a finish that can last for weeks. But what happens when your natural nails start feeling thin, rough, or fragile underneath?
The good news is that you don’t necessarily have to give up gel polish. Learning how to protect nails during gel manicures can help you enjoy your favorite looks while reducing avoidable damage.
From nail preparation and UV protection to safe removal and everyday aftercare, here’s what actually matters for healthier-looking nails.


Can Gel Manicures Damage Your Natural Nails?
Yes, gel manicures can contribute to nail damage, particularly when they’re applied or removed incorrectly. However, the gel coating itself isn’t responsible for every problem.
Damage often happens when someone repeatedly files the natural nail, peels off bonded polish, scrapes away stubborn product, or exposes surrounding skin to uncured gel.
Common problems include:
- Thin nails: Excessive filing or aggressive removal can take away layers of the natural nail plate.
- Peeling nails: Pulling off gel may detach superficial nail layers along with the coating.
- Dryness: Acetone and frequent washing can leave nails and surrounding skin feeling dry.
- Skin irritation: Gel ingredients may irritate skin or trigger an allergic reaction in some people.
- UV exposure: Curing lamps emit ultraviolet radiation, making hand protection worthwhile.
If your nails already feel weak, start by following a consistent healthy nail care routine before scheduling another gel appointment.
Important Safety Warning
Don’t apply gel over painful, infected, visibly damaged, or separating nails. If you notice persistent redness, swelling, itching, blisters, or unusual discoloration, stop using the product and seek medical advice. Covering the problem with another manicure can delay appropriate treatment.
What Do You Need to Protect Your Nails During a Gel Manicure?
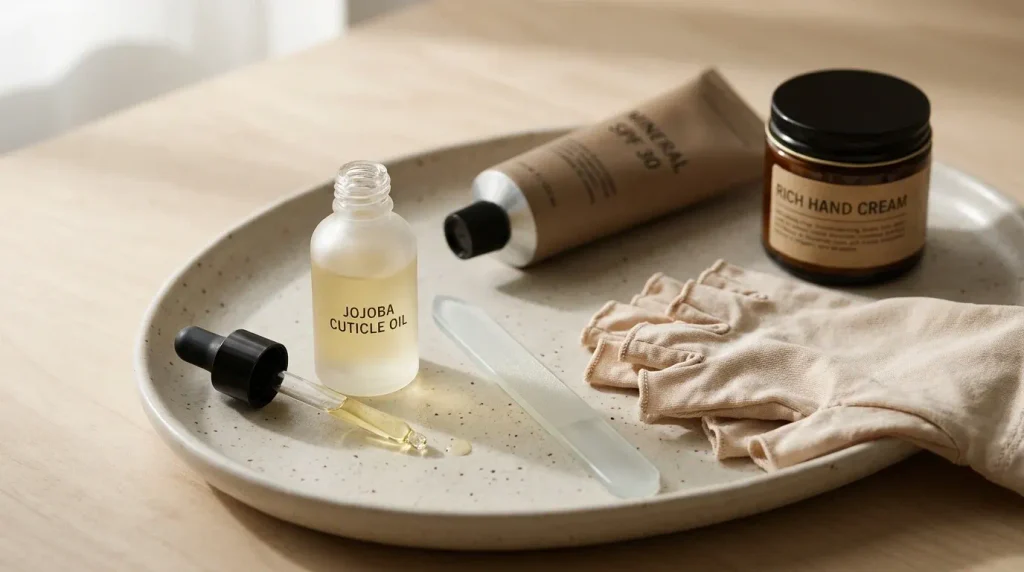
You don’t need a complicated manicure collection. A few carefully chosen essentials can make your routine safer and more comfortable.
- Fine-grit nail file: Shapes the free edge without unnecessary roughness.
- Broad-spectrum SPF 30+ sunscreen: Helps protect exposed hand skin from curing-lamp UV radiation.
- UV-protective fingerless gloves: Provide an additional option for shielding your hands during curing.
- Compatible gel base coat: Helps the polish adhere when used according to its manufacturer’s instructions.
- Cuticle oil: Conditions dry skin around your nails during everyday wear.
- Hand cream: Helps reduce dryness after washing and polish removal.
For UV protection, look for UV-protective manicure gloves that leave your nail plates accessible while covering the surrounding skin.
Choose products designed for nail services and follow their instructions. Gel base coats, colors, top coats, and lamps aren’t automatically interchangeable.
How to Protect Nails During Gel Manicures: 9 Essential Steps
These nine steps cover what to do before your appointment, during application, and after your manicure is finished.
1. Check Your Natural Nails Before Applying Gel
Look at your bare nails before covering them with gel. Check for peeling layers, deep cracks, soreness, unusual spots, or changes in color.
If your nails look significantly damaged, postpone the manicure and focus on gentle care. A fresh gel coating may hide the problem without addressing it.
Common mistake: Using thick gel or builder products to conceal severely damaged nails instead of allowing the affected areas to recover.
2. Shape Your Nails Without Over-Filing
Use a fine-grit file to smooth the free edge and remove small snags. A short oval or softly rounded-square shape can be practical when your nails break easily.
Avoid repeatedly filing the nail surface. Your natural nail plate has limited thickness, and removing too much material makes it more vulnerable to bending and splitting.
Common mistake: Buffing until the natural nail looks noticeably thinner or feels sensitive.
3. Protect Your Cuticles Instead of Cutting Them
Your cuticles help protect the area where new nails grow. Cutting or aggressively pushing them back can damage this barrier and increase the risk of irritation or infection.
Ask your nail technician to leave intact cuticle tissue alone. Rough surrounding skin can be softened with moisturizer rather than removed aggressively.
Common mistake: Removing healthy cuticle tissue to create an extremely clean-looking nail base.
4. Shield Your Hands From UV Exposure
Gel curing lamps use ultraviolet radiation to harden polish. Even lamps marketed as LED produce UV light, although curing times and exposure levels vary by device.
Apply broad-spectrum, water-resistant SPF 30 or higher sunscreen to the backs of your hands before your appointment, allowing time for application as directed. Keep sunscreen off nail plates that need gel adhesion.
Alternatively, wear UV-protective fingerless gloves that expose only the nails. Neither method guarantees complete protection, but both help limit unnecessary skin exposure.
Common mistake: Assuming an LED nail lamp produces no ultraviolet radiation.
5. Choose a Compatible Base Coat and Gel System
Choose a base coat recommended for your particular gel system. Apply it in a thin, even layer while avoiding the surrounding skin.
The base coat helps the manicure adhere to your nail surface. However, it cannot compensate for damaged nails, incorrect curing, or excessive filing.
When choosing a gel nail base coat, check the manufacturer’s lamp compatibility and application instructions.
Common mistake: Applying several thick base-coat layers to strengthen a nail that is already thin or peeling.
6. Apply Thin Gel Layers and Cure Them Correctly
Use thin layers of gel color, cure each coat for the time specified by the manufacturer, and use a compatible curing lamp.
Thick coats may cure unevenly, leaving uncured ingredients that can irritate skin or increase the chance of sensitization. Remove any gel that touches the skin before curing.
If your lamp or product instructions are unclear, don’t guess at the curing time.
Common mistake: Assuming that a hard-looking, shiny surface proves every part of the gel has cured properly.
7. Finish the Manicure Without Damaging the Nail Edges
Apply the correct top coat for your gel system and cure it according to the instructions. Keep the product away from your cuticles and sidewalls.
If your finished manicure has a sticky inhibition layer, remove it with the cleanser recommended for the product. No-wipe top coats normally shouldn’t need this step.
For more details, see our guide on how to clean gel nails correctly.
Common mistake: Trying to correct poorly cured gel by repeatedly wiping it with cleanser instead of checking the curing process.
8. Moisturize Your Nails and Cuticles Every Day
Once your manicure is completely finished, massage a small amount of cuticle oil into the skin around your nails. Follow with hand cream after washing your hands.
Jojoba-based cuticle oil or a simple fragrance-free moisturizer can make dry skin feel more comfortable. Moisturizing won’t rebuild nail layers that have already been removed, but it can help reduce dryness and brittleness.
Keep a jojoba cuticle oil beside your bed to make daily use easier.
Common mistake: Using oil only when your manicure is brand-new and forgetting your cuticles for the next two weeks.
9. Remove Gel Carefully Instead of Peeling It Off
When your manicure grows out or begins lifting, remove it using the method recommended for that exact gel product. Soak-off gel usually requires gently breaking the top-coat seal, followed by controlled acetone contact.
Use acetone-soaked cotton and nail wraps rather than immersing your whole hands. Allow the product to soften before removing anything, and never force stubborn gel away from the nail plate.
Hard gel and some builder systems cannot be removed by ordinary acetone soaking. Professional removal is the safer choice when you’re unsure which product you have.
Common mistake: Peeling off gel from a lifted corner, which can remove natural nail layers along with the coating.
What Should You Avoid During Gel Manicures?
A little extra caution can prevent many common manicure problems.
Do
- Choose clean, hygienic nail salons.
- Protect your hands from curing-lamp UV exposure.
- Keep your cuticles intact.
- Use compatible gel and curing products.
- Moisturize regularly.
- Remove gel gently.
Don’t
- Over-file your natural nails.
- Cut healthy cuticle tissue.
- Let uncured gel remain on your skin.
- Use unknown curing times.
- Pick at lifting polish.
- Cover painful or damaged nails.
How Can You Keep Your Nails Healthy Between Gel Appointments?
Your nail care routine shouldn’t end when you leave the salon. What you do between appointments can make a noticeable difference to how comfortable your nails feel.
Keep Your Nails Hydrated
Apply hand cream after washing and use cuticle oil when the surrounding skin feels dry. For extra moisture overnight, a thin layer of petroleum jelly around your nails can help reduce water loss.
Wear Gloves for Cleaning
Protect your manicure while washing dishes, scrubbing bathrooms, or handling household cleaning chemicals. Repeated wetting and drying may contribute to brittleness, while cleaners can irritate unprotected skin.
Use reusable household gloves that fit comfortably, and dry your hands thoroughly afterward.
Stop Using Your Nails as Tools
A gel coating may feel strong, but that doesn’t make your natural nails indestructible. Avoid using them to open cans, scrape stickers, pry apart packaging, or lift heavy objects.
Mechanical stress can crack the coating or contribute to nail lifting, especially when your manicure has grown out.
Take Breaks When Your Nails Need Them
If your natural nails become thin, sore, or repeatedly peel after removal, choose a temporary break from gel manicures. Focus on moisturizing and gentle grooming while the affected nail grows forward.
Your nails don’t need to “breathe,” but a break helps you avoid more filing, adhesives, curing, and removal while they’re recovering.
Explore our guide on how to make your nails healthy again for a practical recovery routine.
How Long Should You Wait Between Gel Manicures?
There isn’t one perfect waiting period for everyone. The right schedule depends on your nail condition, the products being used, and how your previous manicure was removed.
A gel manicure commonly remains wearable for about two to three weeks, but that doesn’t mean you should automatically reapply it immediately after removal.
If your nails are healthy and comfortable, discuss an appropriate maintenance schedule with your nail technician. If they’re peeling, unusually flexible, or sensitive, take a break and consider a dermatologist’s advice before your next gel service.
Dermatologists sometimes recommend a nail polish holiday of one to two weeks or longer between gel manicures, especially when nails are showing signs of damage.
Pro Tip
Take a clear photo of your bare nails after each gel removal. Compare it with the previous photo before deciding on your next manicure. This makes recurring peeling, discoloration, or thinning easier to notice instead of covering the same problem repeatedly.
What Products Actually Help Protect Gel-Manicured Nails?
You don’t need dozens of products. Focus on essentials that address specific risks: UV exposure, skin dryness, and proper removal.
Recommended Product
UV-Protective Fingerless Manicure Gloves
Fingerless manicure gloves help cover the backs of your hands while leaving your nails exposed for gel application and curing.
As an Amazon Associate, we earn from qualifying purchases.
Recommended Product
Jojoba-Based Cuticle Oil
Cuticle oil is useful for conditioning dry nail folds and keeping the skin around your manicure comfortable.
As an Amazon Associate, we earn from qualifying purchases.
Recommended Product
Soak-Off Gel Removal Wraps
Proper nail wraps help keep acetone-soaked cotton positioned over soak-off gel, reducing unnecessary solvent contact with surrounding skin.
As an Amazon Associate, we earn from qualifying purchases.
What If Your Nails Are Already Damaged After Gel Polish?
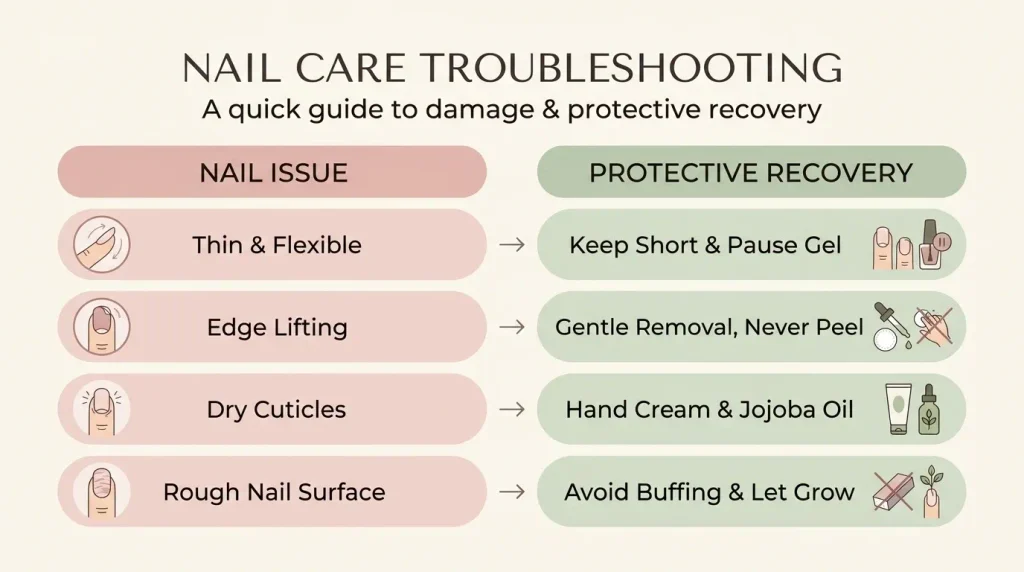
If your nails have started peeling, cracking, or feeling tender, the best solution isn’t another heavy coating.
Problem: Your nails feel thin and flexible
Keep them short, avoid buffing, and pause gel applications while they recover. Damaged nail layers must grow out rather than being permanently restored by a nail strengthener.
Problem: Gel polish is lifting at the edges
Don’t glue, peel, or pry it back into place. Arrange safe removal of the lifted product and keep the area clean and dry. Avoid covering suspicious discoloration or trapped moisture with fresh gel.
Problem: Your cuticles are dry and peeling
Apply fragrance-free hand cream regularly and a small amount of cuticle oil as needed. Avoid picking loose skin. If you have significant redness, itching, or blisters, consider a possible product reaction and seek medical advice.
Problem: Your nails look rough after gel removal
Resist the urge to buff away every ridge. Moisturize, protect your nails from additional trauma, and let new nail growth replace the rough surface gradually.
Frequently Asked Questions About Protecting Nails During Gel Manicures
Q: Can you get gel manicures without damaging your nails?
A: You can reduce the risk of damage through gentle preparation, correct curing, UV protection, and careful removal. However, no gel manicure is completely risk-free, especially with frequent repeated applications.
Q: Should you wear sunscreen during a gel manicure?
A: Yes. Broad-spectrum, water-resistant SPF 30+ sunscreen can help protect hand skin from UV exposure during curing. UV-protective fingerless gloves are another practical option.
Q: Does gel polish make natural nails weaker?
A: Gel manicures can contribute to brittleness, thinning, or peeling, particularly when nails are over-filed or polish is removed aggressively. Gentle application and removal reduce avoidable damage.
Q: Is cuticle oil safe to use with gel nails?
A: Yes. Once your manicure is finished and cured, you can use cuticle oil to condition surrounding skin. It won’t repair removed nail layers, but it can help manage dryness.
Q: How long does it take for damaged nails to recover after gel manicures?
A: Mild dryness may improve quickly with moisturizing, but structural nail damage must grow out. A fingernail often takes approximately four to six months to replace most or all of its length, depending on individual growth.
Protect Your Natural Nails Without Giving Up Beautiful Gel Manicures
Knowing how to protect nails during gel manicures means paying attention to the entire process, not just the finished color. Gentle preparation, UV protection, correct curing, daily moisturizing, and careful removal all matter.
Keep your natural nails healthy first, and let beautiful gel designs be the finishing touch. Save this guide on Pinterest so you have these protective nail care tips ready before your next manicure!

Hi, I’m Jessica, the creator behind Unique Lash & Nails Katy.
I created this website for anyone who loves beautiful nails as much as I do. Here, I share trendy nail designs, seasonal manicure ideas, easy nail care tips, honest product recommendations, and step-by-step guides to help you create salon-worthy nails at home. Whether you’re looking for everyday inspiration or your next favorite nail trend, I hope you’ll find something you love.