19 Halloween Nails: Cute & Spooky Ideas to Try
Halloween nails can be eerie, cute, glamorous, or a little bit of everything. From tiny ghosts and pumpkins to dramatic spiderwebs and deep cat-eye finishes, there’s plenty of room to make the season feel like your own.
The 19 looks below cover short, long, simple, and statement manicures, so you can find inspiration whether you’re painting at home or bringing a reference photo to your nail tech.
If you love changing your manicure with the calendar, you can also browse these cute nail ideas for every season for more year-round inspiration.
✦ Our Top Picks at a Glance
Best Overall — Nude Orange Spiderweb French
Best for Beginners — Nude Ghost Pumpkin French
Most Trendy — Red Black Cat-Eye Stilettos
Best for Special Occasions — Blush Red Rhinestone Drips
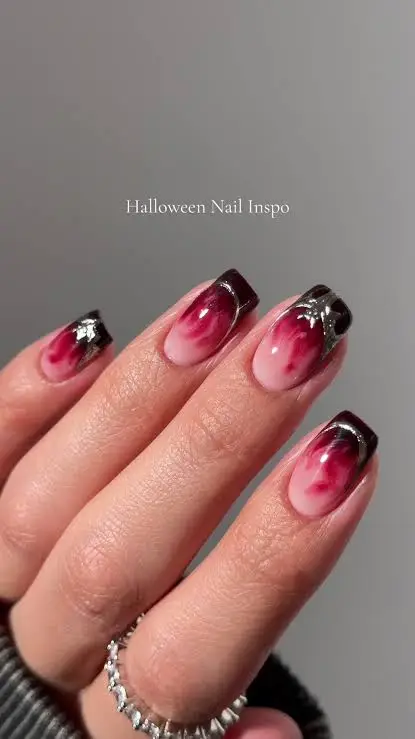


#1. Burgundy Aura Chrome Tips
A soft pink center melts into rich burgundy and nearly black tips, giving these nails a smoky aura effect that feels sophisticated rather than costume-like. Tiny reflective silver accents near the tips catch the light and give the glossy manicure a jewelry-like finish.
Best For — Moody date nights and Halloween parties
Pro Tip — Blend the burgundy inward with a sponge in two thin passes, then keep the darkest color within roughly the outer third of each tip.
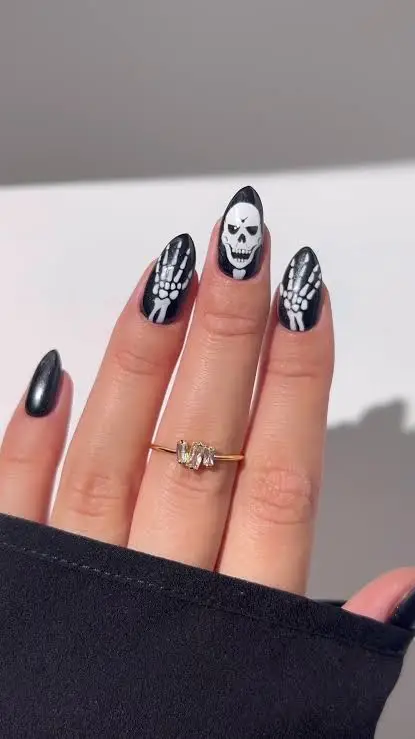
#2. Black Skeleton Hand Nails
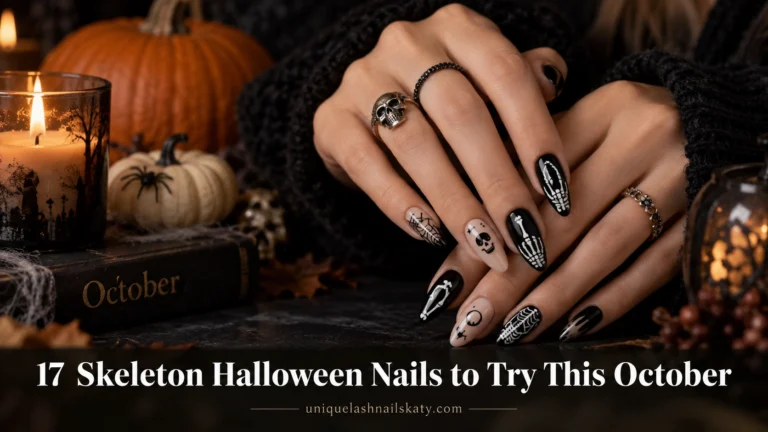
Unlike softer Halloween sets, this manicure goes fully graphic with glossy black nails, white skeletal fingers, and a grinning skull centerpiece. The tapered almond shape gives the bone details enough length to stay recognizable while keeping the overall look sleek.
Best For — Costume parties with graphic monochrome style
Pro Tip — Sketch each bone with three tiny guide dots first, then connect them using a fine nail art liner brush no wider than about 7 mm at the bristle length.
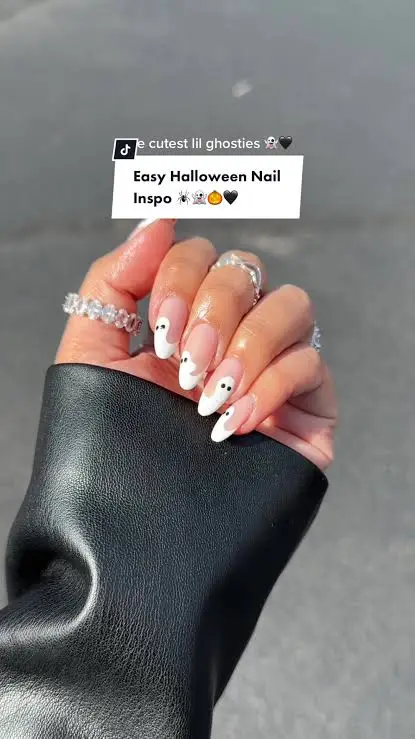
#3. White Ghost French Tips
This one’s for anyone who wants Halloween nails without giving up a clean, feminine manicure. Creamy white asymmetrical French tips stretch into tiny ghost shapes, while simple black dot eyes make each little character noticeable without crowding the nude base.
Best For — Beginner DIY sets and subtle costumes
Pro Tip — Make both ghost eyes with the same 1 mm dotting-tool tip, wiping the tool after every two nails to keep the dots crisp.
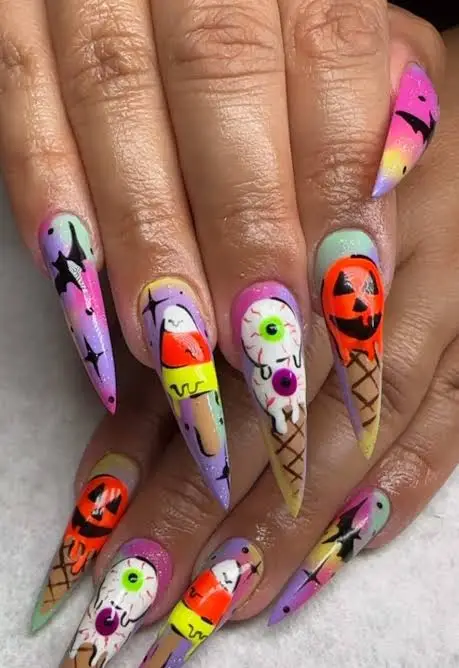
#4. Pastel Monster Ice Cream Stilettos
Pastel purple, mint, pink, and yellow turn this Halloween manicure into a colorful candy-shop fantasy. Long pointed nails are packed with melting eyeball ice creams, bright orange jack-o’-lantern details, black stars, and playful monster-inspired artwork.
Best For — Bold creatives who love playful horror
Pro Tip — Finish one illustrated element at a time and leave roughly 2 mm of visual space around each major motif so the detailed artwork stays readable.
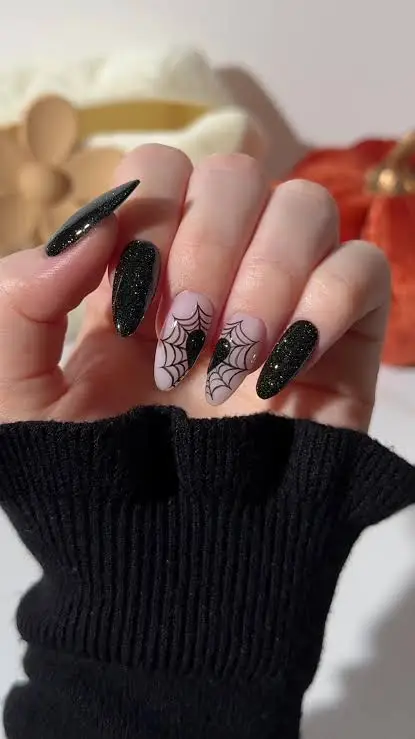
#5. Black Glitter Spiderweb Almonds
Black glitter gives the outer nails a midnight sparkle, while two translucent accent nails carry delicate black spiderwebs that keep the manicure light and elegant. The contrast between dense shimmer and bare-looking negative space is what makes this set feel especially polished.
Best For — Elegant Halloween dinners and evening events
Pro Tip — Draw three web spokes first, then connect them with small curved lines using a spiderweb nail art sticker or detail brush as your guide.
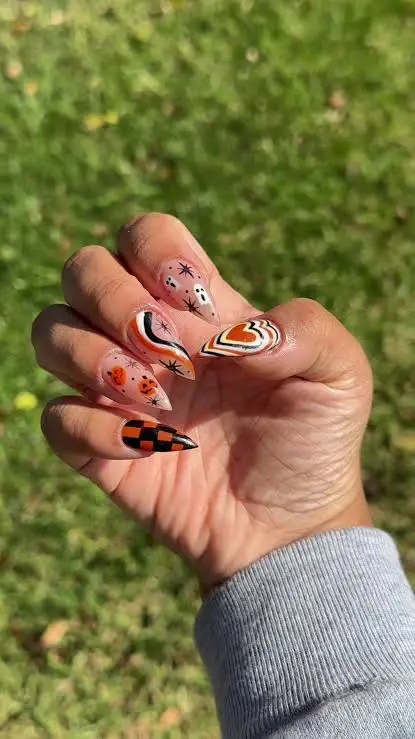
#6. Nude Retro Halloween Mix
Warm nude bases let burnt orange, black, and cream details take center stage in this retro-inspired set. Checkerboard blocks, curved stripes, tiny ghosts, stars, and a miniature pumpkin give every nail its own personality without losing the coordinated fall palette.
Best For — Retro fall outfits and pumpkin-patch days
Pro Tip — For clean checkerboards, divide the accent nail into four main blocks before filling alternating sections instead of painting each square independently.
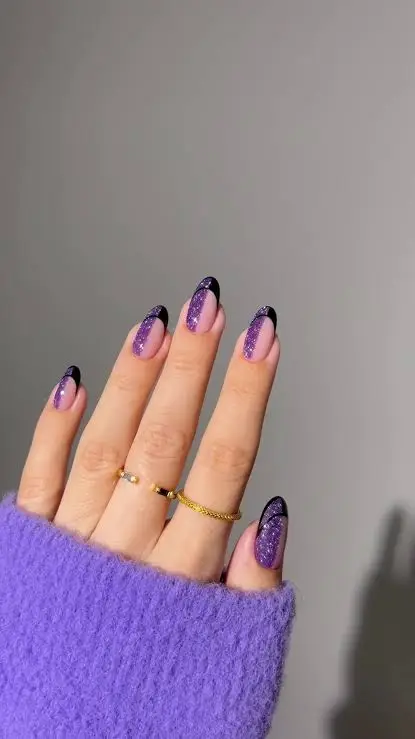
#7. Purple Cat-Eye French Tips
Deep violet sparkle sweeps diagonally across a sheer pink base, finishing with slim black edges that make these nails feel quietly witchy. The magnetic-looking shimmer shifts with the light, while the pointed almond shape keeps the purple tips sharp and refined.
Best For — Purple lovers wanting understated spooky sparkle
Pro Tip — With magnetic cat-eye gel, hover the magnet about 3–5 mm above the uncured tip for 5–10 seconds before curing according to your gel system.
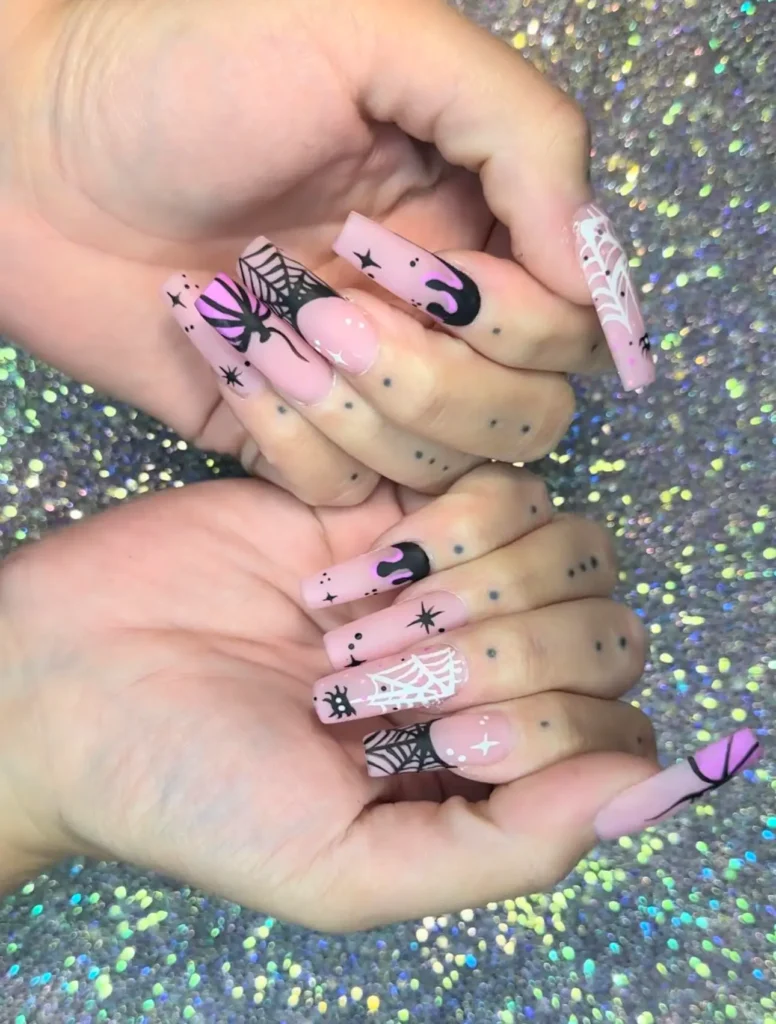
#8. Pink Spiderweb Drip Coffins
Bubblegum pink coffin nails become instantly spookier with oversized black spiders, web patterns, tiny stars, and glossy black drips touched with purple. The long squared shape provides enough canvas for the designs to stay bold instead of looking compressed.
Best For — Statement manicures and Halloween photo shoots
Pro Tip — Build each drip with three dots placed roughly 2–3 mm apart, then pull each dot upward with a liner brush before connecting them across the tip.
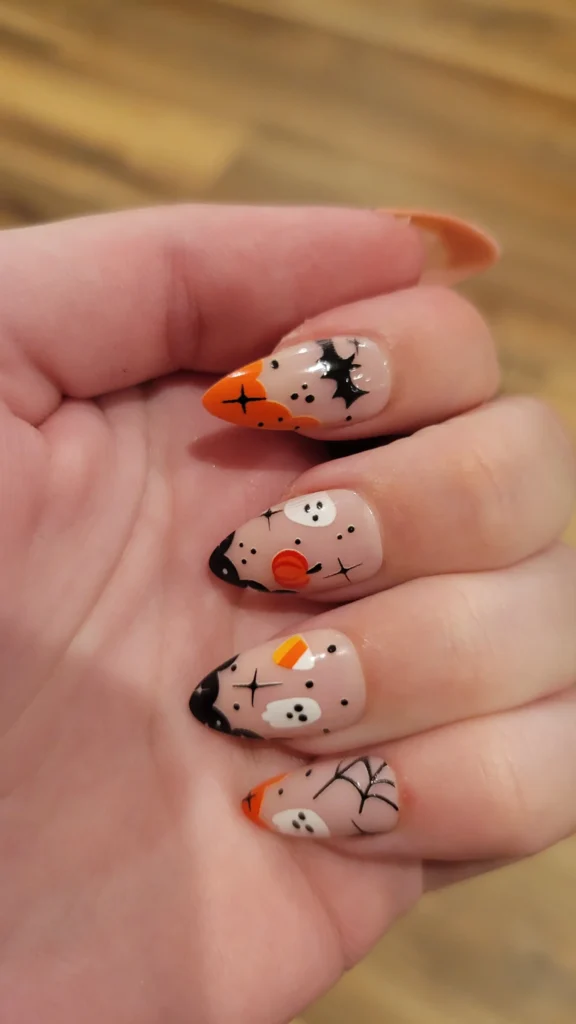
#9. Nude Pumpkin Ghost Minis
A glossy nude base keeps this miniature Halloween artwork sweet and surprisingly wearable. Tiny white ghosts, orange pumpkin shapes, candy-corn colors, black bats, dots, and starbursts are scattered across compact pointed nails like little seasonal stickers.
Best For — Cute spooky looks on shorter nails
Pro Tip — Use a 1 mm dotting tool for eyes and stars, and keep each mini illustration inside roughly the center two-thirds of the nail plate.
 Save
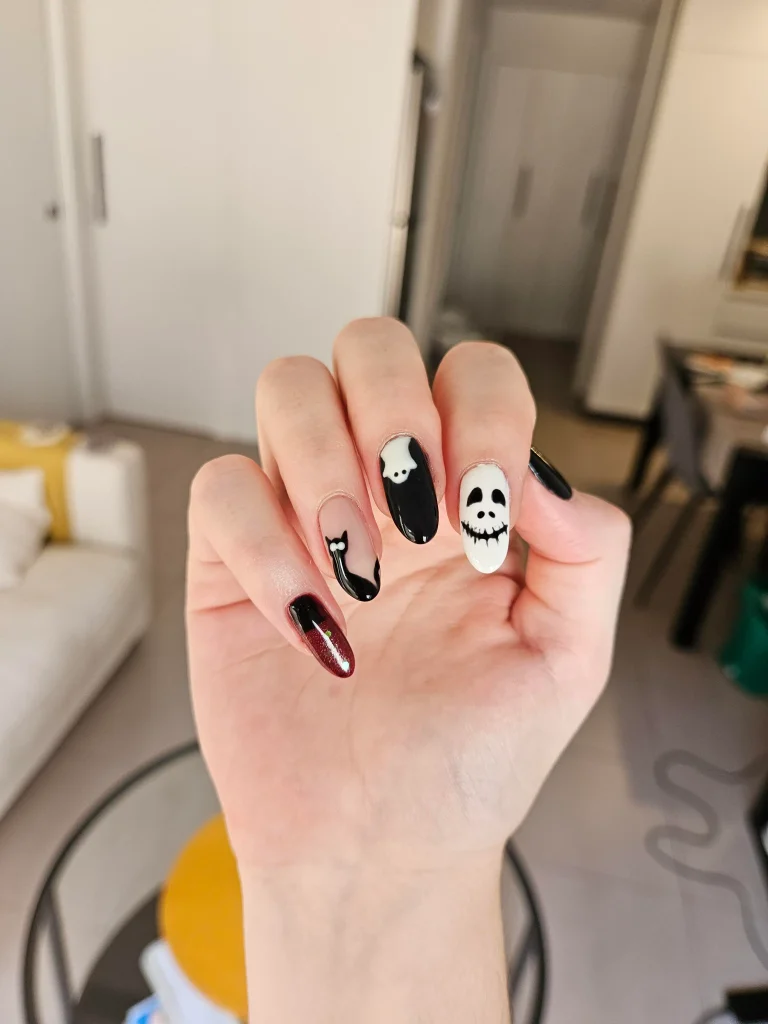
Save#10. Black Skull and Cat Art
Black and white character art gives this manicure a playful gothic personality, especially with the tall white skull face and tiny black cat accent. A deep burgundy shimmer nail breaks up the monochrome palette and adds an unexpected flash of color.
Best For — Dark character-inspired Halloween party styling
Pro Tip — Paint the large black-and-white silhouettes first, then add facial details with a 5–7 mm liner brush only after the base artwork is completely set.
 Save
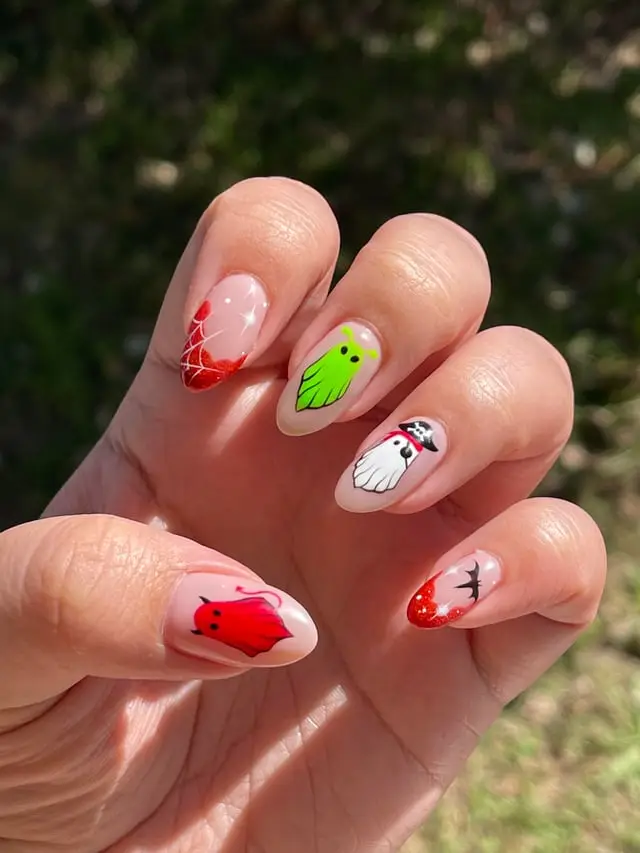
Save#11. Nude Neon Ghost Accents
Bright red, lime green, and crisp white ghost characters stand out beautifully against a clear nude background. Glittery red tip sections and tiny cobweb details add Halloween energy while the medium almond length keeps the playful illustrations easy to wear.
Best For — Color lovers wanting friendly ghost art
Pro Tip — Paint the bright ghost bodies in two thin coats, then use the smallest tip in a nail art dotting tool set for evenly sized faces.
 Save
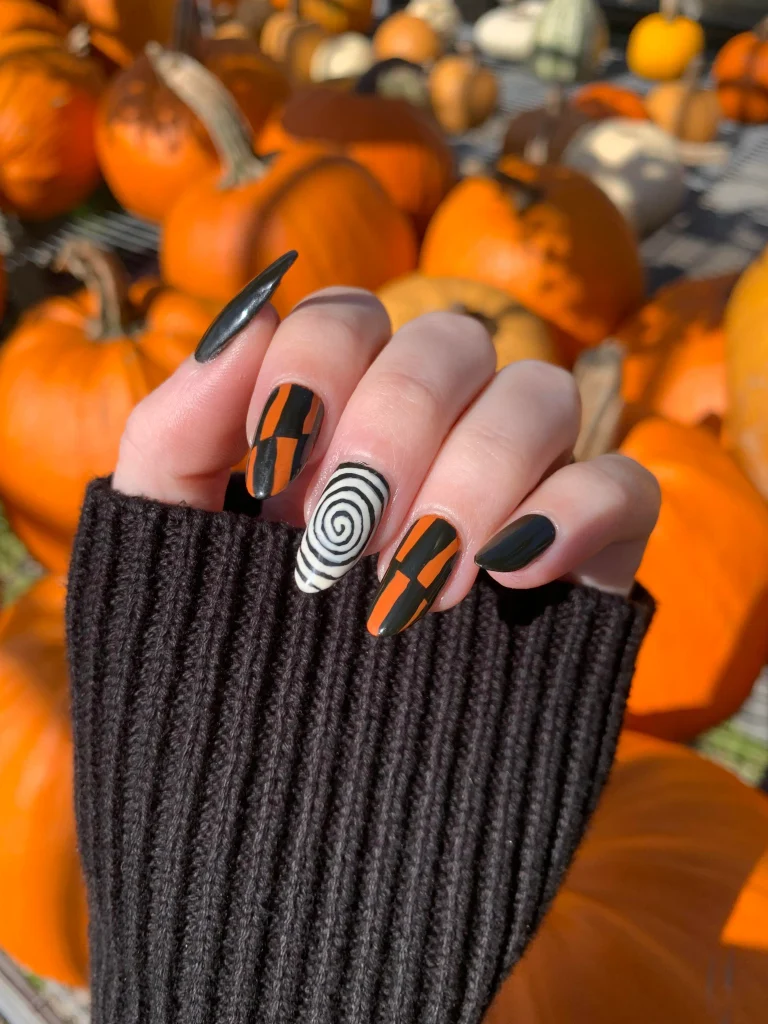
Save#12. Orange Black Hypnotic Nails
Set against a pumpkin-filled background, this black-and-orange manicure feels like Halloween in its purest graphic form. Bold angular orange stripes sit beside solid black nails, while one white-and-black spiral accent creates a hypnotic focal point.
Best For — Pumpkin-patch weekends and graphic nail fans
Pro Tip — Begin the spiral from a center dot and keep approximately 1–2 mm of white space between each black loop as you work outward.
 Save
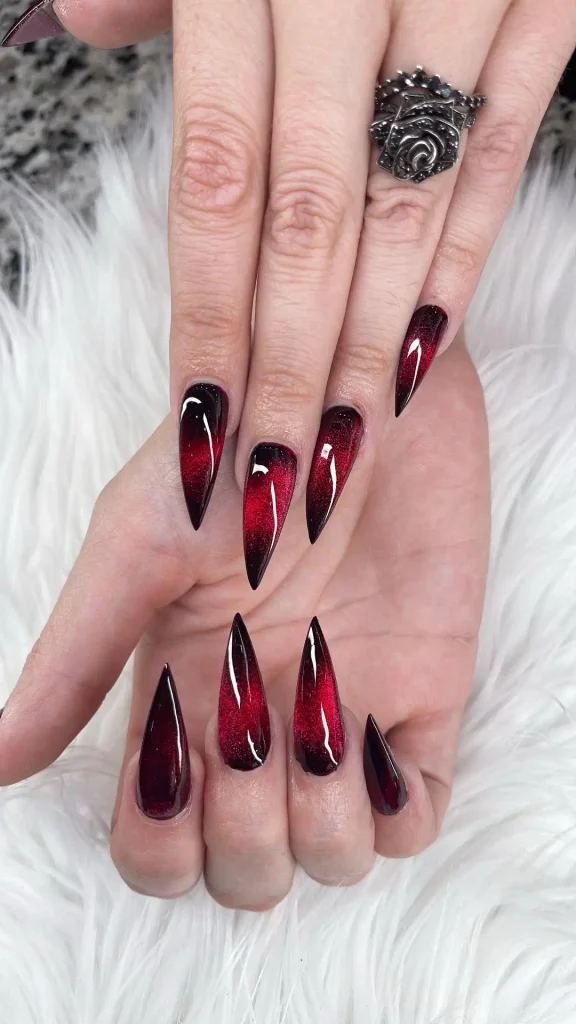
Save#13. Red Black Cat-Eye Stilettos
No ghosts are needed for this dramatic Halloween look—the color and shape do all the work. A luminous crimson magnetic center fades into black-burgundy edges across razor-sharp stiletto nails, creating a dark jewel effect that looks especially striking under evening light.
Best For — Glam Halloween nights and dramatic outfits
Pro Tip — Hold a cat-eye magnet roughly 3 mm above the wet gel for about 10 seconds to concentrate the brightest line before curing.
 Save
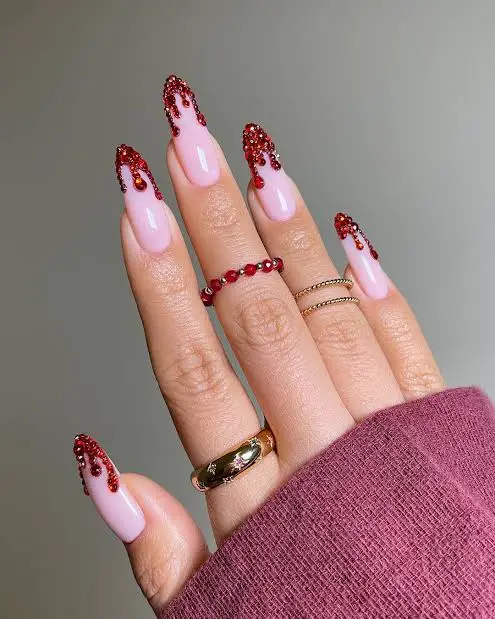
Save#14. Blush Red Rhinestone Drips
A milky blush base makes the deep red crystal-covered tips look almost like jeweled droplets flowing downward. The manicure balances Halloween drama with romantic sparkle, and the pointed almond silhouette keeps those dense red embellishments from feeling heavy.
Best For — Dressy Halloween events and romantic looks
Pro Tip — Place 1–2 mm crystals from the tip downward into thick gem gel, leaving a small gap around the cuticle so the embellishment never touches skin.
 Save
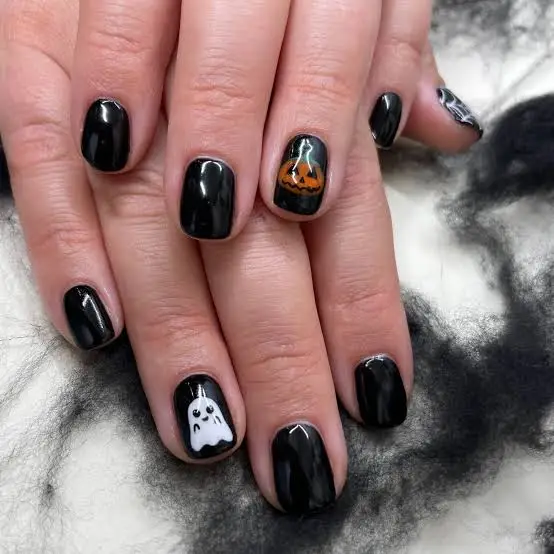
Save#15. Short Black Pumpkin Ghosts
Short glossy black nails prove you don’t need extra length for recognizable Halloween nail art. One orange jack-o’-lantern and one tiny white ghost become the stars of the manicure, while the remaining solid nails keep the set clean and unfussy.
Best For — Short-nail wearers wanting easy seasonal art
Pro Tip — Keep detailed artwork to one or two accent nails and use a 1–1.5 mm dotting tool for facial features so the design stays readable on short plates.
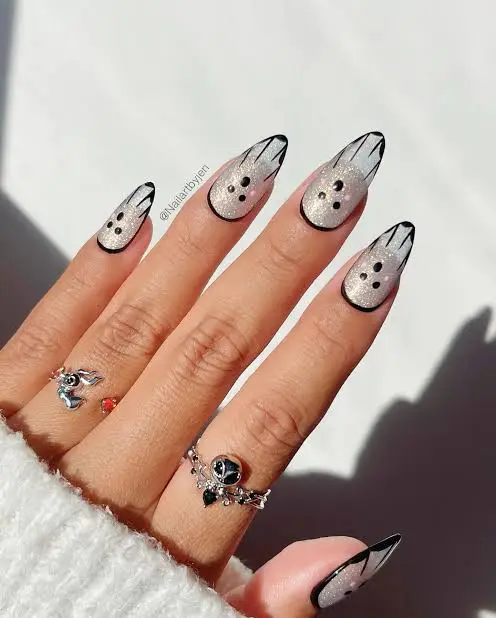
#16. Silver Ghost Outline Tips
Silvery shimmer and translucent negative space give this ghost manicure an icy, almost ethereal finish. Thin black outlines trace pointed French edges around pale ghost faces, with tiny dark eyes creating just enough contrast to make the artwork pop.
Best For — Minimalists who still want Halloween detail
Pro Tip — Mark the center of every tip first, then pull two thin lines toward that point so the black outline stays symmetrical from side to side.
 Save
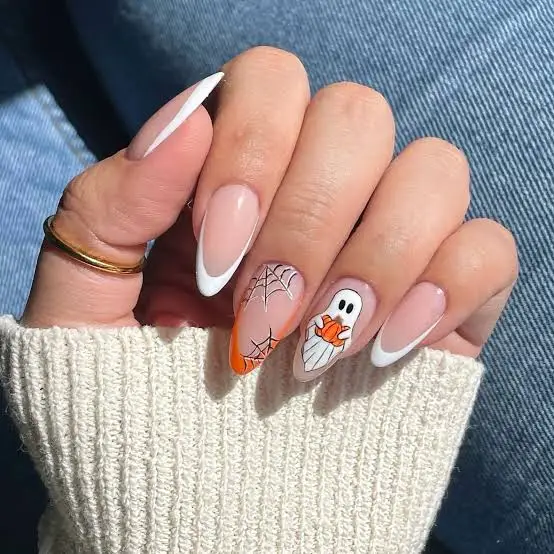
Save#17. Nude Ghost Pumpkin French
Classic white French tips meet a tiny cobweb, orange pumpkin, and adorable white ghost for a Halloween manicure that still feels bright and polished. The sheer pink base and medium almond shape make this one especially approachable if elaborate dark nail art isn’t your style.
Best For — Casual autumn days and beginner nail art
Pro Tip — Paint all French tips first and let them set before adding the ghost and pumpkin; this separates the two steps and makes accidental smudging easier to avoid.
 Save
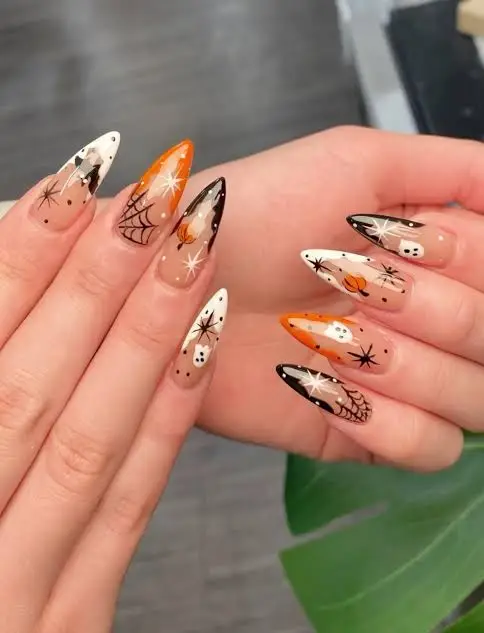
Save#18. Nude Orange Spiderweb French
Orange, black, cream, and sheer nude combine across pointed nails decorated with webs, tiny ghosts, starbursts, and alternating French-tip patterns. Because each nail uses a different arrangement while repeating the same four-color palette, the whole set looks detailed without becoming chaotic.
Best For — Classic Halloween colors with elegant shape
Pro Tip — Use orange and black nail art gel in alternating tip positions, then sweep top coat once across every free edge to seal the design.
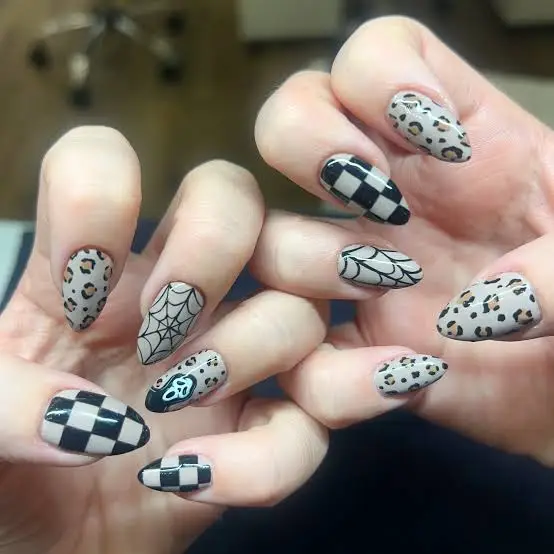
#19. Beige Checker Leopard Webs
Neutral beige turns edgy when it’s mixed with black-and-white checkerboards, leopard-like spots, spiderweb lines, and tiny illustrated accents. The varied patterns across both hands feel intentionally mismatched, making this a fun option if you like Halloween designs that aren’t built around orange polish.
Best For — Pattern lovers craving an edgy manicure
Pro Tip — Assign one main pattern to each nail before you begin, then repeat only one small element—such as a black line or dot—to tie the full set together.
How to Choose the Right Nail Design
The best Halloween nails are the ones that fit your natural nails, your plans, and the amount of detail you’re comfortable creating.
- Consider your nail shape — Long almond and stiletto nails give webs, skeletons, and illustrated designs extra room. Short round or square nails often look strongest with one clear motif, such as the tiny pumpkin-and-ghost set above.
- Work with your skin tone — Sheer pink, nude, burgundy, purple, orange, and black can all be adjusted warmer or cooler. Choose the nude base you already know looks natural against your hands, then build the Halloween colors over it.
- Match the occasion — A Halloween party can handle bold skeletons, rhinestones, or monster art, while workdays and dinners may call for ghost French tips, dark cat-eye polish, or a simple spiderweb accent.
- Be realistic about skill level — Beginners can start with dots, French tips, stickers, and one accent nail before trying detailed character painting. For more easy techniques, this guide to simple nail art for beginners shows how small accents and decals can create a finished look without advanced freehand work.
What You’ll Need
You don’t need every nail-art product at once. A small group of precise tools can recreate many of the ghosts, webs, dots, drips, and graphic tips in this list.
Useful for spiderwebs, skeleton lines, French edges, and tiny details.
Creates even ghost eyes, pumpkin faces, dots, and mini accents.
A shortcut for detailed ghosts, pumpkins, bats, and spiderwebs.
Covers the classic Halloween palette used throughout these designs.
Creates luminous purple or red dimensional effects with minimal painting.
Adds gem-covered drips and dimensional accents to dressier manicures.
Helps refine almond and pointed shapes before you begin painting.
If your file has been in your manicure kit for a long time, check this guide on when nail files need replacing before doing your prep work.
Pro Tips for a Long-Lasting Manicure
Start With a Clean Surface
Remove visible dust and residue before applying your base. Give each nail roughly 10 seconds of attention with a lint-free wipe, including the sidewalls where lifting often starts.
Keep Your Layers Thin
Two controlled thin coats are easier to manage than one heavy layer, especially around detailed Halloween art. Leave a tiny gap of about 0.5–1 mm from the skin instead of flooding the cuticle.
Seal the Free Edge
After finishing the surface, lightly sweep your top coat once across the free edge. This is especially useful on French tips because the painted design reaches the part of the nail most likely to meet everyday wear.
Protect Raised Decorations
For rhinestones and dimensional accents, secure the base of each decoration rather than burying the entire top in product. Check all sides after finishing and smooth any edge that catches on fabric.
Frequently Asked Questions
Q: What are easy Halloween nails for beginners?
A: Try white ghost French tips, a black manicure with one pumpkin accent, or nude nails with tiny dots and stars. These looks use simple shapes and let you practice on one or two accent nails rather than painting every nail freehand.
Q: Can you do Halloween nails on short nails?
A: Yes. Short nails look great with miniature pumpkins, ghosts, black polish, checkerboards, simple webs, or one accent design; keeping each motif compact usually gives the manicure a cleaner appearance.
Q: What colors work well for Halloween nails?
A: Black and orange are classic, but burgundy, deep red, purple, silver, white, nude, and even pastel shades can work beautifully. Choose two or three main colors first, then use smaller accent shades so detailed sets still feel coordinated.
Q: How can I make Halloween nail art look cleaner?
A: Map detailed artwork with dots or thin guide lines before filling it in, and work from the largest shapes to the smallest details. A fine liner brush and small dotting tool give you much more control over webs, eyes, stars, and character faces.
Recommended Product
Fine Liner Nail Art Brush Set
★★★★☆ Useful for detailed nail art
A set of fine liner brushes can make small Halloween details such as spiderwebs, ghost faces, drips, and outlined French tips easier to control.
As an Amazon Associate, we earn from qualifying purchases.
Final Thoughts
Halloween nails don’t have to fit one mood. You can go dark with skeletons and cat-eye red, keep things cute with tiny ghosts and pumpkins, or mix both sides of the season in one playful manicure.
Choose the look that fits your nail length and skill level, then borrow individual details from the other designs to make it your own.
Which of these nail looks are you trying first? Save this post to Pinterest so you can come back to it whenever you need fresh nail inspo!

Hi, I’m Jessica, the creator behind Unique Lash & Nails Katy.
I created this website for anyone who loves beautiful nails as much as I do. Here, I share trendy nail designs, seasonal manicure ideas, easy nail care tips, honest product recommendations, and step-by-step guides to help you create salon-worthy nails at home. Whether you’re looking for everyday inspiration or your next favorite nail trend, I hope you’ll find something you love.