17 Pumpkin Halloween Nails for Cute Spooky Manicures
Pumpkin Halloween nails are one of the easiest ways to make your manicure feel festive without committing to an overly scary look. From tiny jack-o’-lantern faces to glossy orange polish, there are plenty of ways to make pumpkins work with your personal style.
Below, you’ll find 17 ideas ranging from simple short nails to detailed ghosts, checkerboards, French tips, and dramatic Halloween art. Use them as salon inspiration or adapt the details for your next at-home manicure.
✦ Our Top Picks at a Glance
Best Overall — Black Ghost Pumpkin Drips
Best for Beginners — Glossy Orange Pumpkin Accents
Most Trendy — 3D Pumpkin French Tips
Best for Special Occasions — Ghost Checker Pumpkin Nails
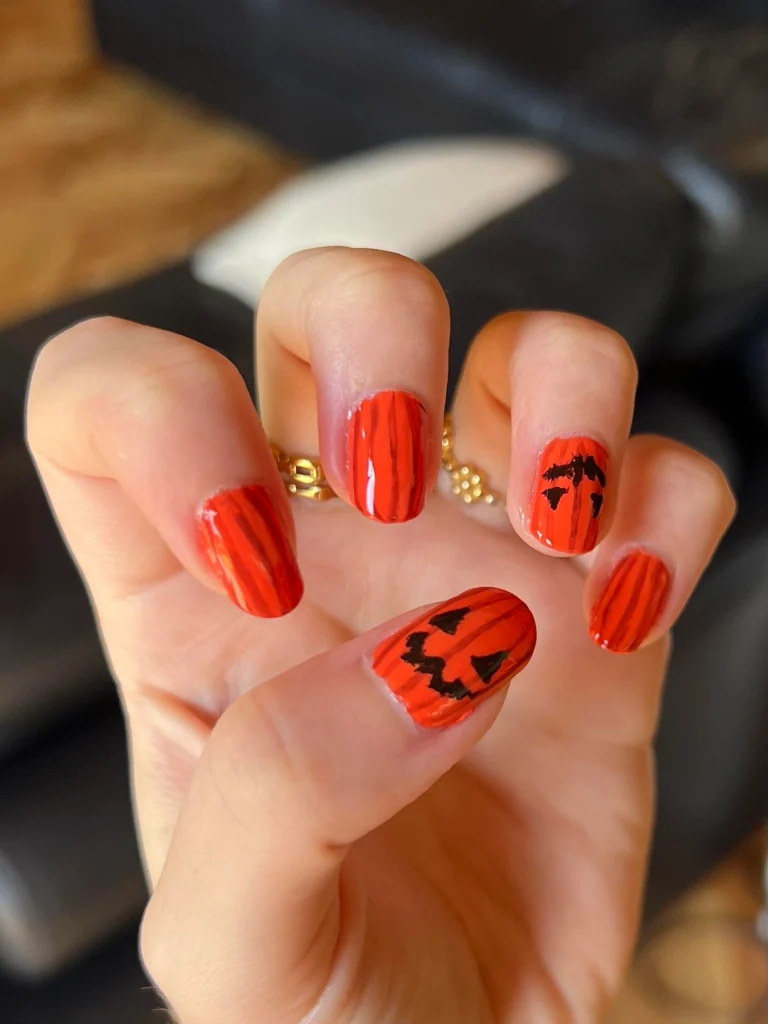


#1. Striped Orange Pumpkin Faces
Bold orange-red polish gets extra dimension from fine vertical stripes, while the thumb turns into a playful jack-o’-lantern with sharp black eyes and a crooked smile. The tiny black face detail on another nail keeps the set coordinated without making every finger identical.
Best For — Easy hand-painted Halloween nail art
Pro Tip — Use a 7-10 mm liner brush for the dark stripes, then wait about 60 seconds before adding the black pumpkin face so the lines don’t drag.
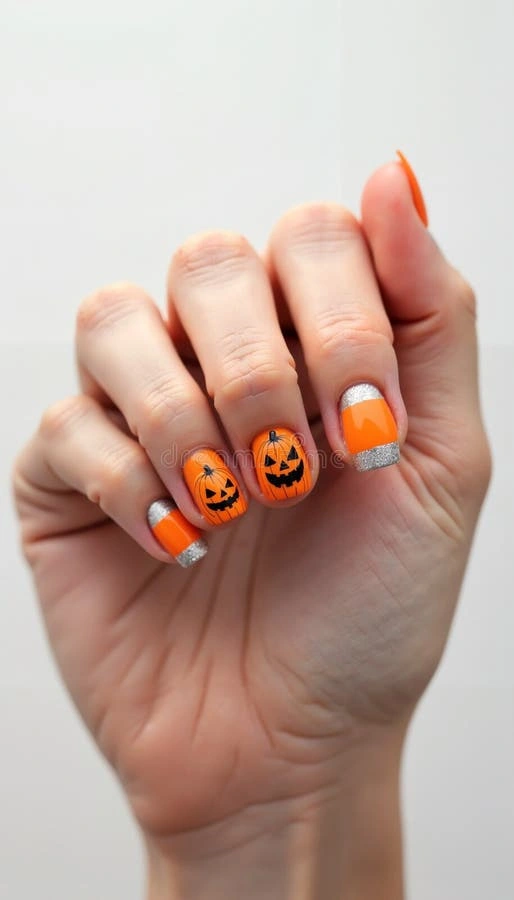
#2. Orange Pumpkin Silver Tips
For a brighter take on pumpkin Halloween nails, this short manicure pairs cheerful orange jack-o’-lanterns with crisp silver glitter sections. The sparkling bands give the playful pumpkin faces a slightly dressier finish that’s perfect when you want Halloween color without a dark base.
Best For — Short nails and Halloween parties
Pro Tip — Create the silver sections with a flat 5 mm brush, then clean the edge with a tiny angled brush dipped lightly in acetone.
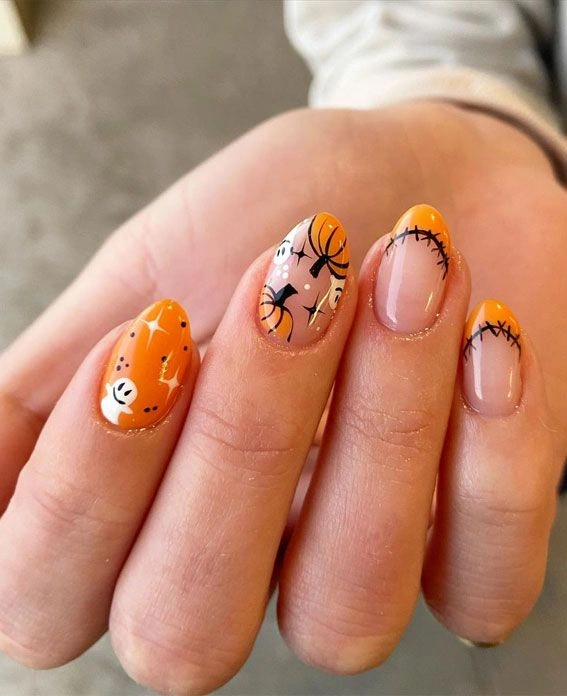
#3. Orange Pumpkin Stitch Mix
This design mixes glossy orange, soft nude, pumpkin shapes, little spooky characters, and stitched black accents across almond-shaped nails. Because the artwork changes from finger to finger, the manicure has that collected Halloween-sticker feel without looking overcrowded.
Best For — Detailed Halloween nail-art lovers
Pro Tip — Sketch the pumpkin circles first with a size-1 detail brush, cure for 30-60 seconds, and add the black outlines only after the orange is fully set.
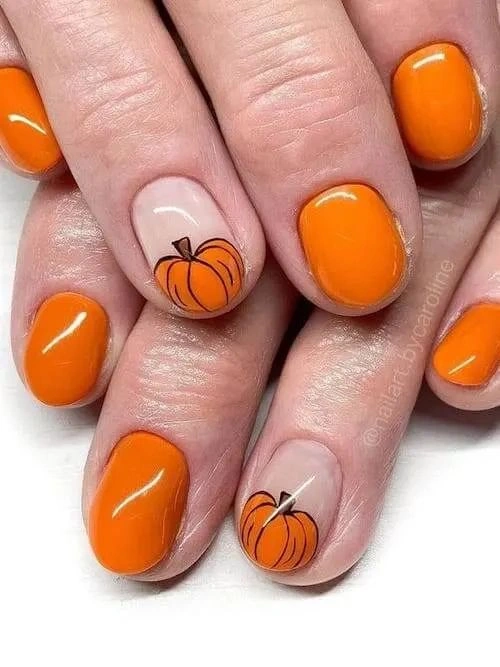
#4. Glossy Orange Pumpkin Accents
If complicated Halloween nail art isn’t your thing, glossy tangerine polish does most of the work here. Two creamy nude accent nails feature simple outlined pumpkins, giving the short rounded manicure a clean seasonal focal point.
Best For — Beginners wanting simple pumpkin nails
Pro Tip — Paint the pumpkin as three overlapping oval strokes with a fine nail art liner brush, keeping each curved line under about 1 mm wide.
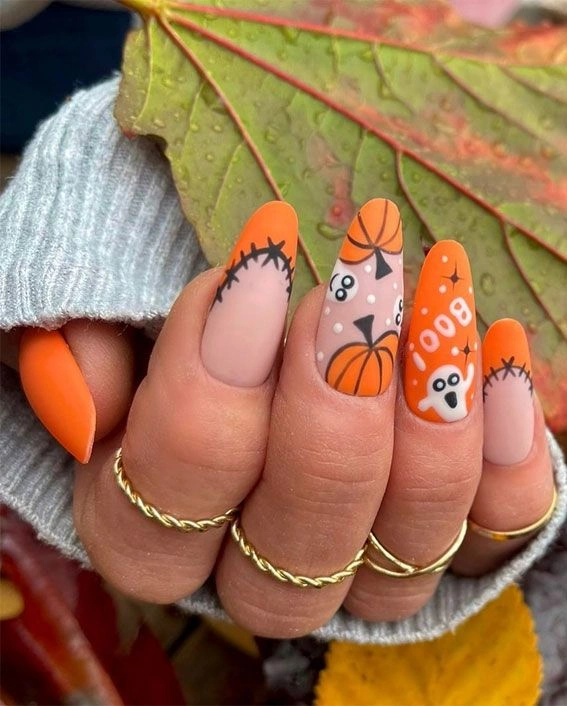
#5. Orange Boo Pumpkin Mix
Long almond nails give this orange-and-nude set enough room for pumpkins, ghost art, stitched French details, and a playful “boo” accent. The soft neutral negative space keeps all that Halloween imagery surprisingly wearable.
Best For — Playful October weekend manicures
Pro Tip — Leave roughly one-third of each stitched-tip nail nude, then draw the stitches perpendicular to the orange border with a 5-7 mm liner brush.
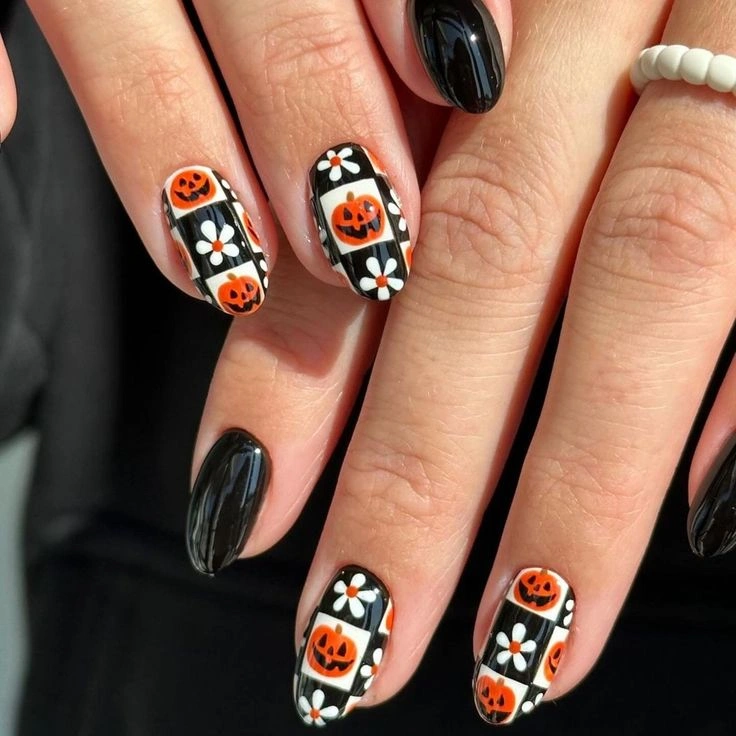
#6. Checkerboard Pumpkin Daisy Nails
Unlike the softer pumpkin looks, this manicure goes graphic with glossy black nails and black-and-white checkerboard accents. Orange jack-o’-lanterns and tiny white daisies sit inside the checked pattern, creating a fun retro contrast.
Best For — Retro Halloween and graphic styles
Pro Tip — Divide the nail into 2-3 mm squares using a thin striping brush before filling alternating sections, which helps the checkerboard stay visually even.
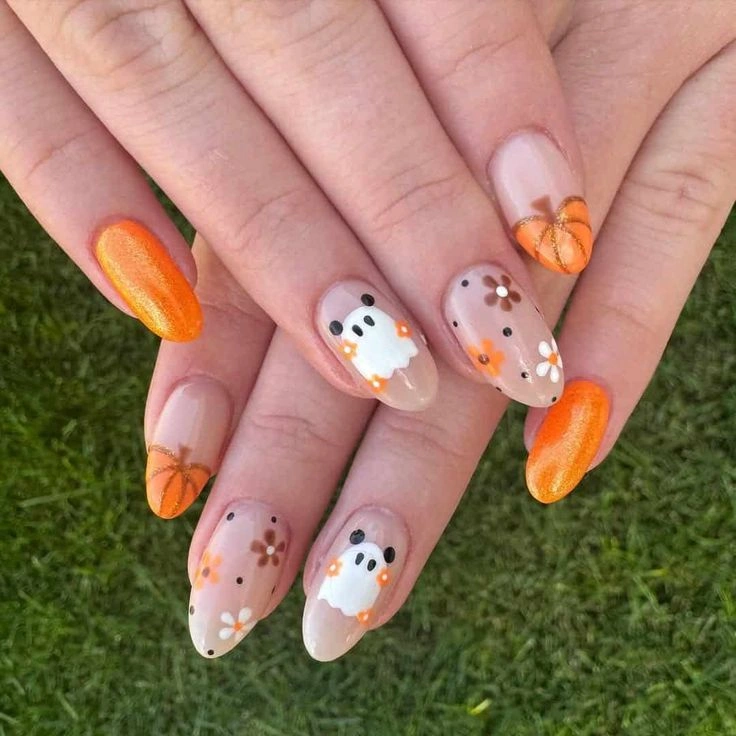
#7. Nude Ghost Pumpkin Florals
Soft nude polish makes the little white ghosts, orange pumpkin tips, tiny flowers, and scattered dots feel delicate instead of spooky. Shimmery orange outer nails add a warm autumn glow while the transparent center nails keep everything airy.
Best For — Cute feminine Halloween outfits
Pro Tip — Make each small flower with five dots from a nail art dotting tool, then place one contrasting dot directly in the center.
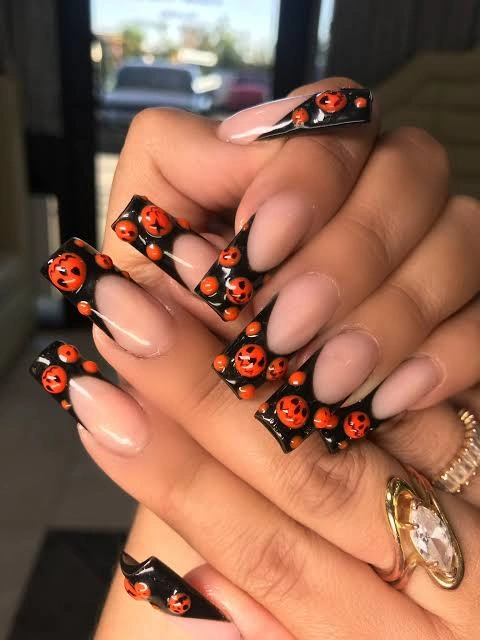
#8. 3D Pumpkin French Tips
This one’s made for maximum Halloween drama: extra-long square nails have nude centers framed by glossy black French tips covered in raised orange pumpkin faces. The dimensional pumpkins catch the light like tiny charms, making the tips the clear centerpiece.
Best For — Halloween events and statement nails
Pro Tip — Secure each 3D charm with a small bead of thick nail gel, hold it in place for 10-15 seconds, then fully cure according to your gel system.
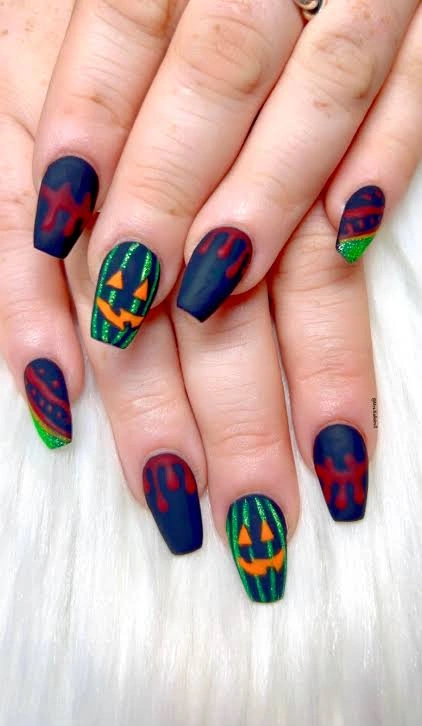
#9. Matte Midnight Pumpkin Drips
Deep midnight-blue coffin nails set a moodier background for red drips and bright jack-o’-lantern accents. The touches of sparkling green around the pumpkin faces make this one of the most unexpected color combinations in the collection.
Best For — Dark colorful Halloween manicures
Pro Tip — Build each drip with three small dots near the cuticle, then pull each dot upward using a 7 mm liner brush before the polish starts to level.
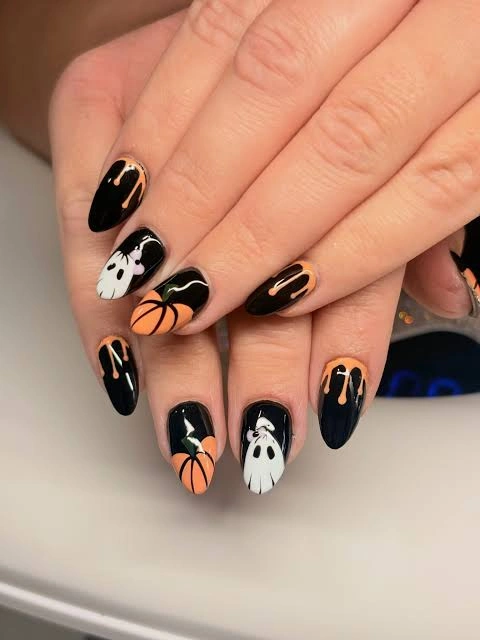
#10. Black Ghost Pumpkin Drips
Glossy black almond nails look instantly Halloween-ready beside white ghosts and orange pumpkins, while thin caramel-orange drips soften the otherwise dark palette. The alternating motifs make every finger interesting without losing the clean black-and-orange theme.
Best For — Classic spooky-season color lovers
Pro Tip — Apply a glossy no-wipe gel top coat over the entire design and cap the free edge with one thin horizontal stroke.
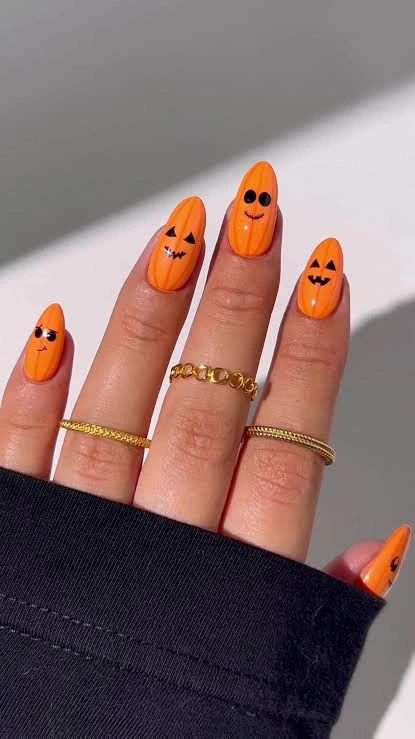
#11. Minimal Orange Pumpkin Faces
Bright pumpkin-orange almond nails become surprisingly expressive with a different tiny black face on each finger. Some are sweet, some look mischievous, and the simple gold rings in the photo reinforce the clean minimal styling.
Best For — Minimalists who still love Halloween
Pro Tip — Use the smallest end of a dotting tool for eyes, keeping them about 2-3 mm apart so the expressions stay readable on shorter nail beds.
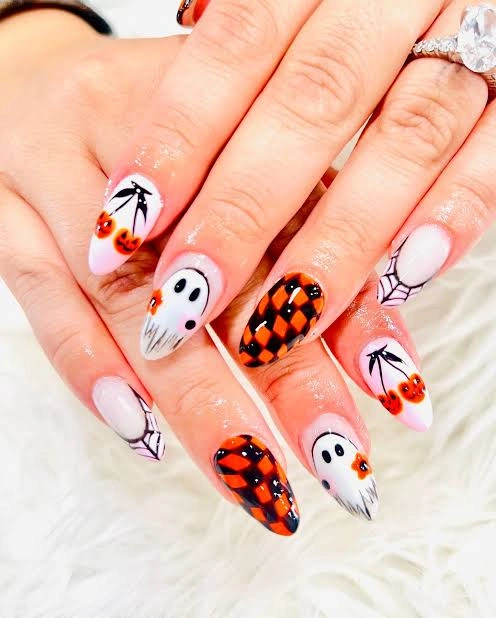
#12. Ghost Checker Pumpkin Nails
White almond nails create a bright canvas for black spiderwebs, floating ghosts, tiny pumpkins, and bold orange-and-black checkerboards. It’s detailed enough for a Halloween party manicure, yet the pale base keeps the finished set crisp and photo-friendly.
Best For — Costume parties and Halloween photos
Pro Tip — For the web, draw 3-4 thin lines from one corner first, then connect them with shallow curved arcs using a fine nail art brush.
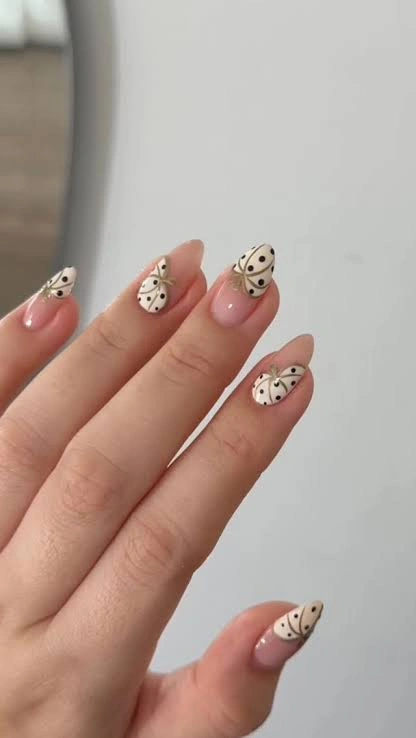
#13. Neutral Pumpkin French Tips
Halloween doesn’t always need orange and black. These nude almond nails use creamy ivory pumpkin shapes, fine dark outlines, and tiny dot details near the tips for a soft autumn manicure that still reads seasonal.
Best For — Work-friendly subtle Halloween manicures
Pro Tip — Keep the pumpkin section within the upper 25-30% of the nail to preserve the elongated French-tip effect on almond shapes.
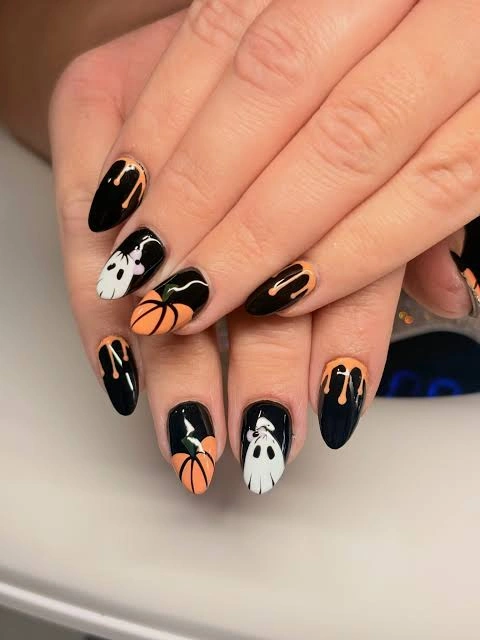
#14. Glossy Pumpkin Ghost Mix
Here’s another glossy black approach, with plump orange pumpkins, white ghost characters, and fine orange drips spread across almond nails. Focusing the illustrated accents on only a few nails lets the solid black fingers act as visual breathing room.
Best For — Glossy black Halloween nail fans
Pro Tip — Paint the white ghost silhouette in one thin layer, cure for 60 seconds with your compatible lamp, then add its black face so the features stay sharp.
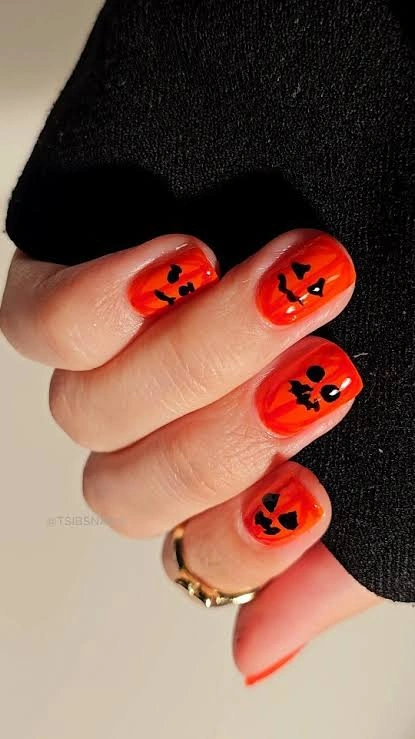
#15. Jelly Orange Pumpkin Faces
Translucent orange polish gives these short nails a glowing candy-like finish, while tiny black jack-o’-lantern expressions bring the Halloween theme into focus. Against the black sleeve, the warm jelly color looks especially luminous.
Best For — Short trendy October nail looks
Pro Tip — Build a jelly effect with 2-3 very thin coats of orange jelly gel polish rather than one opaque coat.
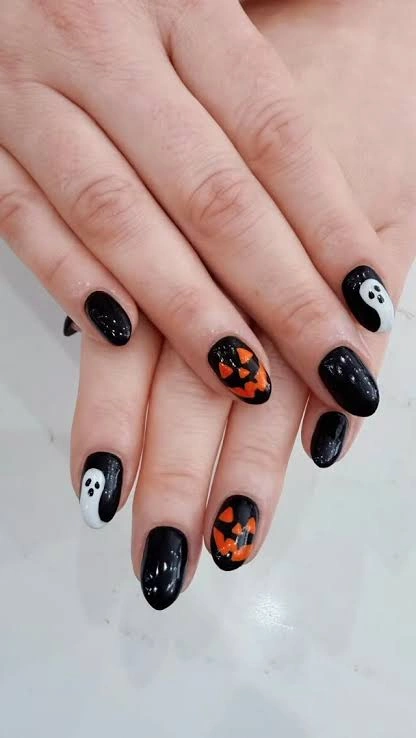
#16. Black Ghost Pumpkin Checks
Mostly black oval nails make the orange-and-black checker accents and white ghost tips stand out immediately. A few warm orange squares break up the darkness, giving this manicure a compact graphic look that works well on natural lengths.
Best For — Short dark nails with accents
Pro Tip — Place the checker pattern on just 1-2 nails per hand and use squares around 2 mm wide so the design doesn’t overwhelm a shorter nail plate.
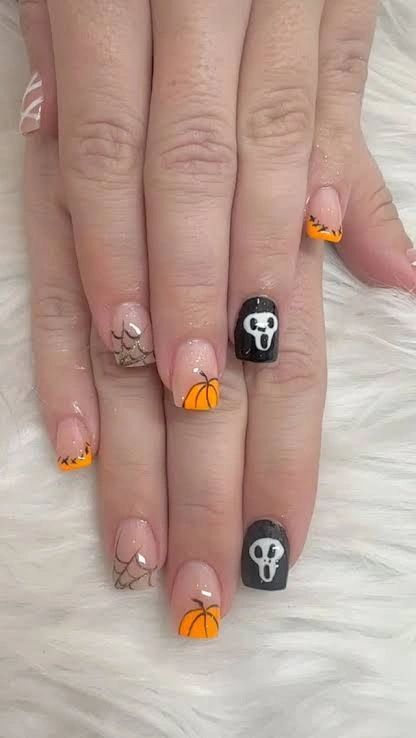
#17. Nude Pumpkin Scream Mix
Finishing the list is a soft nude manicure with orange pumpkin French details, wispy spiderwebs, delicate line art, and bold black nails featuring white scream-style faces. The contrast between barely-there neutral polish and dark graphic accents makes each small Halloween detail easy to notice.
Best For — Mixed-art Halloween salon sets
Pro Tip — Use a detail brush set with a 5-7 mm liner for webs and a shorter 3-5 mm brush for the small pumpkin outlines.
How to Choose the Right Nail Design
The best pumpkin Halloween nails are the ones that fit your nail length, routine, and how much detail you actually enjoy wearing. A dramatic design can be gorgeous, but a simpler version may suit everyday life better.
- Think about nail shape — Almond and coffin nails give you more vertical space for ghosts, pumpkins, drips, and webs. Short round or squoval nails look especially polished with single pumpkin accents or tiny faces.
- Choose colors that flatter you — Bright tangerine creates strong contrast, while burnt orange, nude, cream, or black can make pumpkin designs feel softer or more sophisticated. Hold a few orange swatches near your hand before choosing.
- Match the design to the occasion — 3D charms and mixed-art manicures are fun for parties and photos. For work, school, or everyday wear, try nude pumpkin French tips or one small pumpkin accent.
- Be realistic about skill level — Solid orange nails with simple black faces are beginner-friendly. Checkerboards, detailed ghosts, miniature webs, and dimensional charms take more control and time.
What You’ll Need
You don’t need every nail-art tool available, but a few basics make pumpkin shapes and tiny Halloween details much easier to control.
The core color for pumpkins, French tips, stripes, and accents.
Useful for pumpkin curves, faces, webs, stitches, and thin outlines.
Helps create eyes, flower centers, dots, and smooth rounded details.
Gives pumpkin faces and fine Halloween outlines strong contrast.
Seals detailed artwork and gives pumpkins a smooth shiny finish.
Useful for sharpening French edges and cleaning polish near cuticles.
Pro Tips for a Long-Lasting Manicure
Prep Before You Paint
Gently push back the cuticle and remove surface shine with a fine buffer before applying your base coat. Keep products off the skin, because flooding the cuticle can encourage early lifting.
Work in Thin Layers
Two or three thin color coats usually create a smoother base than one heavy coat. Follow the curing time specified for your polish and compatible lamp rather than guessing.
Cure Details Separately
When you’re painting tiny faces, webs, or pumpkin lines, cure finished elements before adding artwork beside them. Separating the design into 2-3 stages helps prevent fine lines from bleeding together.
Seal the Free Edge
Run a very thin layer of top coat across the nail tip before the final cure. This small step helps protect the edge, especially on dark polish where tiny chips are easy to spot.
Frequently Asked Questions
Q: What colors look best for pumpkin Halloween nails?
A: Classic orange and black give the strongest Halloween look, but pumpkins also work beautifully with nude, cream, brown, silver, midnight blue, and even soft pink. Choose one dominant shade and use the others as small accents.
Q: Can I do simple pumpkin Halloween nails on short nails?
A: Yes. Short nails are ideal for tiny pumpkin faces, one outlined pumpkin accent, orange French tips, or a glossy solid-orange manicure with small black details.
Q: How do you paint a small pumpkin on nails?
A: Start with one center oval, add a curved oval on each side, then paint a tiny stem above it. Once the base is dry or cured, use a very thin brush for the outline and optional jack-o’-lantern face.
Q: What nail shape is best for detailed pumpkin Halloween nail art?
A: Almond, oval, coffin, and medium square nails provide useful space for larger artwork. If your nails are short, scale the pumpkin down and limit the detailed design to one or two accent fingers.
Recommended Product
Fine Nail Art Liner Brush Set
★★★★☆ Compare highly rated options on Amazon
A set of thin liner brushes makes it easier to control pumpkin curves, tiny faces, spiderwebs, stitches, and other detailed Halloween artwork.
As an Amazon Associate, we earn from qualifying purchases.
Final Thoughts
These pumpkin Halloween nails prove that pumpkin art can be cute, dramatic, minimal, elegant, or seriously spooky. Whether you’re drawn to simple orange faces, neutral pumpkin French tips, or a detailed ghost-and-checkerboard manicure, there’s plenty here to adapt to your own nail shape and skill level.
Which of these nail looks are you trying first? Save this post to Pinterest so you can come back to it whenever you need fresh nail inspo!

Hi, I’m Jessica, the creator behind Unique Lash & Nails Katy.
I created this website for anyone who loves beautiful nails as much as I do. Here, I share trendy nail designs, seasonal manicure ideas, easy nail care tips, honest product recommendations, and step-by-step guides to help you create salon-worthy nails at home. Whether you’re looking for everyday inspiration or your next favorite nail trend, I hope you’ll find something you love.