17 Black Cat Halloween Nails You’ll Want to Copy
Nothing says spooky season like a set of black cat nails peeking out from your fingertips. Whether you want a single subtle kitty tucked into a French tip or a full-on glossy black manicure with glowing eyes, there’s a look here for every nail length and skill level. Grab your polish and let’s find your perfect match.
✦ Our Top Picks at a Glance
Best Overall — Nude French Tip with Yellow-Eyed Cats
Best for Beginners — Minimalist Nude Cat Silhouette
Most Trendy — Holographic Ghost Swirl on Navy Glitter
Best for Special Occasions — Purple Gloss with Peekaboo Cat Faces
#1. Nude French Tip with Yellow-Eyed Cats
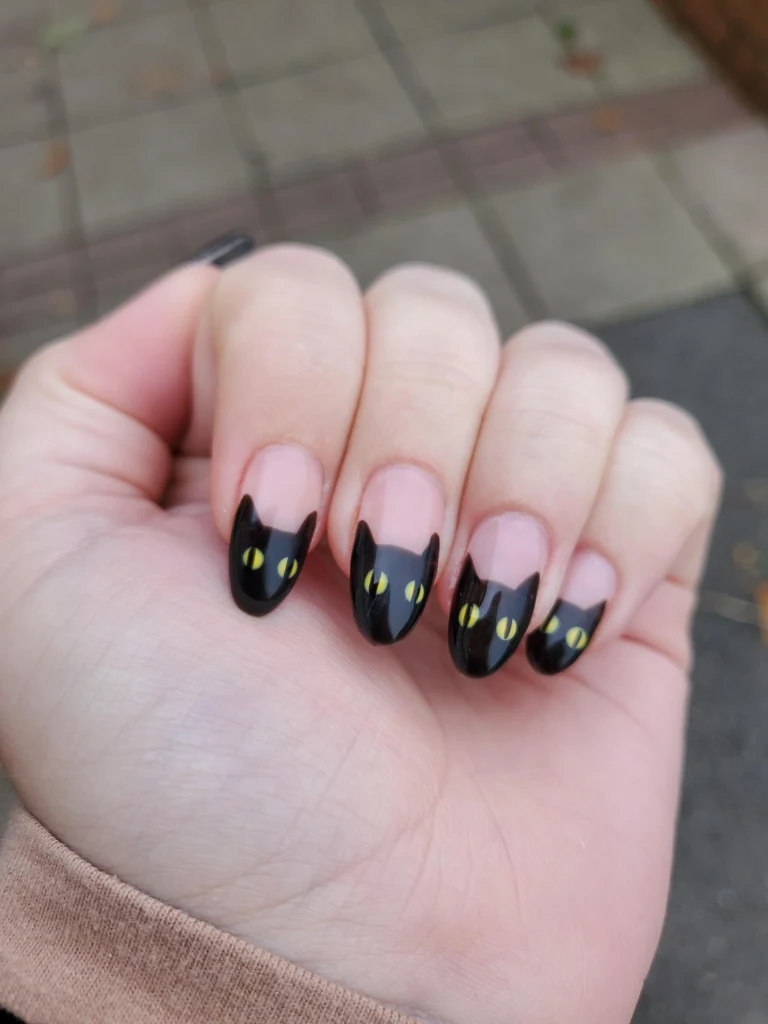
Picture a sheer pink-nude base with pointed black cat-ear tips creeping up from the edge of each nail. Two tiny yellow dots sit low on the black, giving the illusion of a cat peering over the tip line.
Best For — Anyone who wants Halloween nails that still read polished at work
Pro Tip — Use a fine detail brush held at a 45° angle to shape the ear points, then dot the eyes on last with a toothpick once the black base has cured for a full 60 seconds.
#2. Orange French Tips with Cat Paw Prints
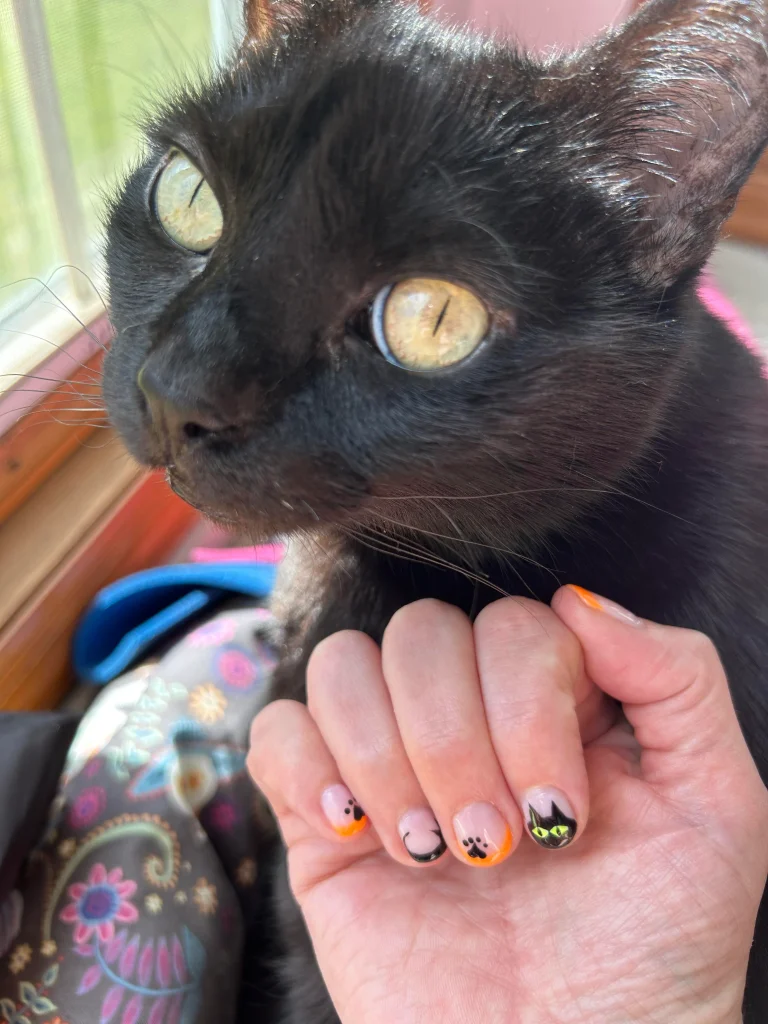
This one’s for the girls who want their Halloween nails to double as fall nails. Bright orange tips line a bare pink canvas dotted with tiny black paw prints and one sleek cat face on the accent finger.
Best For — Short nails that still need Halloween personality
Pro Tip — Dip a dotting tool once per paw print instead of reloading polish each time, so you get four evenly sized toe pads on the very first try.
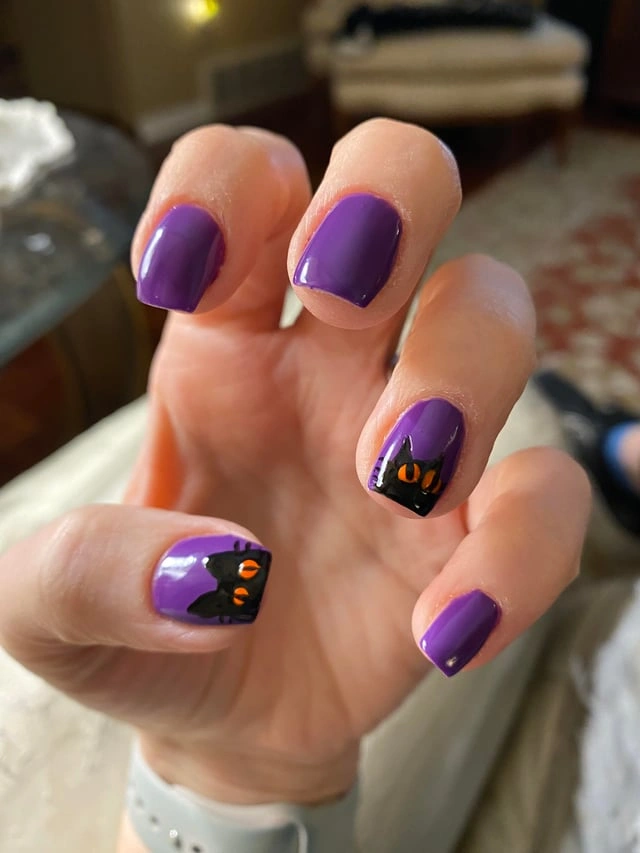
#3. Purple Gloss with Peekaboo Cat Faces
Unlike the softer nudes on this list, this look goes bold with a rich grape-purple base on every nail. Two accent nails hide a black cat face with glowing orange eyes tucked into the corner, like it’s watching from the shadows.
Best For — A Halloween party where you want color that still feels moody
Pro Tip — Apply two thin coats of the purple gel nail polish rather than one thick one — it cures more evenly under an LED lamp and won’t pool at the cuticle.
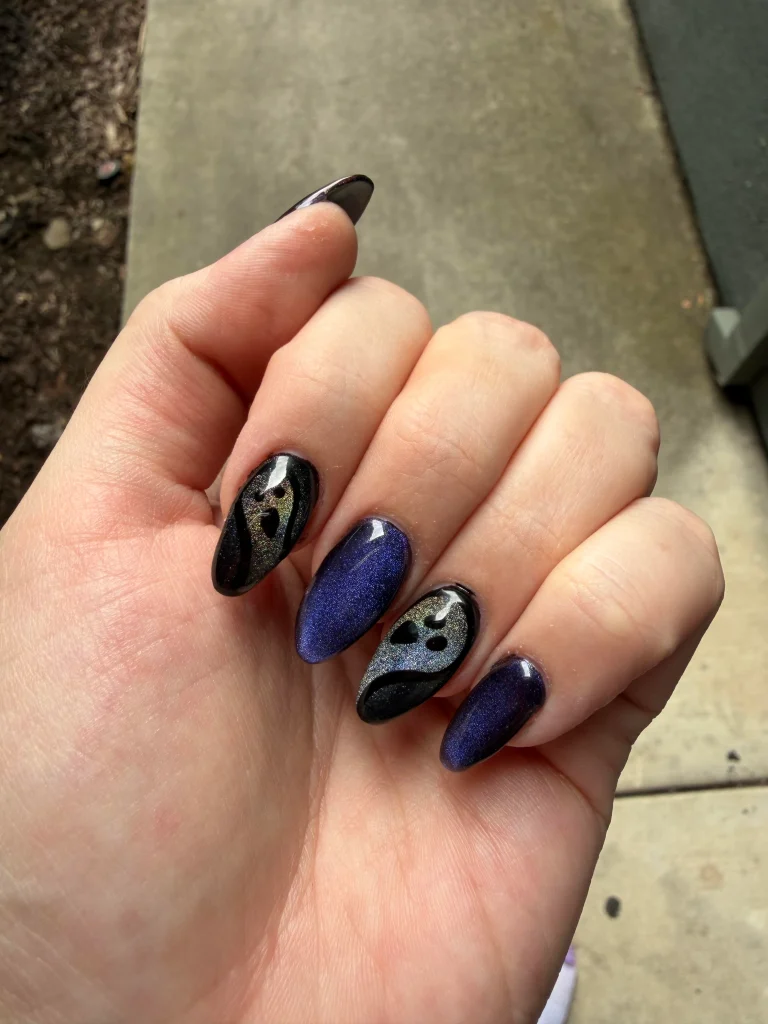
#4. Holographic Ghost Swirl on Navy Glitter
This design trades cats for a swirling holographic ghost shape, but it earns its spot with sheer sparkle payoff. A deep navy glitter base sits beside two accent nails where black polish swoops around a holographic “face,” catching rainbow flashes in the light.
Best For — Fans of maximalist sparkle who still want a dark palette
Pro Tip — Apply the holographic chrome powder while the black base is still slightly tacky, then buff with a soft applicator for full shine.
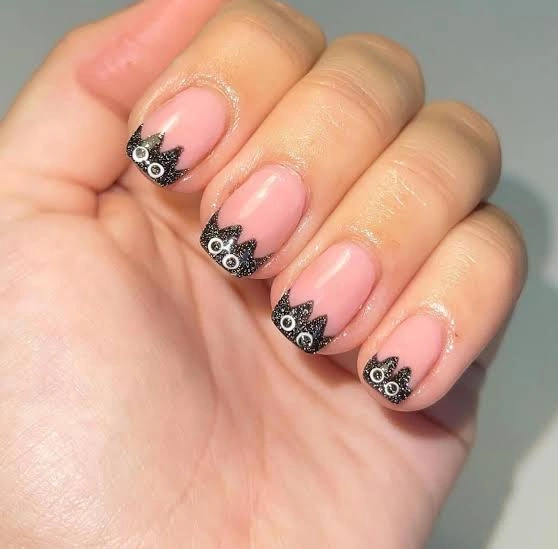
#5. Glitter Zigzag French with Rhinestone Eyes
Here’s why this one stands out: the tip isn’t a plain curve, it’s a jagged black glitter zigzag shaped like tiny cat ears in a row. Each ear holds a single silver rhinestone for an eye, so the whole set catches light every time your hand moves.
Best For — A daytime Halloween look that photographs beautifully
Pro Tip — Press each rhinestone into uncured top coat with a wax pencil, then seal with one more thin layer of top coat so it doesn’t snag or fall off within the week.
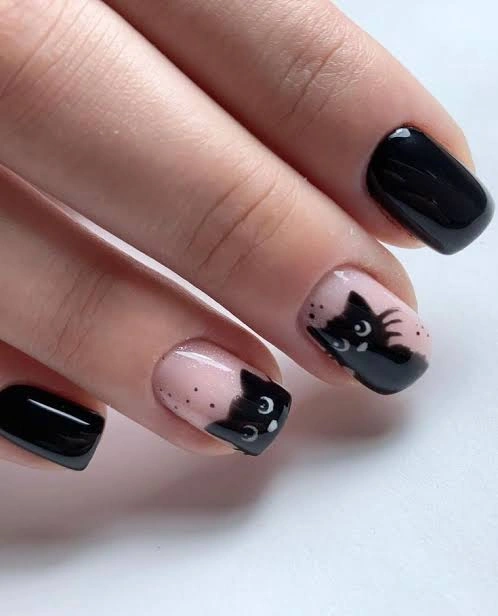
#6. Glossy Black with Winking Cat Accent
Three nails go full high-gloss black here, mirror-shiny enough to see the room reflected in them. The remaining nude nails feature a black cat face with a playful winking eyelash and a tiny crescent moon tucked beside it.
Best For — Anyone who wants max drama with minimal design time
Pro Tip — Cure the plain black nails for the full recommended time before starting the art nails, since even a half-cured base will drag under your detail brush.
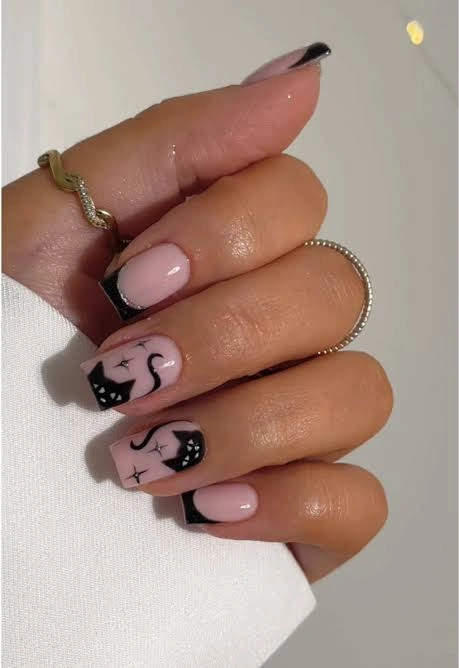
#7. Black French Tip with Star-Dust Cats
A crisp black French tip sits over bare, glossy nude nails for a clean base. Two accent nails add a sitting cat silhouette with a curled tail, plus a scatter of tiny four-point stars that look almost like stardust drifting off its fur.
Best For — Long square or coffin nails headed to a fall wedding
Pro Tip — Paint the tail as one continuous curved stroke instead of several short ones — lift the brush only once you reach the tip, so the line stays smooth.
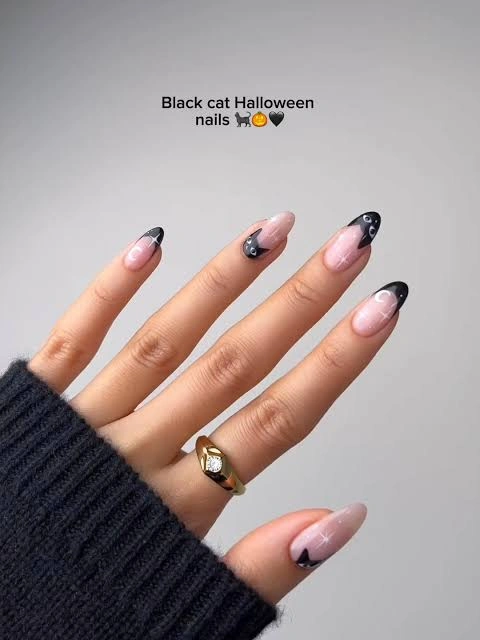
#8. Smoky Grey French with Subtle Cat Silhouette
So what does this mean for you if you want something quieter? This set softens the black into a smoky grey-to-black gradient tip, with a faint cat outline and moon worked into just two nails so the theme whispers instead of shouts.
Best For — Offices with a “no costume nails” policy
Pro Tip — Blend the grey-to-black gradient with a damp makeup sponge, dabbing three times per nail rather than dragging, so you avoid harsh lines.
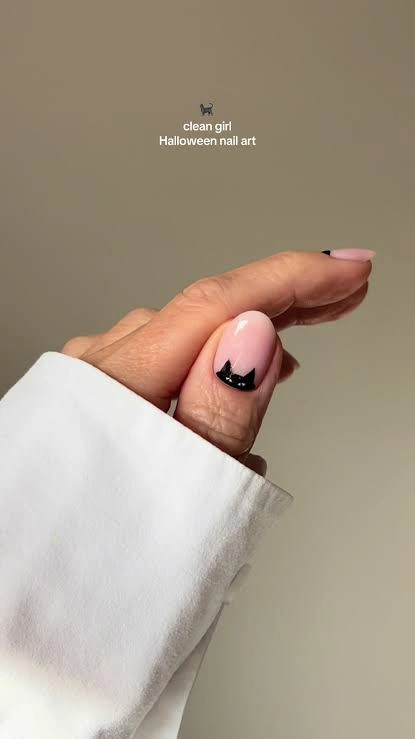
#9. Minimalist Nude Cat Silhouette
This is the design to screenshot if you’re new to nail art. Just one small black cat silhouette sits on a bare, glossy nude nail, with the rest of the set left completely clean.
Best For — First-timers who’ve never freehanded nail art before
Pro Tip — Sketch the cat shape in pencil on paper five or six times first so your hand memorizes the curve before you ever touch the brush to your nail.
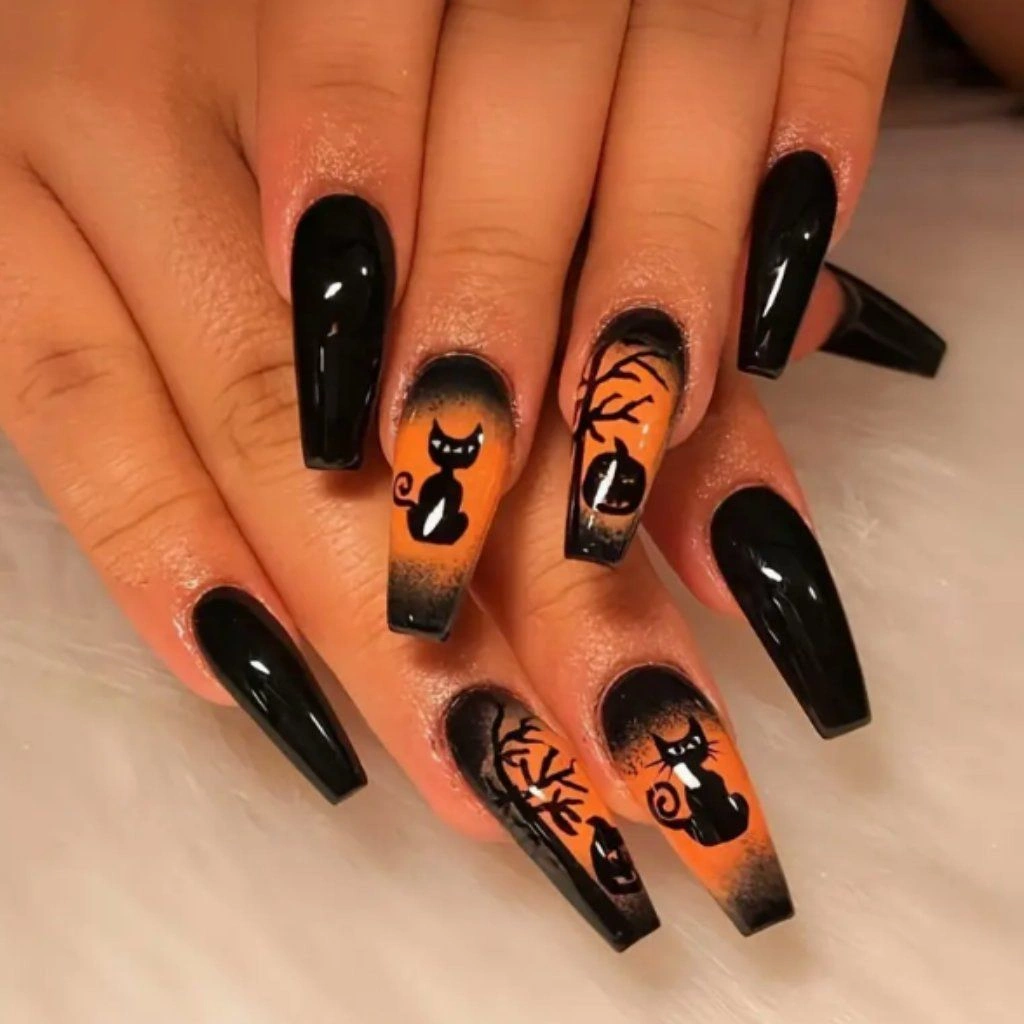
#10. Orange Sunset Ombre with Cat Silhouette
Long black coffin nails set the stage for two accent nails that fade from black at the base to a fiery orange sunset at the tip. A spooky tree, a jack-o’-lantern, and an arched-back black cat are painted right into the gradient like a scene from a classic Halloween postcard.
Best For — Anyone with long nails who wants a full scene, not just a shape
Pro Tip — Airbrush or sponge the orange-to-black gradient first and let it cure completely before adding the tree and cat details, so the black linework stays crisp instead of smudging into the gradient.
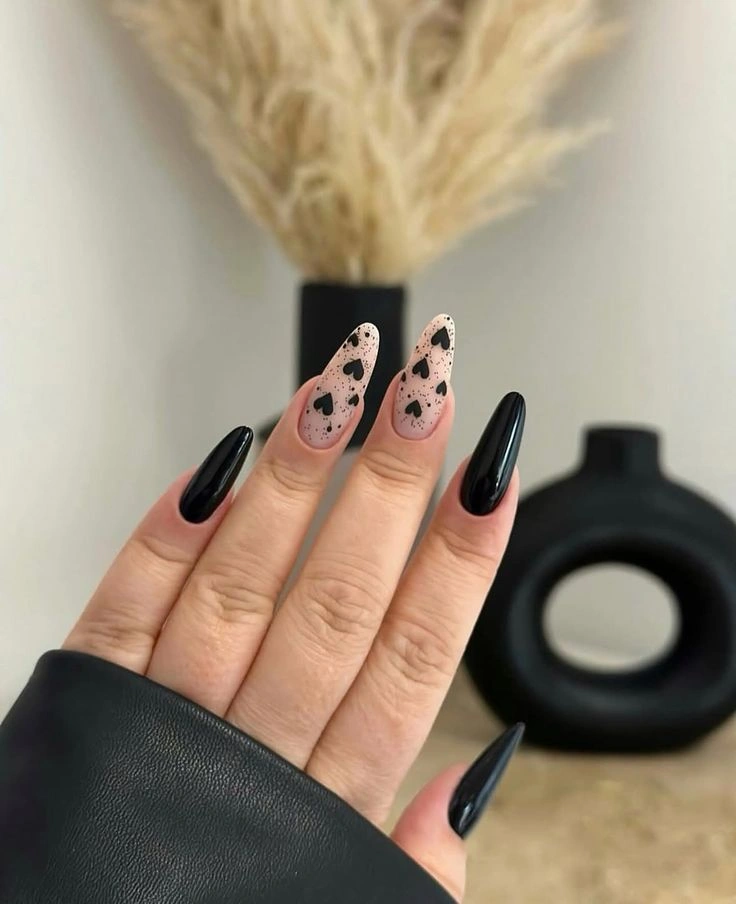
#11. Heart-Speckled Accent on Glossy Black
Here’s a design that leans more witchy-romantic than spooky-cute. Glossy black almond nails frame one accent nail scattered with tiny black hearts and fine speckled dots over a nude base, like confetti caught mid-fall.
Best For — A Halloween date night that still feels a little soft
Pro Tip — Flick a loaded detail brush from about two inches above the nail to scatter the fine speckled dots randomly, rather than placing each one by hand.
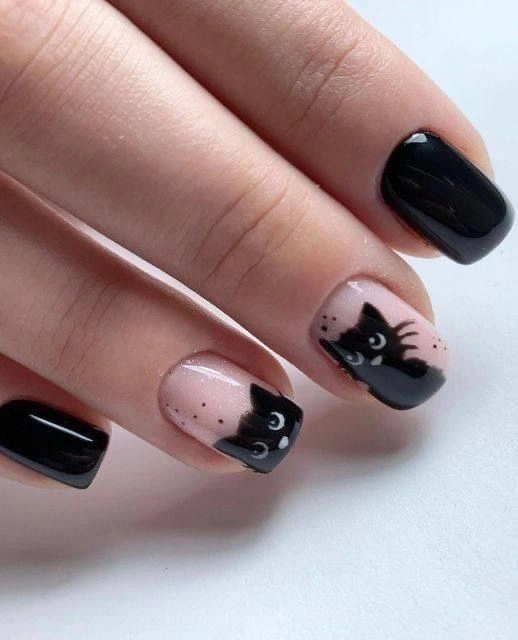
#12. Black Gloss with Moonlit Cat Peekaboo
Fans of the classic black-and-nude combo will recognize this one instantly, though here the cat face sits a touch lower on the nail with its ears just brushing the cuticle line. A crescent moon and a light dusting of dots finish the negative-space corner for extra depth.
Best For — Shorter round nails that need a design placed lower
Pro Tip — Map out where the ears, moon, and dots will sit with a light pencil dot before committing to polish, since shorter nails leave almost zero room to correct placement.
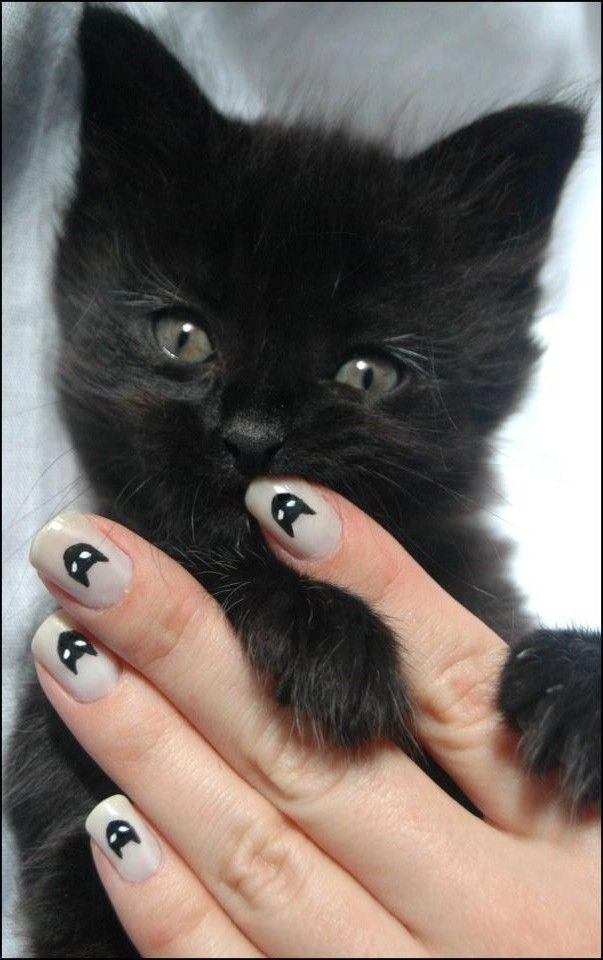
#13. Tiny Cat Ear Peek on Nude Nails
This look keeps things soft and grey-nude across the board, with a small black cat-ear peek in the corner of every nail instead of a full face. It’s the kind of subtle repetition that reads “Halloween” only once you look twice.
Best For — Anyone whose job means keeping nails understated all October
Pro Tip — Keep the ear shape under 4mm tall on short nails so it reads as a peek rather than crowding the whole nail bed.
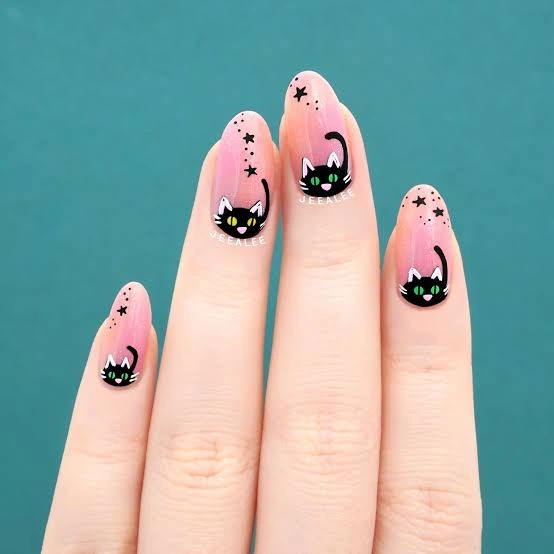
#14. Pink Ombre with Green-Eyed Cat Faces
Trade the usual black-and-orange palette for a pink-to-peach ombre background that feels almost more Halloween-cute than spooky. Full black cat faces with bright green eyes and white whiskers sit low on each nail, with tiny stars trailing up toward the tip.
Best For — Pastel-lovers who still want to join in on Halloween
Pro Tip — Apply the pink-to-peach gradient sponge kit in three light dabs and let it cure before layering the cat face, so the colors stay bright instead of muddying.
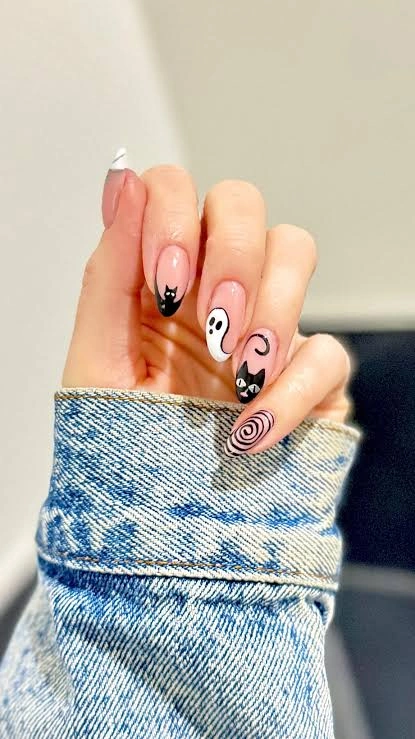
#15. Ghost, Cat, and Spiral Mix
That’s not all you get with this set — it mixes three different Halloween icons instead of repeating one. A cat silhouette, a simple white ghost, and a hypnotic black spiral each take their own nail over a clean nude base.
Best For — Trick-or-treating with kids who love variety
Pro Tip — Draw the spiral from the outside in using one steady rotation of the nail itself rather than moving the brush in circles, so the lines stay evenly spaced.
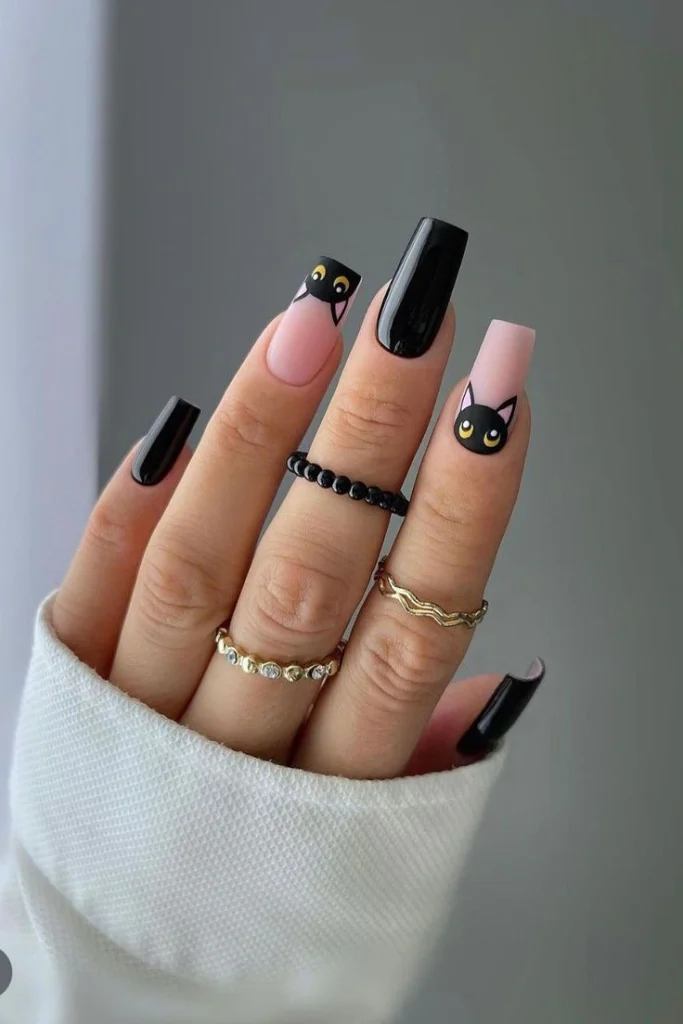
#16. Coffin Nails with Yellow-Eyed Cat Tip
Long square coffin nails alternate between solid glossy black, matte black, and nude nails topped with a sharp-eared cat face. Bright yellow eyes stand out against the matte black fur, and a few stacked rings add extra styling in the photo.
Best For — A statement set for a Halloween night out
Pro Tip — Alternate one matte top coat nail with one glossy top coat nail across the set — apply the matte top coat in a single even swipe so it doesn’t streak.
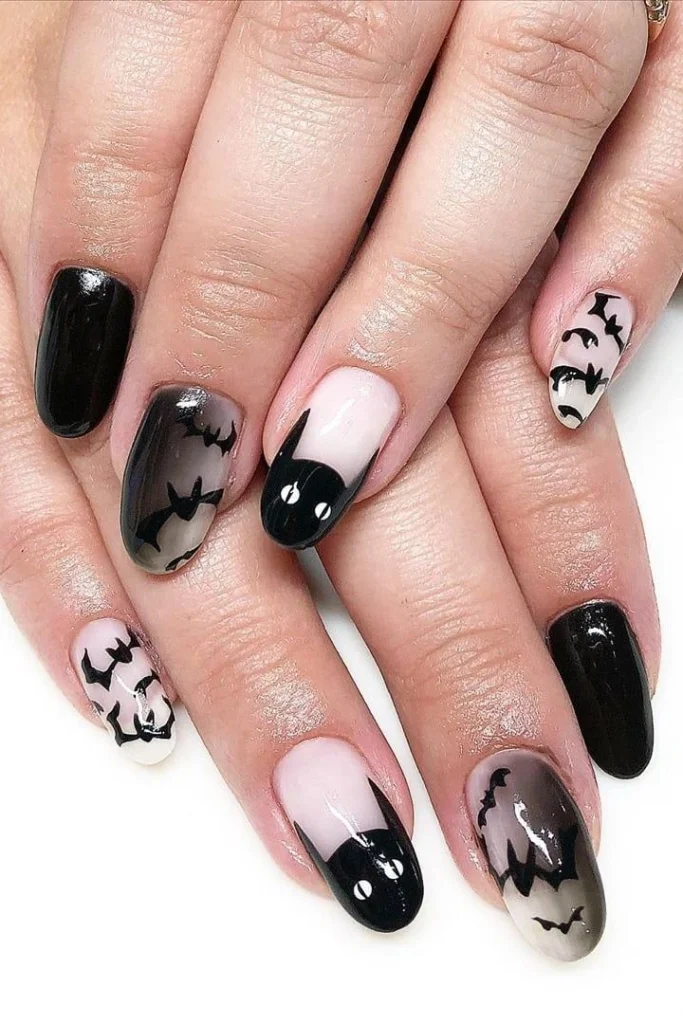
#17. Black French with Bat Silhouette Swarm
Rounding out the list, this set swaps a few cats for a flock of tiny bats scattered across nude nails, anchored by one bold pointed-ear silhouette with wide white eyes on the middle finger. It’s proof you can mix creatures on the same hand and still keep a cohesive black-and-nude palette.
Best For — Nail art fans who want a whole spooky menagerie
Pro Tip — Paint the smallest bats last, sizing them down gradually as they move toward the cuticle, so the swarm looks like it’s flying into the distance instead of just scattered randomly.
How to Choose the Right Nail Design
With 17 options in front of you, narrowing it down comes down to a few practical things. Here’s what actually matters when you’re picking.
- Nail shape — Almond and coffin shapes give you the most room for a full cat face or a scene like the sunset silhouette design. Round and square nails work better for smaller icons like the minimalist silhouette or the tiny ear peek.
- Skin tone — Warmer nude polishes tend to sit closer to olive and deeper skin tones, while cooler pale pinks show up better on fair skin. If you’re not sure, a true black base works beautifully with every tone.
- Occasion — Save the long coffin sunset scene or the holographic ghost swirl for a costume party. Keep it to the minimalist silhouette or the subtle grey French if you’ve got work the next day.
- Skill level — Start with a single accent nail before attempting a full set of matching cat faces. One good nail beats five uneven ones.
What You’ll Need
You don’t need a full salon setup at home, but a few key tools make these designs much easier to pull off.
For cat ears, whiskers, and any clean linework
The base for almost every design on this list
For even eyes, dots, and paw prints
For sparkle-eye and rhinestone accents
To cure gel polish fully between layers
Seals in the art and adds mirror shine
Pro Tips for a Long-Lasting Manicure
Cap the free edge every time
Swipe your top coat over the very tip of the nail, not just the surface, on every single coat. This single habit is the biggest reason gel manicures chip early.
Cure each layer the full recommended time
Rushing a cure by even 10 seconds leaves the gel slightly soft underneath, which causes art to smudge and colors to dent later on.
Wipe with alcohol between every layer
Gel polish leaves a tacky residue after curing. A quick swipe with a lint-free pad and 99% isopropyl alcohol keeps your next layer from smearing the art underneath.
Apply cuticle oil daily
Dry cuticles lift polish faster than almost anything else. Massaging in oil once a day keeps the seal at your nail’s edge intact for two to three extra weeks.
Frequently Asked Questions
Q: How do I paint a simple black cat face on my nail?
A: Start with two triangle ears pointing up from a rounded head shape, then fill in solid black. Add two small dots or almond shapes in yellow, green, or white for the eyes once the black has cured.
Q: What colors pair best with black cat nail art?
A: Nude and soft pink backgrounds make the black art pop the most, while orange and purple lean more traditionally Halloween. Navy and deep green also work well if you want something moodier.
Q: How long do black cat Halloween nails typically last?
A: A gel version with proper prep and a sealed edge usually lasts two to three weeks. Regular polish versions hold up for about five to seven days before chipping begins.
Q: Can I do black cat nail art without a UV lamp?
A: Yes — every design here can be done with regular polish. Just allow extra drying time between layers since regular polish air-dries slower than gel cures under a lamp.
Recommended Product
Fine Detail Nail Art Brush Set
★★★★☆ Highly rated on Amazon
This is the one tool that makes every cat ear, whisker, and eye on this list actually achievable at home.
As an Amazon Associate, we earn from qualifying purchases.
Final Thoughts
Whichever design you land on, black cat nails are one of the easiest ways to get into the Halloween spirit without committing to a full costume. Start small if you’re new to nail art, and don’t be afraid to mix two or three of these ideas into one set.
Which of these nail looks are you trying first? Save this post to Pinterest so you can come back to it whenever you need fresh nail inspo!

Hi, I’m Jessica, the creator behind Unique Lash & Nails Katy.
I created this website for anyone who loves beautiful nails as much as I do. Here, I share trendy nail designs, seasonal manicure ideas, easy nail care tips, honest product recommendations, and step-by-step guides to help you create salon-worthy nails at home. Whether you’re looking for everyday inspiration or your next favorite nail trend, I hope you’ll find something you love.