16 Demon Halloween Nails for a Dark Spooky Manicure
If you love Halloween nails with a darker edge, these demon Halloween nails bring together everything from fiery tips and tiny bats to blood drips, ghost faces, and dramatic gothic details.
Some are surprisingly wearable, while others are full-on statement manicures. I’ve included a mix of simple painted designs, glitter finishes, creepy character details, and dimensional nail art so you can find something that fits your skill level and Halloween plans.
✦ Our Top Picks at a Glance
Best Overall — Red Devil French Tips
Best for Beginners — Pink Glitter Blood Drips
Most Trendy — 3D Gore Eyeball Stilettos
Best for Special Occasions — Black Red Gothic Demon
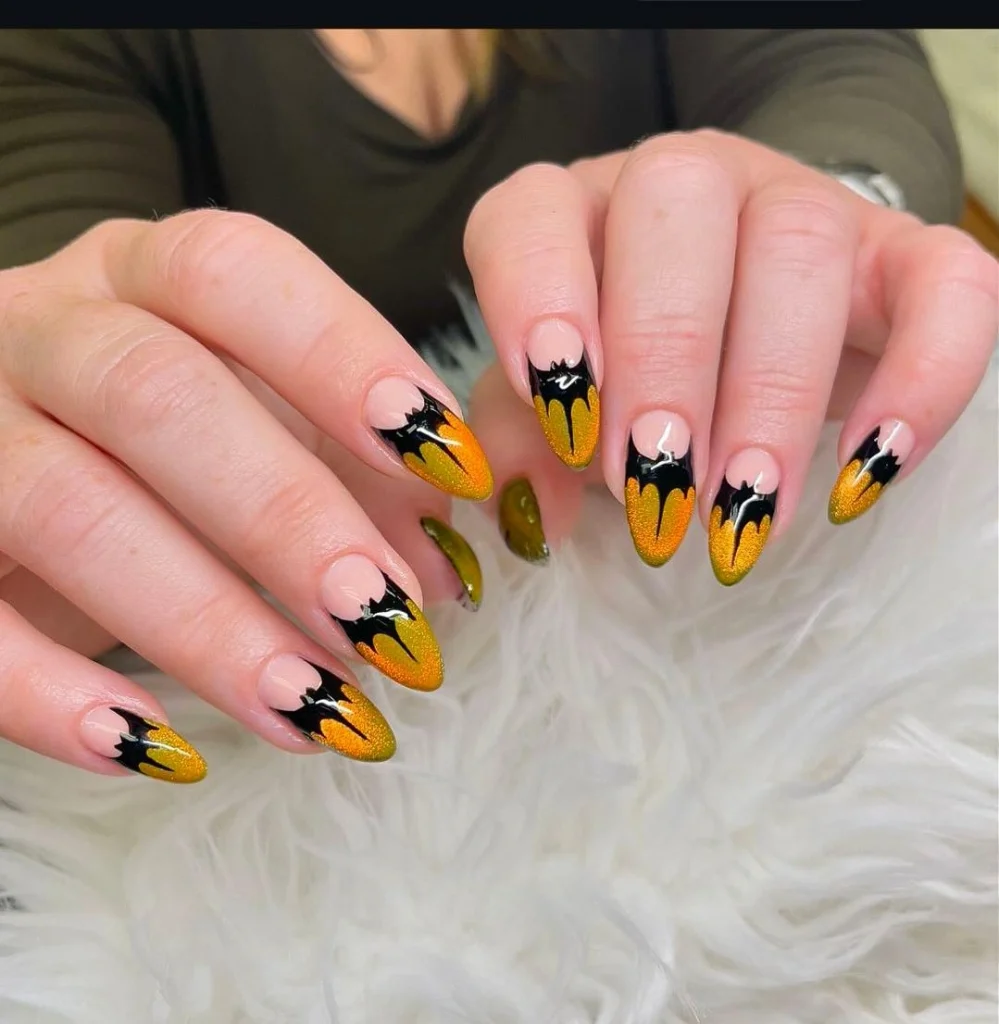
#1. Orange Glitter Bat Drips
Bright orange-gold glitter covers the pointed tips while glossy black shapes sweep down from the nude base like tiny bat wings or dripping shadows. The matching design across both hands keeps it polished, and the soft white background makes that Halloween orange sparkle even harder.
Best For — Glam Halloween parties and fall photos
Pro Tip — Use a fine liner nail art brush held around a 45° angle to pull the black points downward, then cure each gel layer for the full time recommended by your lamp.
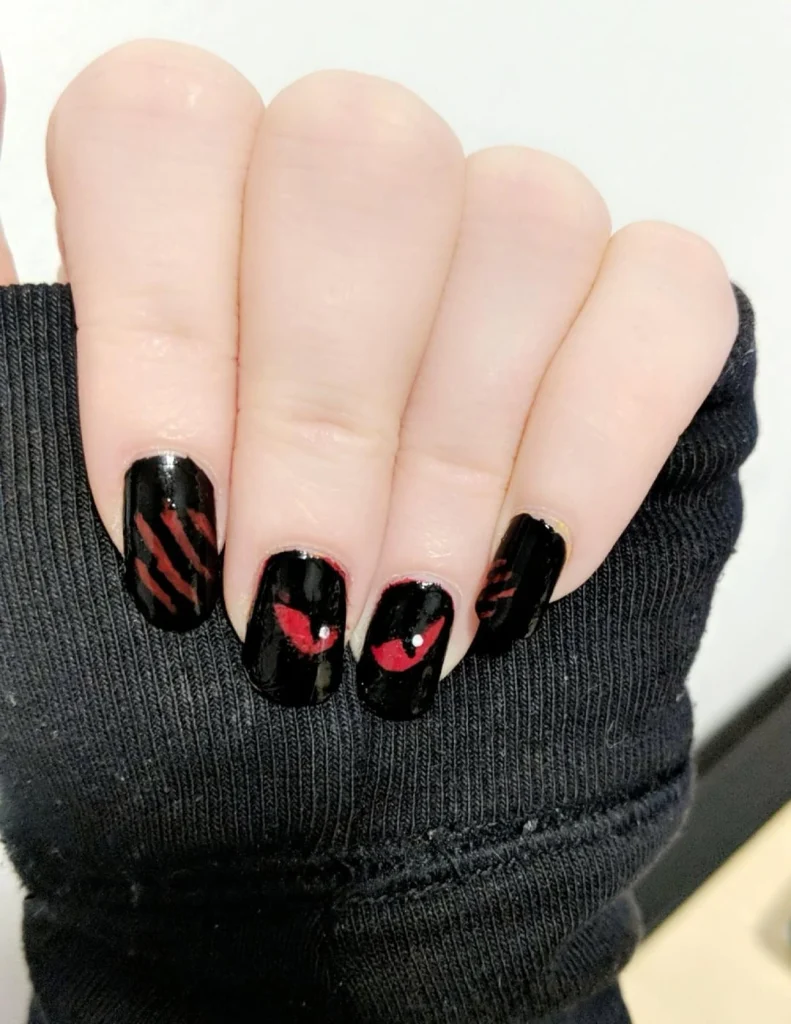
#2. Black Demon Eye Claws
Unlike the glittery look above, this manicure goes stark and graphic with short black nails, glowing red eye shapes, and claw-like red slashes. The squared tips and glossy finish give the design a compact, almost comic-book intensity without requiring extra-long extensions.
Best For — Short-nail lovers wanting demon energy
Pro Tip — Paint two thin coats of black gel nail polish, curing each coat separately, then add the red eyes with a size 5/0 detail brush so the shapes stay crisp.
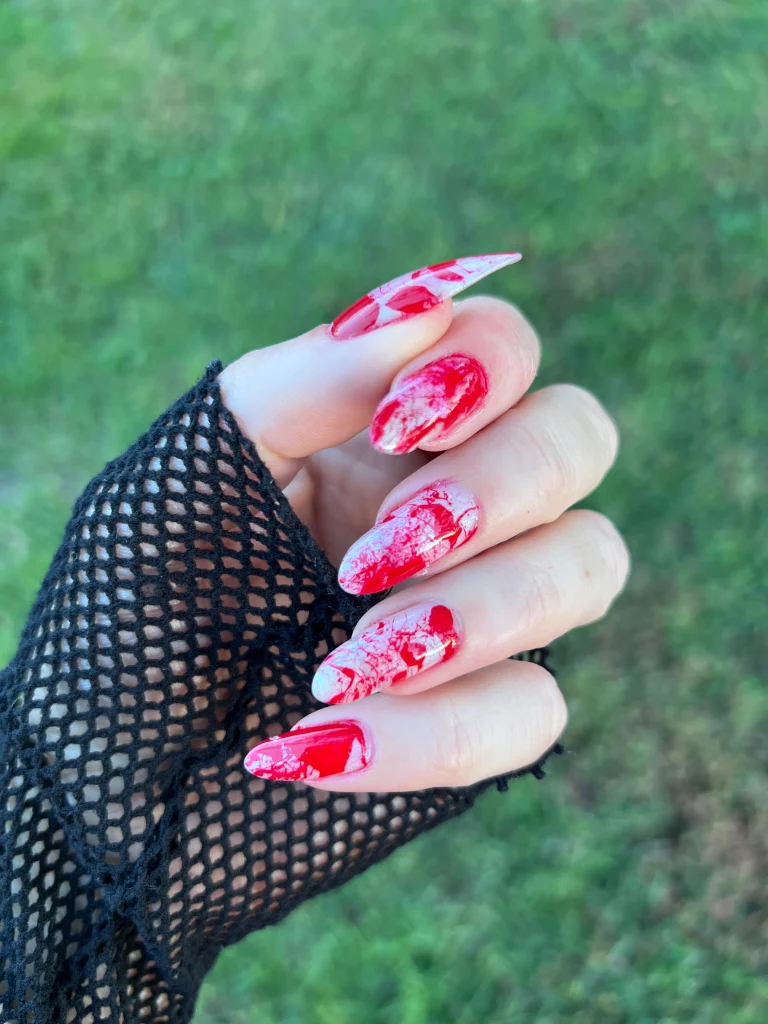
#3. Red Blood Splatter Marble
Picture long almond-to-stiletto nails streaked with vivid red over cloudy white, creating a messy blood-splatter effect that feels intentionally chaotic. The black fishnet glove against the green outdoor background makes the manicure look especially dramatic and costume-ready.
Best For — Horror costumes and outdoor Halloween shoots
Pro Tip — Put a small drop of red jelly gel polish on a palette, thin it slightly with clear gel, and drag it through the white base in only 2–3 passes to avoid over-blending.
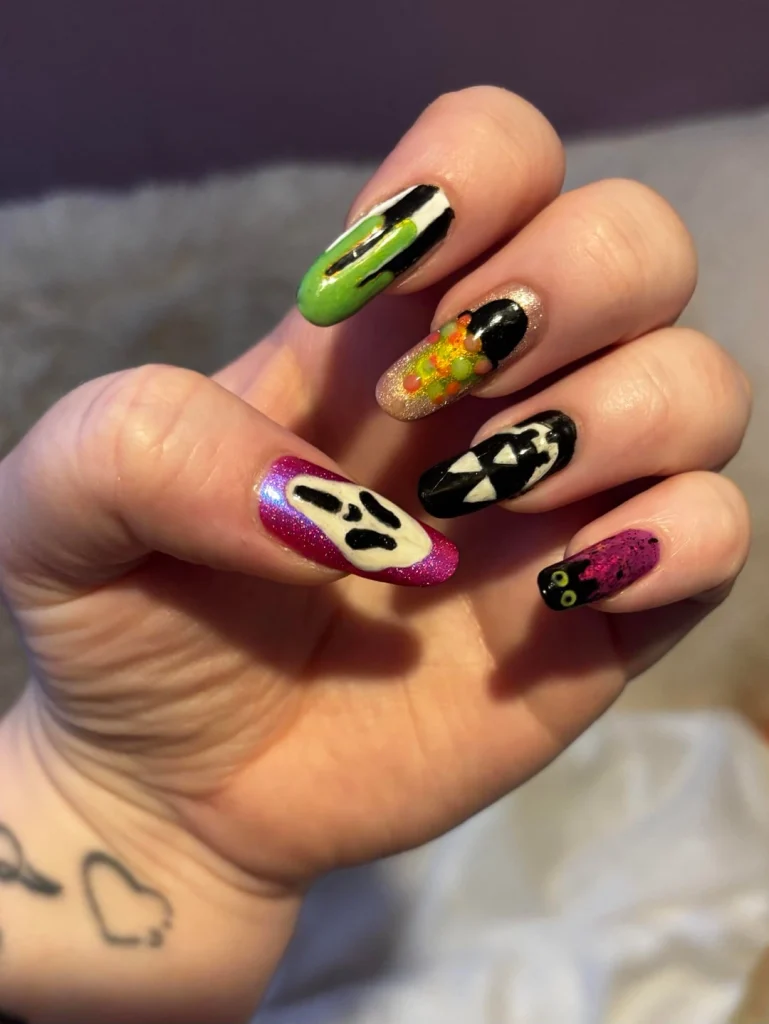
#4. Multicolor Monster Mix Art
This one’s for anyone who can’t choose just one Halloween character. Green, orange, black, magenta, and creamy white each get their own moment, with a ghost-like thumb accent, stitched details, and a tiny pair of neon-green eyes peeking from the dark tip of the pinky.
Best For — Creative maximalists who love mixed sets
Pro Tip — Finish one character nail at a time and flash-cure it for about 10 seconds before moving on, which helps prevent tiny painted details from shifting while you work.
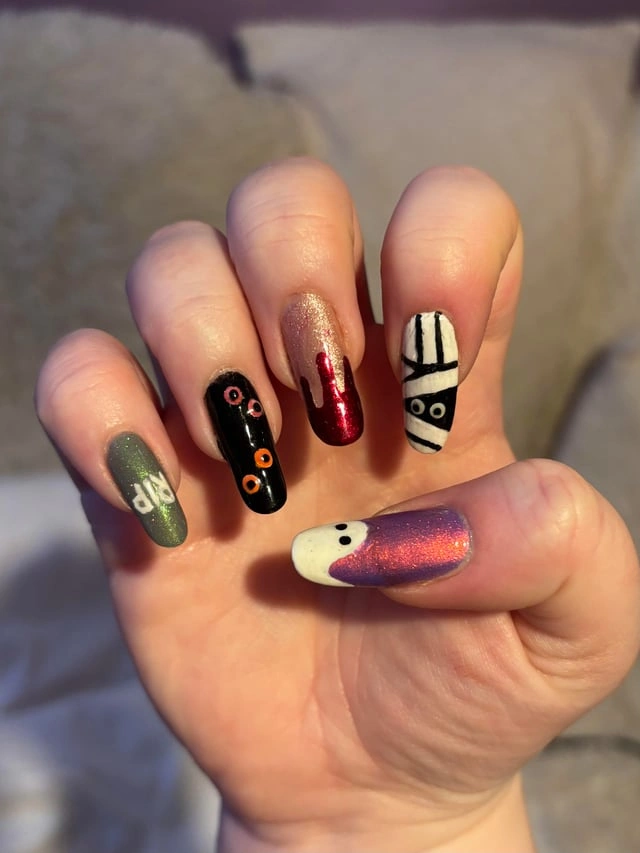
#5. Moody Halloween Symbol Mix
Every nail tells a different little Halloween story here: a muted green moth, orange-ringed dots on glossy black, striped mummy-like detailing, and an ombré thumb with a simple pale face. The subdued colors make the quirky symbols feel moodier than a typical orange-and-black manicure.
Best For — Eclectic nail art and subtle costumes
Pro Tip — Sketch your smallest symbols first with a 7–9 mm liner brush, leaving at least 1 mm around each detail so separate motifs don’t visually merge together.
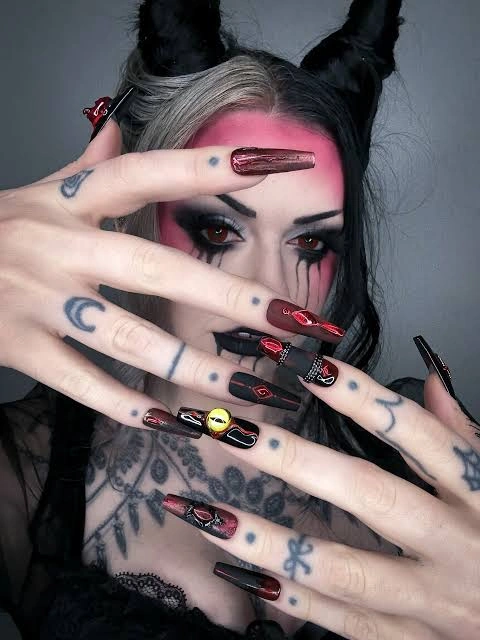
#6. Black Red Gothic Demon
Deep black and metallic blood-red nails fit perfectly with the dramatic gothic styling in this look. What makes it memorable is the mix of finishes: some nails catch the light like dark red chrome while others stay nearly black, creating a layered demon-inspired manicure instead of one flat color.
Best For — Gothic parties and dramatic Halloween makeup
Pro Tip — Apply chrome pigment over a no-wipe top coat cured for roughly 30 seconds, then seal the free edge twice so the metallic finish is less likely to chip.
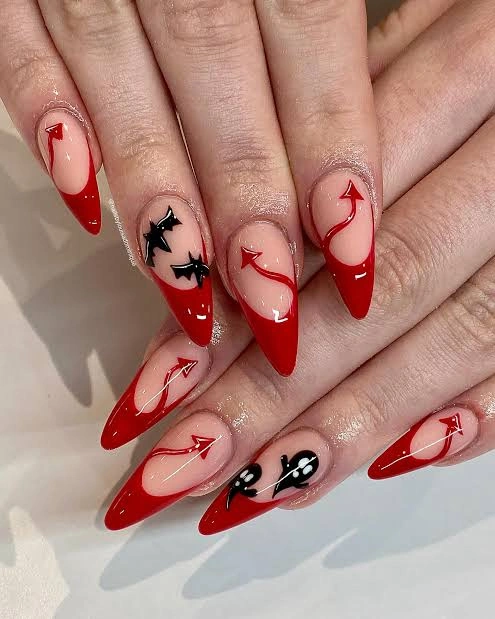
#7. Red Devil French Tips
Classic nude nails get a Halloween makeover with glossy red pointed French tips, delicate devil-tail lines, and tiny black bat accents. I especially like how the negative space keeps the set elegant, even though the sharp red tips and curling arrows clearly lean into a mischievous demon theme.
Best For — Date nights and polished Halloween parties
Pro Tip — Map each tail with a long nail art liner brush, making the curved line first and adding the arrowhead last with two short strokes at roughly 45°.
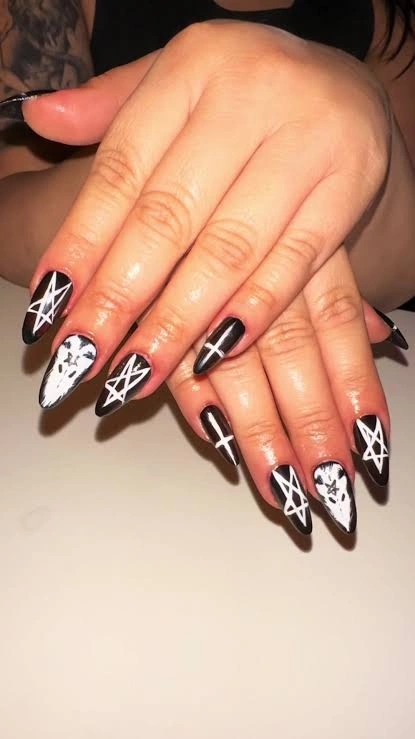
#8. Black Occult Ghost Stilettos
Glossy black pointed nails become the backdrop for stark white symbols, including pentagram-like linework and elongated ghostly faces. The monochrome palette is what makes this set work—the details remain visible from a distance without needing glitter, rhinestones, or extra colors.
Best For — Monochrome lovers and edgy costumes
Pro Tip — Draw geometric lines from the center outward with a 5/0 brush, curing for 10 seconds after every 2–3 lines so accidental smudges don’t ruin the entire symbol.
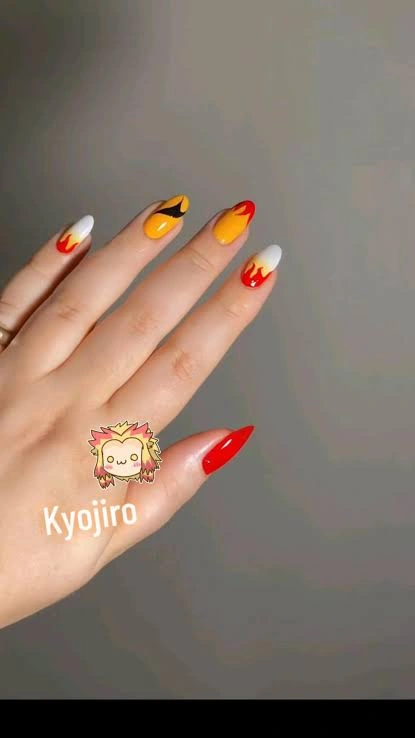
#9. Orange Flame Demon Tips
Fire takes center stage in this mismatched manicure, with yellow, orange, red, and black flame shapes curling across pointed nails. One bright red thumb and the lighter white-based accents stop the whole set from feeling too uniform, which gives it that energetic, animated Halloween look.
Best For — Fiery costumes and anime-inspired looks
Pro Tip — Build flames in three layers—yellow first, orange second, red last—and cure each color for 30–60 seconds before overlapping the next flame shape.
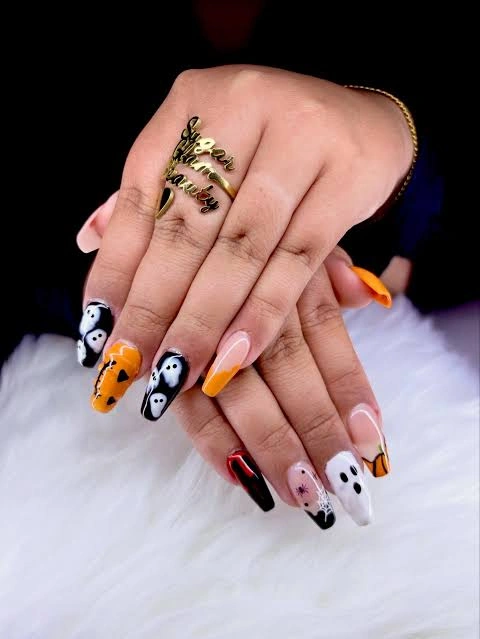
#10. Orange Ghost Pumpkin Mix
Orange, black, white, and soft nude come together in a playful Halloween set filled with floating ghost faces and graphic accent blocks. The little gold name ring above the manicure adds an extra warm metallic detail, while the alternating designs make every finger worth a second look.
Best For — Halloween brunches and cute spooky outfits
Pro Tip — Dot ghost eyes with a 1 mm dotting tool rather than a brush; matching eye size instantly makes simple character faces look cleaner and more intentional.
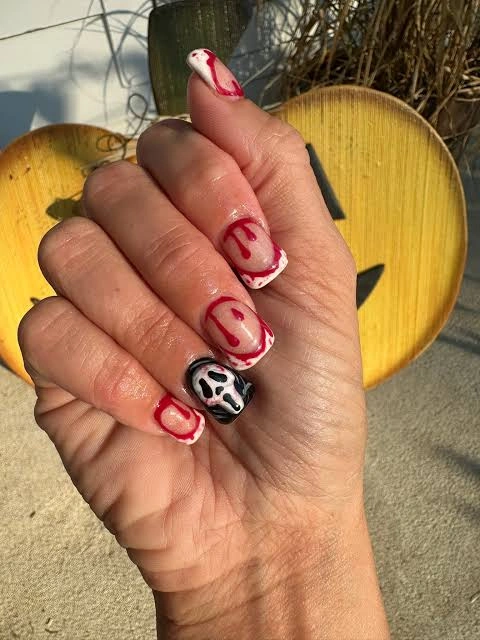
#11. Bloody Scream Face Nails
A creamy nude base keeps these shorter nails simple until the thin red lines start winding around the tips like fresh smears. The standout black-and-white screaming face accent adds an unmistakable horror-movie mood, especially against the warm pumpkin-colored background.
Best For — Horror marathons and October weekends
Pro Tip — Keep the red lines between about 0.5 and 1 mm wide and vary their curves; perfectly identical lines can make a blood-inspired design look more striped than organic.
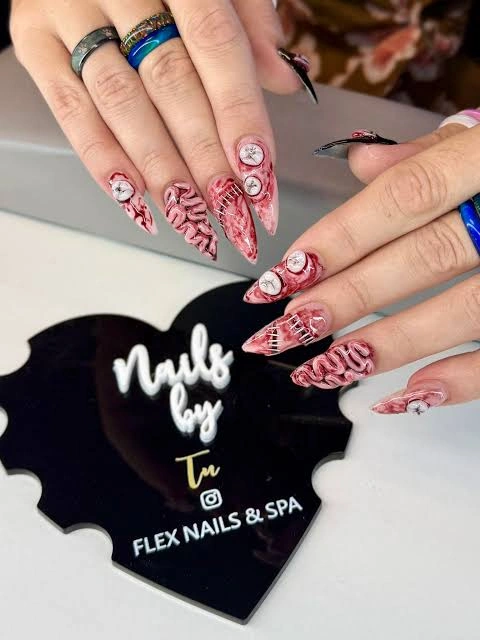
#12. 3D Gore Eyeball Stilettos
Nothing about this manicure is shy: sculpted pink flesh-like ridges, dimensional eyeballs, blood-red textures, and crisscrossed details cover long pointed nails. The raised anatomy-inspired pieces create real depth, making this one of the most theatrical demon Halloween nails in the entire group.
Best For — Costume contests and serious nail-art fans
Pro Tip — Sculpt raised textures with 3D sculpting gel in sections no thicker than about 2 mm, fully curing each piece before attaching the next detail.
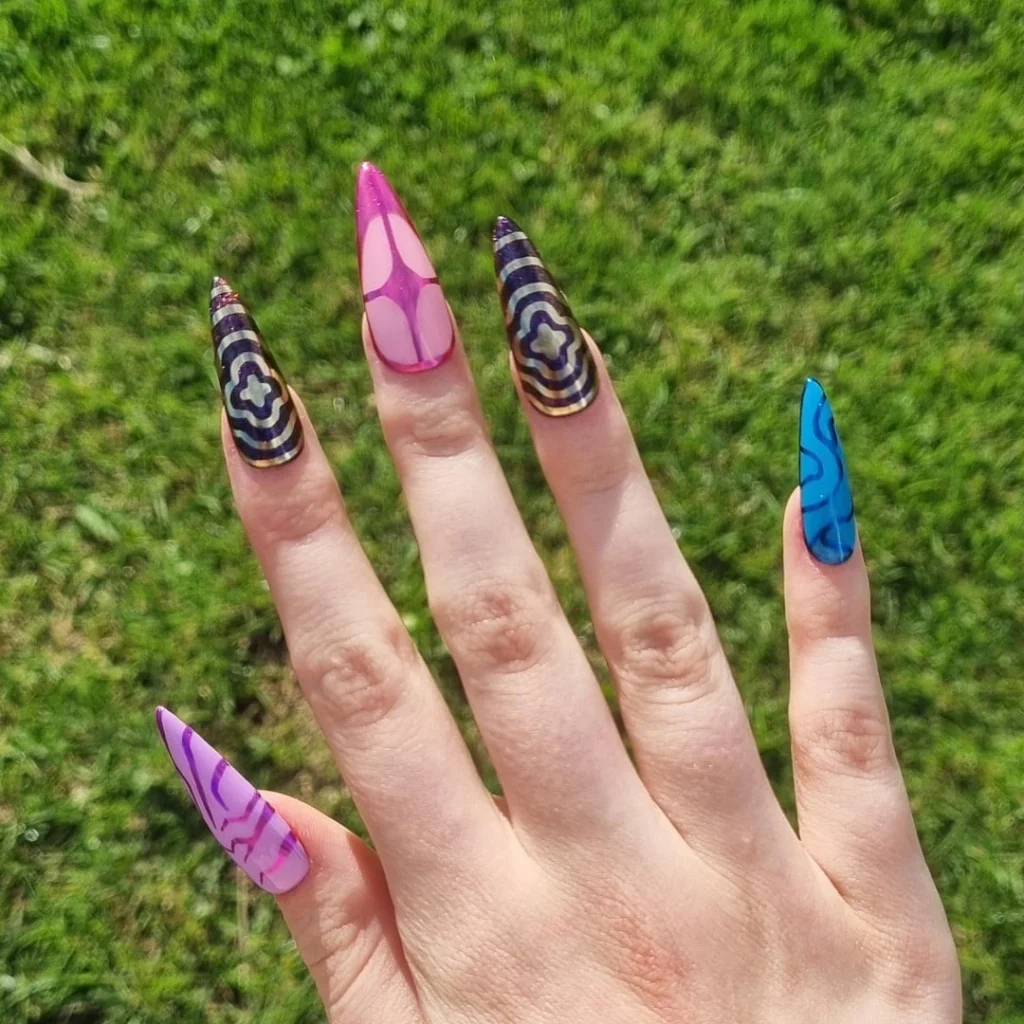
#13. Psychedelic Color Swirl Stilettos
If traditional Halloween colors aren’t your thing, these extra-long stilettos take a psychedelic route with purple, pink, blue, black, and metallic-looking swirls. The concentric flower-like pattern on the center nails contrasts beautifully with the bold blue pinky and translucent magenta sections.
Best For — Color lovers wanting unconventional Halloween nails
Pro Tip — Mark the center of each swirl with one tiny dot, then paint outward in 2–3 mm rings so your pattern stays balanced across a long stiletto shape.
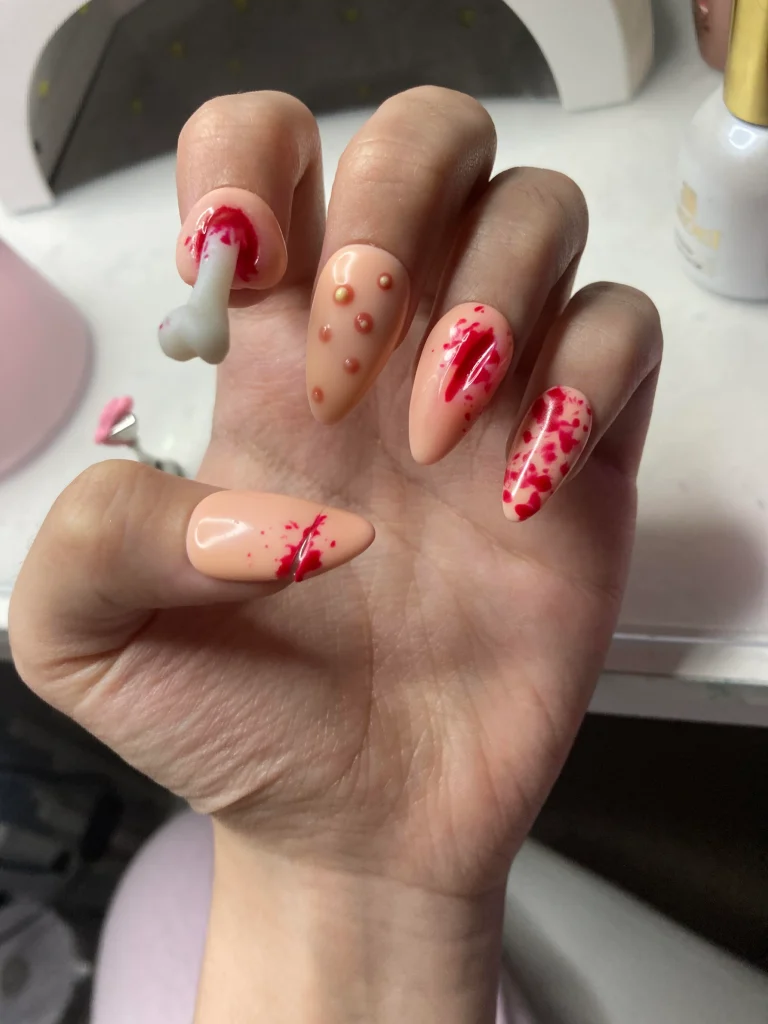
#14. Nude Bloody Bone Accents
A soft peachy nude base makes the gruesome details on this manicure look even more unexpected. One nail appears to have a tiny bone pushing outward, while raised blister-like dots, red cuts, and scattered blood marks give the rest of the set a creepy special-effects finish.
Best For — Special-effects costumes and gore themes
Pro Tip — Anchor bulky 3D pieces with a bead of builder gel about the size of the charm base, hold the piece steady for 10 seconds, then complete the full cure.
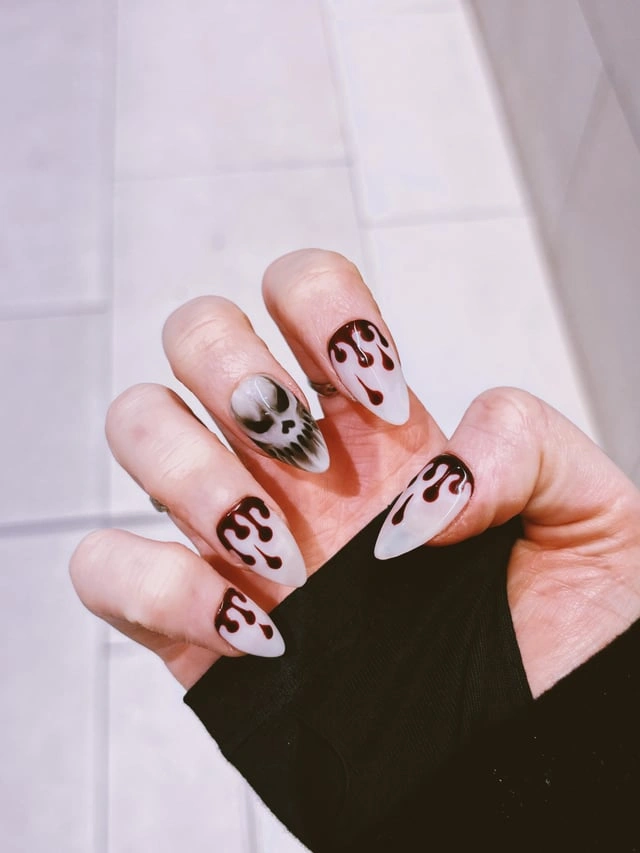
#15. White Burgundy Blood Drips
Milky white nails topped with deep burgundy drips feel cleaner and moodier than bright scarlet blood art. One smoky gray-and-black accent breaks the repeated pattern and adds a ghostly focal point, while the black sleeve makes the pale manicure pop.
Best For — Minimalists wanting darker seasonal nail art
Pro Tip — Place three uneven burgundy dots near the tip, then pull each downward with a liner brush between 3 and 6 mm before connecting them along the edge.
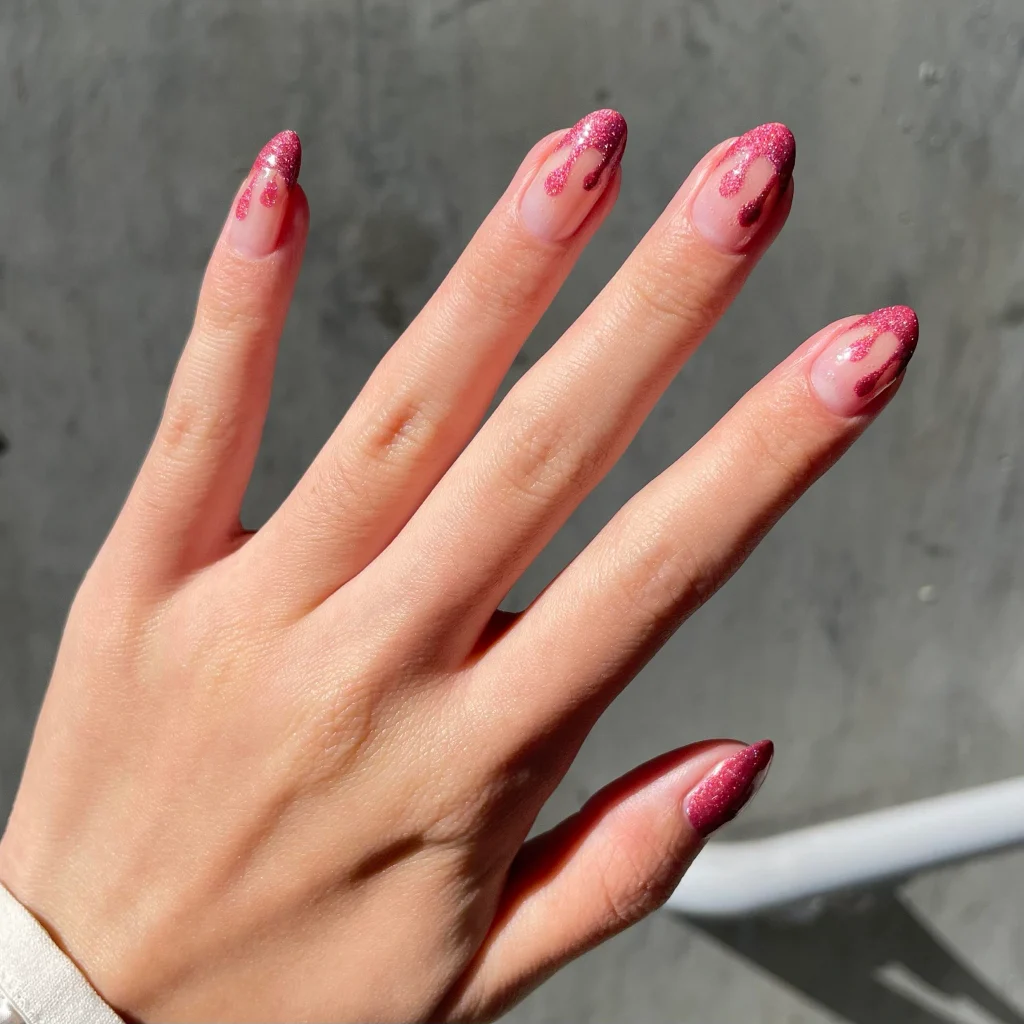
#16. Pink Glitter Blood Drips
For a softer take on spooky nails, a sheer nude base is paired with sparkling berry-pink tips that drip downward toward the cuticle. Sunlight catches the fine glitter beautifully, and the shorter almond shape makes this design much easier to wear day to day.
Best For — Beginners and subtle Halloween manicures
Pro Tip — Apply pink glitter gel polish with the bottle brush at the tip, then use a 7 mm liner to pull only 2–3 narrow drips downward before curing.
How to Choose the Right Nail Design
The best demon Halloween nails aren’t necessarily the most complicated ones. Start with the shape, colors, and level of detail you’ll actually enjoy wearing.
- Choose a shape that supports the artwork — Long almond and stiletto nails give flames, drips, tails, and character art more vertical space. Short square nails are great for simple eyes, claw marks, and compact graphic designs.
- Think about contrast with your skin tone — Bright red, white, orange, and glossy black create strong contrast on many complexions. If you prefer something softer, try burgundy, berry glitter, smoky gray, or a sheer nude base.
- Match the design to your occasion — A costume party can handle 3D gore, eyeballs, and extra-long extensions, while red French tips or glitter drips are easier for work, dinners, or everyday October outfits.
- Be realistic about your skill level — Beginners can start with drips, dots, and simple flames. Detailed faces, geometric symbols, dimensional charms, and mixed character sets are easier when you’ve already practiced fine-line nail art.
What You’ll Need
You don’t need every nail-art product at once. These basics cover most of the painted, glitter, and dimensional Halloween designs above.
Useful for tails, bats, flames, scratches, symbols, and narrow blood drips.
Makes matching eyes, bubbles, dots, and rounded drip shapes much easier.
These two shades cover demon eyes, gothic accents, blood, bats, and outlines.
Needed to cure gel polish and secure many dimensional gel-art details.
Helps build raised wounds, textured accents, and sculptural Halloween details.
Seals painted details while keeping glossy blood and black accents looking sharp.
Pro Tips for a Long-Lasting Manicure
Prep Before You Paint
Gently remove surface shine with a 180–240 grit buffer, then wipe the nail plate with alcohol before applying your base. Keeping polish off the skin and cuticle also reduces early lifting.
Work in Thin Layers
Two thin color coats usually cure more evenly than one thick coat. Follow the curing time listed for your gel system—commonly around 30–60 seconds under an LED lamp.
Cap the Free Edge
Run a small amount of base, color, and top coat across the nail’s free edge. That extra swipe takes only a second but can help protect the tip where wear often begins first.
Secure Heavy 3D Details
For eyeballs, bones, or chunky charms, place builder gel underneath and around the base instead of balancing the piece on ordinary top coat. Cure one charm at a time so it doesn’t slide out of position.
Frequently Asked Questions
Q: What are easy demon Halloween nails for beginners?
A: Start with blood drips, red French tips, simple flames, or red eyes on a black base. They rely on basic dots and curved lines rather than detailed faces or complicated 3D sculpting.
Q: What colors work best for demon Halloween nail designs?
A: Black and red are the classic combination, but orange, burgundy, white, metallic chrome, and smoky gray work beautifully too. Pink glitter can also make demon-inspired designs feel softer and more wearable.
Q: Can I do demon Halloween nails on short nails?
A: Absolutely. Short nails are especially good for demon eyes, claw scratches, tiny ghosts, simple blood drips, and compact black-and-red graphics that don’t need much vertical space.
Q: How can I make Halloween nail art last longer?
A: Properly prep the nail plate, keep gel off the cuticle, apply thin coats, follow the correct curing time, and seal the free edge. Heavy charms should be anchored with builder gel rather than regular top coat.
Recommended Product
Professional Fine Liner Nail Art Brush Set
★★★★☆ Highly rated on Amazon
A fine liner brush set makes it much easier to create the narrow flames, devil tails, bats, scratches, symbols, and blood details featured in these designs.
As an Amazon Associate, we earn from qualifying purchases.
Final Thoughts
These demon Halloween nails show just how many directions you can take a spooky manicure. You can keep things wearable with red French tips and glitter drips or go all-in with dimensional gore, ghost faces, gothic symbols, and monster-inspired details.
Pick the design that fits your nail length, skill level, and Halloween plans, then make the colors and details your own. Even one creepy accent nail can completely change a simple manicure.
Which of these nail looks are you trying first? Save this post to Pinterest so you can come back to it whenever you need fresh nail inspo!

Hi, I’m Jessica, the creator behind Unique Lash & Nails Katy.
I created this website for anyone who loves beautiful nails as much as I do. Here, I share trendy nail designs, seasonal manicure ideas, easy nail care tips, honest product recommendations, and step-by-step guides to help you create salon-worthy nails at home. Whether you’re looking for everyday inspiration or your next favorite nail trend, I hope you’ll find something you love.